• About
    • About Rebecca
    • Meet the Team
    • Media Kit
    • FAQ
  • Photography
  • Holidays
  • Recipes
  • Printables
  • 2019 Calendar
  • Write for Us
  • Beyond Snapshots

Simple as That

Making Everyday Beautiful

Cute DIY Photo Blocks

Sunday, October 2, 2016

Cute DIY Photo Blocks – create your own rustic photo displays using recycled wood and a handful of favorite family photos.

Hi everyone, it’s Annika here. Fall is officially here, have you started to feel the urge to craft more lately? I always feel it more strongly when the weather starts to get a bit darker and cooler, and you start to spend more time indoors. Or maybe it’s because I’m in a total nesting mode at the moment, and very excited about our coming family addition 🙂

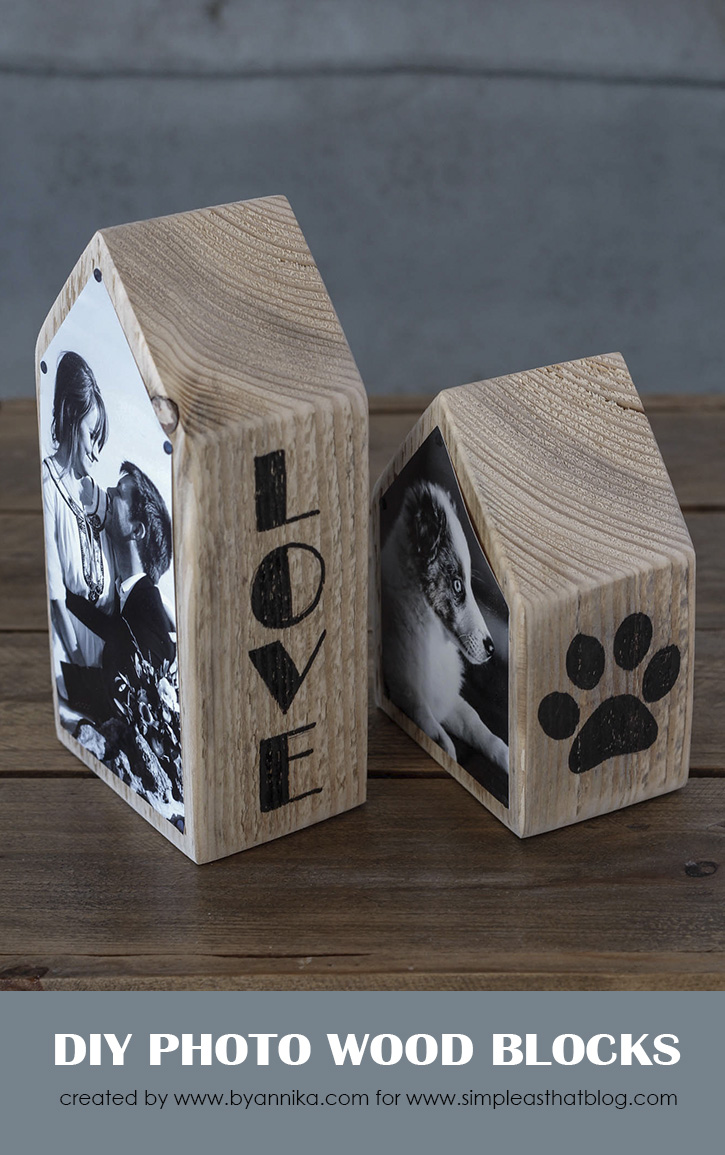
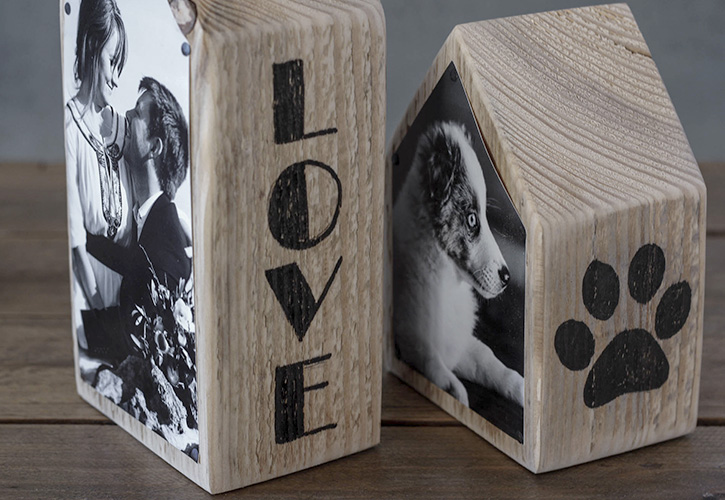
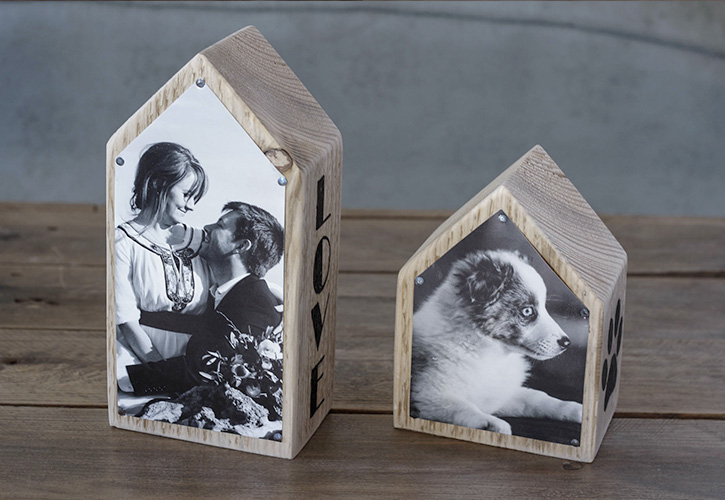
Today’s craft project is a fairly simple one. My hubby made these cute little wood houses from recycled wood, a while ago, and I really love the rustic feel they add to my decor. Then the other day, I just felt like spicing them up a bit and thought that they would look pretty awesome as photo blocks, with some simple lettering. Since I was going to put them in our nursery, I wanted the pictures to reflect our family. So I chose a couple of images of the hubby and I, a couple of our dogs, and then I wanted to add words like home and love and a couple of paw prints to the blocks, as well.
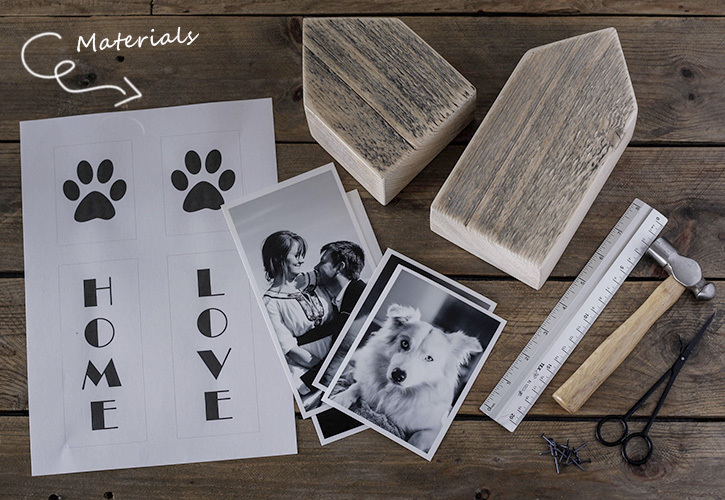
Create your own rustic photo displays using recycled wood and a handful of favorite family photos.

For the project, you will need the following tools and materials:

MATERIALS:

  • WOODBLOCKS
    I’m not going into great detail on how to make woodblocks, but just explain that all it takes is a couple of scrap wood pieces, thick enough to stand. Then you saw/cut them to your desired shape and measurements and sand them down.
  • PRINTOUT OF WORDS/CLIP ART
    Your printouts can be made in a simple program like Word (or photoshop), where you write out a couple of words, use a font you like and scale the words to match the sides of your photo blocks. You’ll also find default clip art galleries in the programs, where you can find cute shapes like flowers, or in my case paw prints.
  • PHOTOS
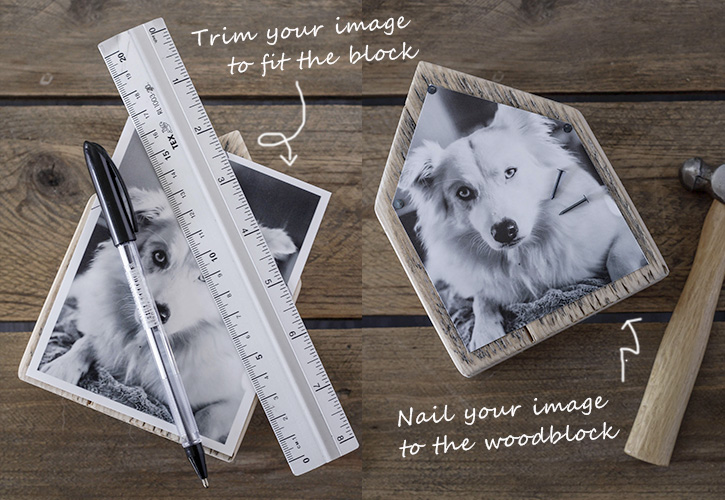
    I printed the photos to fit the width and height of my woodblocks, which is then later trimmed to fit the woodblock. Make sure that when you choose your photos, and if they need trimming, that the area of focus is not going to be trimmed away.So you don’t end up cutting away half a face.
  • NAILS WITH SMALL HEADS
    Use small nails with a flat head One for each corner of the image(s). The flat head will make sure that the image stays in place.

TOOLS:

  • SCISSORS
  • HAMMER
  • RULER
  • PENCIL & PEN
  • MARKER or PAINT & BRUSH
Create your own rustic photo displays using recycled wood and a handful of favorite family photos.
STEP 1:
Take your block and put one of your images on top. Use a ruler and pen to mark out where you need to trim the image to fit the shape of your block. Trim the photo with a scissor along the marking.
STEP 2:
Place your trimmed photo on the block and nail it to the wood with a hammer in each corner. Make sure the photo doesn’t bulge.
Create your own rustic photo displays using recycled wood and a handful of favorite family photos.
STEP 3:
Next, we add some lettering or shapes to the sides of our blocks. Cut out the ones you need from your printout and cover the back of it with pencil.
STEP 4:
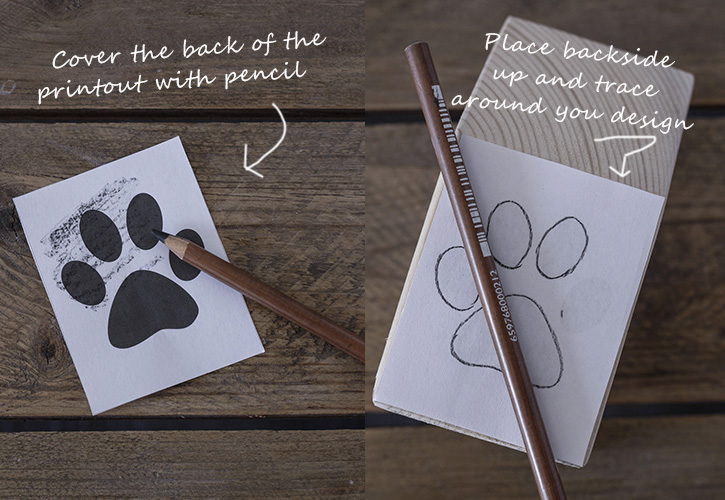
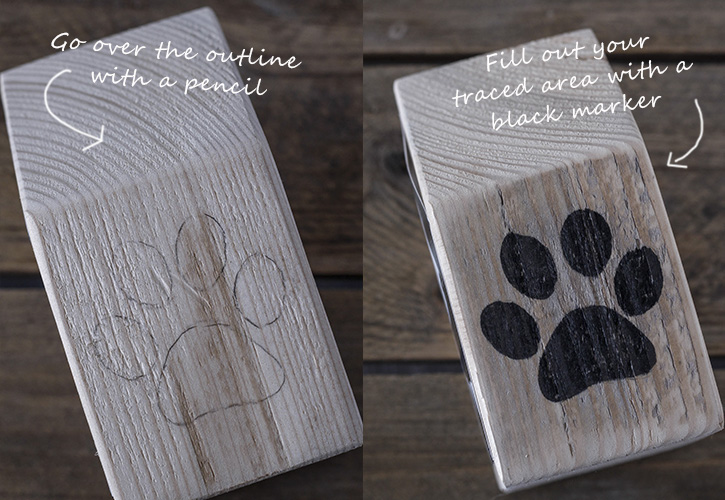
Now turn your paper and place it on where you want the shape or lettering to go. Trace firmly around the shape. You have now transferred an outline of your shape to the woodblock.

NOTE: In the below picture, I actually flipped the paper wrong. It’s so much easier if you trace on the printed side of the paper ;-).

Create your own rustic photo displays using recycled wood and a handful of favorite family photos.
STEP 5:
Go over the outline with your pencil, to make it more visible.
STEP 6:
Last we take a marker ( or paint and brush) and fill out the traced outline of the shape or lettering.
Create your own rustic photo displays using recycled wood and a handful of favorite family photos.
Go through the above process for all your blocks. I have filled out all the sides of each block, which allows me to have two images, and two-lettered words (or shapes) on each block. This way it can be seen from all sides.
If you are already thinking about crafting your own Christmas presents this year, this simple project can be really fun and personalized for the receiver.
Create your own rustic photo displays using recycled wood and a handful of favorite family photos. Create your own rustic photo displays using recycled wood and a handful of favorite family photos.
I hope you liked this simple and fun little way of displaying photos and that you get to make some of your own.
Have a beautiful October. See you soon!
Annika
  • Bio
  • Facebook
  • Google+
  • Pinterest
  • Latest Posts
  • Instagram
Annika Olsson

Annika Olsson

Annika is the owner of ByAnnika, a design studio, that creates hand lettered inspirational art for the nursery and kids room. She has a love for vintage typography, retro patterns, and pastel colors. On her blog she shares her creative projects, that are influenced by her home and life in the country.
Annika Olsson
Annika Olsson

+Annika Olsson

Annika Olsson

Annika Olsson

Annika Olsson

Latest posts by Annika Olsson (see all)

  • The one reusable accessory you need to make your baby photos look stunning (tutorial) - Monday, June 12, 2017
  • Create a beautiful personalized Mother’s Day gift - Wednesday, May 3, 2017
  • Create a super quick last minute Easter (or any time of year) hostess gift. - Sunday, March 19, 2017
Annika Olsson
@annika.olsson on Instagram

Beyond Snapshots  - Mastering Mobile PhotographyBeyond Snapshots
A moment captured is worth more than a moment forgotten—no matter how imperfect the lighting or how basic the camera. In one week we’ll move beyond taking snapshots to capturing magical moments with your phone. Click to learn more.

Filed Under: Crafts / DIY

Reader Interactions

Leave a Reply Cancel reply

Your email address will not be published. Required fields are marked *

Primary Sidebar

Rebecca Cooper — Founder, Simple as That Blog

Hello, I'm Rebecca. Welcome to my blog, Simple as That. Come along as we embrace simplicity in crafting, photography, travel, and family life. Read more about me.

Newsletter

Get the latest updates from Simple as That delivered to your inbox.

Join for Free

Beyond Snapshots: Mastering the Art of Mobile Photography

Connect

  • Bloglovin
  • Facebook
  • Instagram
  • Pinterest
  • Twitter

Follow On Pinterest

Visit Rebecca - Simple as That Blog's profile on Pinterest.

Categories

  • Crafts / DIY
  • Holidays
  • Motherhood
  • Organization
  • Photography
  • Printables
  • Recipes
  • Simple Living
  • Travel
  • Wellness

Our Privacy Policy

Follow on Instagram

Instagram has returned invalid data.

Printable 2023 Calendar

Our printable calendars and organizational pages have been essential in keeping our home and my life in order and I guarantee they will be a help to you too!

Click here to learn more

© Simple as That Blog, 2017 · Design by Brian Gardner

Simple as That Blog

Facebook / Instagram / Pinterest / Twitter / Contact