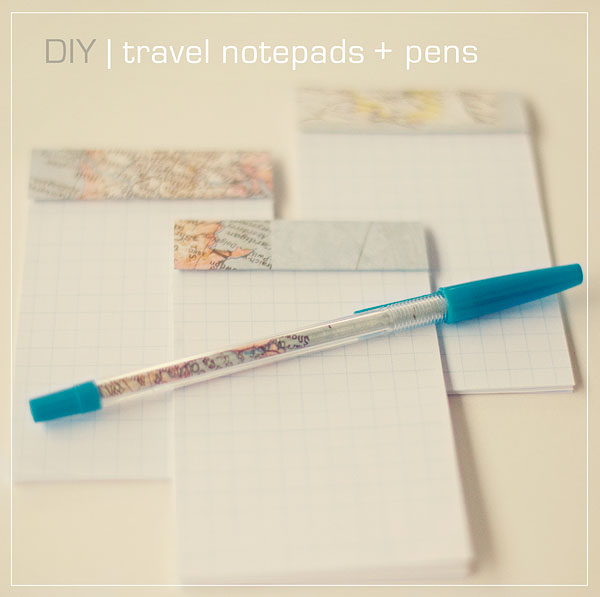
Today’s post is the first in a series of {simple summer projects} that I’ll be sharing with you over the next couple of months. There’ll be recipes, crafts and lots of other simple, stress-free, fun stuff for summer so stay tuned! 🙂
. . . . . . . . . .
I helped my daughter put together some of these little notepads a few months ago to sell at a children’s craft sale she was a part of and they were so simple and so much fun to make! When I say these are simple to make, I mean reeaaaalllly simple!
Here’s how you do it:
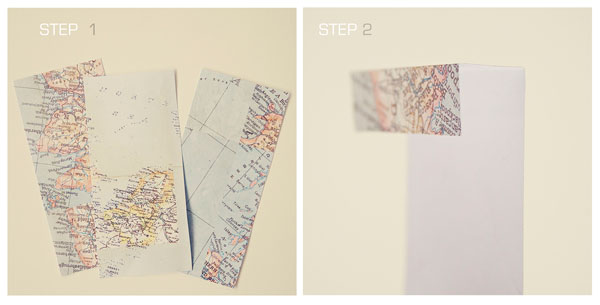
{STEP 1}
Pick out some patterned paper and trim to the size you’d like your notepad to be. (I used these and printed my map paper at home.) This paper will be for the binding along the top of your notepad and for the backing. Mine measured approximately 2 3/4 inches X 6 3/4 inches.
{STEP 2}
To create the binding at the top of the notepad, fold the top edge down about 3/4 of an inch. Fold down one more time the same direction (towards the wrong side of your paper) and the same width as your first fold.
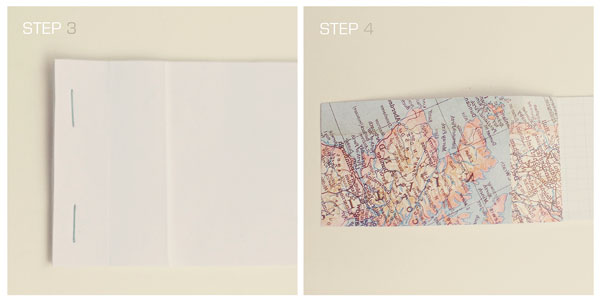
{STEP 3}
For the pages in your notepad, trim some plain white paper (or you could use this printable graph paper card from The Creative Place printed on plain computer paper like I did) to the same size of the backing you’ve already made. Once you have all your pages ready, take your backing paper and unfold everything you did there back in step 2. With the right side (the side you want showing) of your backing paper against the top page of your notepad pages, line everything up and staple together.
{STEP 4}
Now we’ll create that top binding on the front of the notepad by using the folds we made in step 2.
Fold the backing paper up towards the top of the notepad, then fold one more time towards
the back of the notepad.
{STEP 5}
Your notepad should now look like this, with a top edge of pattern paper to hide those staples and forming a patterned backing for your notepad. Place a strip of double sided tape (or use a gluestick, whatever you’ve got on hand) along the top back edge to hold the backing in place.
{STEP 6}
You can even create some coordinating pens to go with your super cute, super simple notepads. Measure a thin width of paper the same length as your pen . Take the pen apart and roll your paper tightly around the part of the pen that contains the ink (you don’t want your piece of paper too wide or when you roll it up it will be too thick to fit back into your pen.) Keep that paper wrapped up as tight as you can and carefully place the pen back together.
Pack a few of these cute notepads along on your travels this summer {to far off places, to visit family or maybe just heading to the grocery store} to jot down lists or cute things the kids say. For something to do one afternoon, you could even have the kids make some of their own!
. . . . . . . . . .
I’m so excited to welcome simple as that’s newest sponsor Chantelle Nicole Designs. I’ve fallen in love with Chantelle’s new summer line and I know you will too!
Stay tuned tomorrow for a SUPER fun giveaway from Chantelle!
Follow Chantelle Nicole Designs on facebook.
🙂

I’m linking up with these fabulous blogs:
life made lovely, tip junkie, todays creative blog, funky polkadot giraffe, mad in crafts, paisley passions
tidy mom, 30 handmade days, blue cricket design, the trendy treehouse, whipperberry, skip to my lou


Love this idea! Why didn’t I think of that??? Love it. I pinned it, too!
so simple, but genius! thanks for sharing!!
Just a quick note to let you know that a link to this post will be placed on CraftCrave today [29 Jun 01:00am GMT]. Thanks, Maria
so cute and a great kid project, too!
Great project!! love it! thumbs up 🙂
happy crafting,
Linda
I Like this simple idea..I have shared a few months back a tutorial about adding the colorful sheet in the pen,,
check it out,,I hope you will enjoy!!
http://creativemind-zeshuregi.blogspot.com/2011/01/from-transparent-to-colorful-look.html
Thanks