How to shoot in Aperture Priority with your DSLR camera to get better pictures!
If you want to take better photos of your kids, but haven’t yet managed to venture away from the Auto Mode on your camera, then this is the tutorial for you!
I’m going to teach you, step by step, how to shoot in Aperture Priority Mode; which will help you get more control over how your images look, without going the full hog of shooting in manual mode. It’s a great first step toward learning how to take great photos, so let’s get cracking!
Before we start, let’s take a moment to understand what your camera is going to do on “Auto” and why we want to move away from it.
What’s Wrong with AUTO?
In AUTO, all your camera can do is have a look at the light available and try to come up with the correct exposure by balancing the three elements of exposure – aperture, shutter speed and ISO – for you. Although this sounds ideal, the problem with that is that the camera doesn’t know what you are trying to photograph or what you want the scene to look like, so it simply aims for a middle ground to try to cover any many situations as possible. This is why you will often end up with photos that have that “middle of the road” look to them, since that is exactly what your camera is aiming for! In order to get the images you hope for, you need to at least give the camera a nudge in the right direction.
Using Aperture Priority Mode
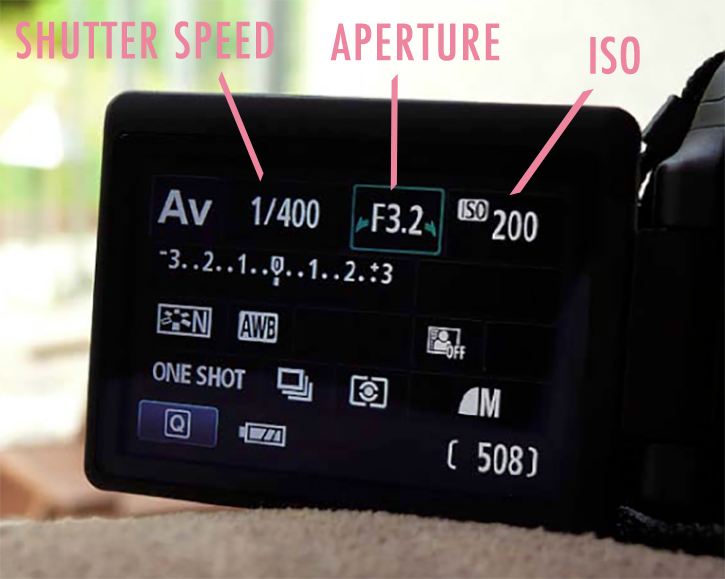
An easy way to start doing that is by using something called Aperture Priority Mode. In this semi-automatic mode, you tell the camera which Aperture and ISO setting to use, and the camera works out the correct exposure by setting the remaining element, Shutter Speed, for you. Although you are only choosing two settings yourself, and the camera is still doing all the balancing for you, this gives you SO much more control than simply shooting in AUTO!
What is Aperture?
Before we get onto how to shoot in Aperture Priority Mode, we first need to have a quick lesson in what Aperture is, and what it does.
Aperture is basically an opening in your camera lens – a hole really – which lets light into the camera. When you change the aperture setting, you change the size of this opening, making it bigger or smaller. This is measured in something called F stops (such as F1.8 or F5.6 or F8) and the smaller the F-stop number, the bigger the Aperture. So for example, F5.6 is a smaller opening than F1.8. (It does seem like it should be the other way around I know!)
As you would probably imagine, a bigger hole lets in more light; and a smaller hole, less light. This is useful to keep in mind because if you are shooting indoors where there is less light, you might want to use a wider aperture (small F number) so you can make the most of the light available, and not have to resort to the dreaded pop up flash.
The other important bit to know about Aperture is that it also changes how our images look, by controlling something called ‘depth of field’. Depth of field is simply how much or how little of your scene will be in focus. Photographs with a large depth of field will have a larger area, from front to back, in focus, whilst images with a shallow depth of field will have a small area, again from front to back, in focus.
You can see this effect in the images below – the image taken with an aperture setting on F1.8 has a very blurry background, the one taken at F6.3 has some blurring in the background, whereas at F22, the entire background is also in focus – that’s depth of field in action!
You can use this to great effect, by blurring out parts of the scene you want to draw attention away from – for example a messy background; or by getting a slightly larger area in focus for a group shot, or having the whole scene from front to back in focus, for example when shooting a landscape.
To do this, simply remember that using a smaller F number will give you a smaller area in focus, and a larger F number will give you a larger area in focus.
What about ISO and Shutter Speed?
You cannot really talk about Aperture without also mentioning the other two elements of exposure, Shutter Speed and ISO.
Let’s start with ISO. ISO is simply how sensitive your camera is to light. On a bright sunny day, you would use a low ISO to make your camera less sensitive to all that light, and on a dark overcast day, or indoors, you would use a high ISO to “boost” the light available. ISO is written as a number from 100 to 6400 (or higher on some models) sometimes with “ISO” written in front of it.
Shutter Speed is how fast the shutters (think of them like curtains) over your aperture opens and closes. For now, what’s important to know about shutter speed is that it affects how motion is captured – too slow a shutter speed and you will get motion blur, where parts of the image are soft and unfocused (and not the areas you want!) so in most cases we want to make sure we have a high enough shutter speed to prevent this. Shutter speed is a number, usually with a 1/ in front of it, so 1/125 or 1/800.
I know that all these different numbers are a bit confusing, but it does become easier with time, I promise! To help you with this I’ve created a little “cheat sheet” for you, which has all the information about Aperture, ISO and Shutter Speed on it, along with suggested numbers to use for each one, which will totally help you with this. You can download the cheat sheet here.
The very best way to learn how to shoot in Aperture Priority Mode is simply to go out and practice with it! Here’s what to do:
STEP ONE – Change From Auto to Aperture Priority Mode
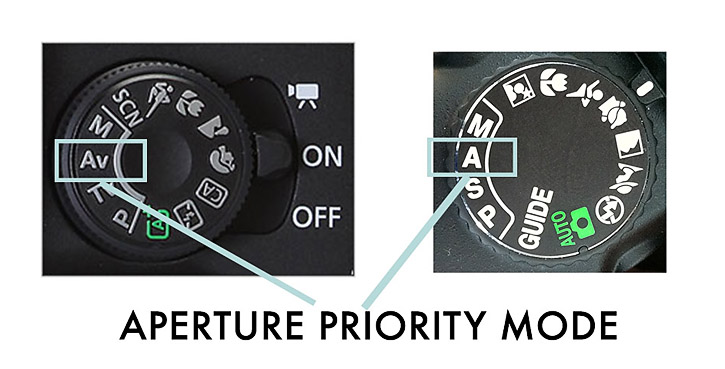
Set the dial at the top of your camera to A (Nikon) or AV (Canon) for Aperture Priority Mode, like in the images below. (Goodbye little green box!)
STEP TWO – Set Your Aperture
Now you need to choose your Aperture number – the F stop. If you want a larger area of the scene to be in focus, for example if you were shooting a landscape, then you would choose a bigger F number, such af F9 or F16. If you want to get that yummy blurred background, say for a portrait shot, then choose a smaller F number, such as F2.8 or F4.5.
STEP THREE – Set the ISO
Now you need to set the ISO number. As a general rule you can set this based on how much light there is in the scene you are trying to photograph. On a bright sunny day choose a small number like ISO100 or ISO200, but indoors where there is less light or a dark overcast day, choose something like ISO800.
If you feel that setting both the aperture and the ISO is too much for you right now, don’t worry, you can set the ISO to AUTO, which means that the camera will balance both the ISO and the Shutter Speed for you, so you only need to worry about which one to choose. Although this does give you less control, it might be a great starting point until you get comfortable choosing both.
STEP FOUR – Check your shutter speed
Your camera will then balance the exposure for you by setting the Shutter Speed for you. Try to make sure that your shutter speed never falls below 1/100 (otherwise you risk getting blurry, out of focus images) if it does, change your ISO to a higher number, or choose a smaller aperture number.
STEP FIVE – Take your Picture!
Half depress your finger on the shutter to set focus, then depress fully to take your picture!
I hope you have enjoyed this tutorial. Don’t forget to pick up your cheat sheet which you can print out and refer to when shooting to make sure that you know which numbers to use and when!


Love this! Simple and straight forward for beginners wishing to move away from the little green button! Thank you for this!
I love how easy you made this! I have tried for YEARS to understand all of this complicated photography jargon and I just never could get the hang of it! Thanks for making this so easy! I can;t wait to try this again!
I have read articles after boring articles on Aperture priority mode – all of them more or equally confusing as the others. Your three pictures are worth more than three thousand words – just looking at the background each with clearly labeled f-stops : I got this thing now in ONE ATTEMPT!!!
It’s like math – if you are a great teacher, you can make your students LOVE math !!!
I salute you for making this so simple.
I was having my DSLR for over 2 years and was still confused. But after reading this article, I felt how simple it is to learn. Now it;s my turn to try on. Thanks a lot for this wonderful information.
Superb explanation! This is what i was looking for my friend. She is a bit confused in all these settings and i was unable to explain her well. I think this article will help her in clearing all this messing stuff and assist her to get rid of this green auto button. Thanks
This is great! I really needed a plain language explanation of the mysteries of the camera setting dial. I’m going to start practising tomorrow! Thankyou so much.
Like many others I have had my DSLR camera for a couple of years and never understood what all the settings were for. Even having a 35 millimeters camera in the past never new how to use it. The instructions were always confusing. They assumed everyone new what all the abbreviations meant. Thank you for making it so easy to understand. Now I have to go give it a shot. We have a vacation home in the mountains of Virginia with many opportunities to take beautiful pictures.
You are a terrific teacher! Thank you for breaking everything down to its simplest form. I am new to photography and have read so many articles about AV mode, but it was like I was reading a different language because I didn’t understand the terminology.
Thank you for teaching me…and for the cheat sheet!
I have started a little notebook to keep all my notes in because I know I’ll forget when I get out there. Your explanations are so easy even I understood it. My notebook is filled with your advice. You have a knack for explaining the difficult. Thank you for the time you put in to doing this.
You really are awesome. Thank you for making this so much easier. THANK YOU!
Audrey must say you explained in a good and simple way which helps me to explain my son the basics of photography. He loves to do photography.
Cheatsheet is a life savor.Luv
Thanks