This tutorial was featured over at Ucreate a few months back and I thought I’d share it here with all of you today!
The photos I took here, and here were all edited using this technique.
So lets jump right in shall we? I’m going to show you how to take a photo like this:

To this in just a few simple steps:

1. I began by opening my original photo in my photo editing program Adobe Photoshop CS4 (File -> Open) **please note: Adobe Photoshop Elements is also a great program to use and the technique is almost identical when following the instructions given here.
2. Using a couple of my favorite photoshop actions (more info about what photoshop actions are and how to use them can be found here) my photo began to look like this:

3. Next I wanted to add a little bit of interest to the background (the blue wall in my office) and I did this by adding a texture overlay to my photo. There are many textures available out there for purchase but for this particular effect I created my own texture using my camera and a piece of scrapbook paper. I simply took a photo of a piece of scrapbook paper (lay the paper on the floor, stand directly above it and while keeping your camera level with the paper snap a photo). I then opened the photo of the paper in my photo editing program and cropped it to the same size as the photo I was working with.

4. To add the texture to your photo you will need to have both the texture file (the cropped photo of the scrapbook paper) and the photo you are working on open in your photo editing software. Now drag the texture file on top of the photo file using the move tool (if this option isn’t available in your photo editing software simply copy and paste the texture file onto your photo). Your photo will no longer be visible because the texture file will be on top of it.
5. By placing the texture file on top of the photo we have now created two seperate layers within the photo document we’re working on. Open the layer pallette (Window -> Layers) and you will see the two layers there, the background layer (which is your photo) and the texture layer (the photo of the scrapbook paper). Click on the texture layer, and you will see an OPACITY slider in the upper right corner of the Layers pallette. Click on this and begin sliding it to the left to lower the oppacity of the texture layer. You will notice your photo begin to look a little bit like this:
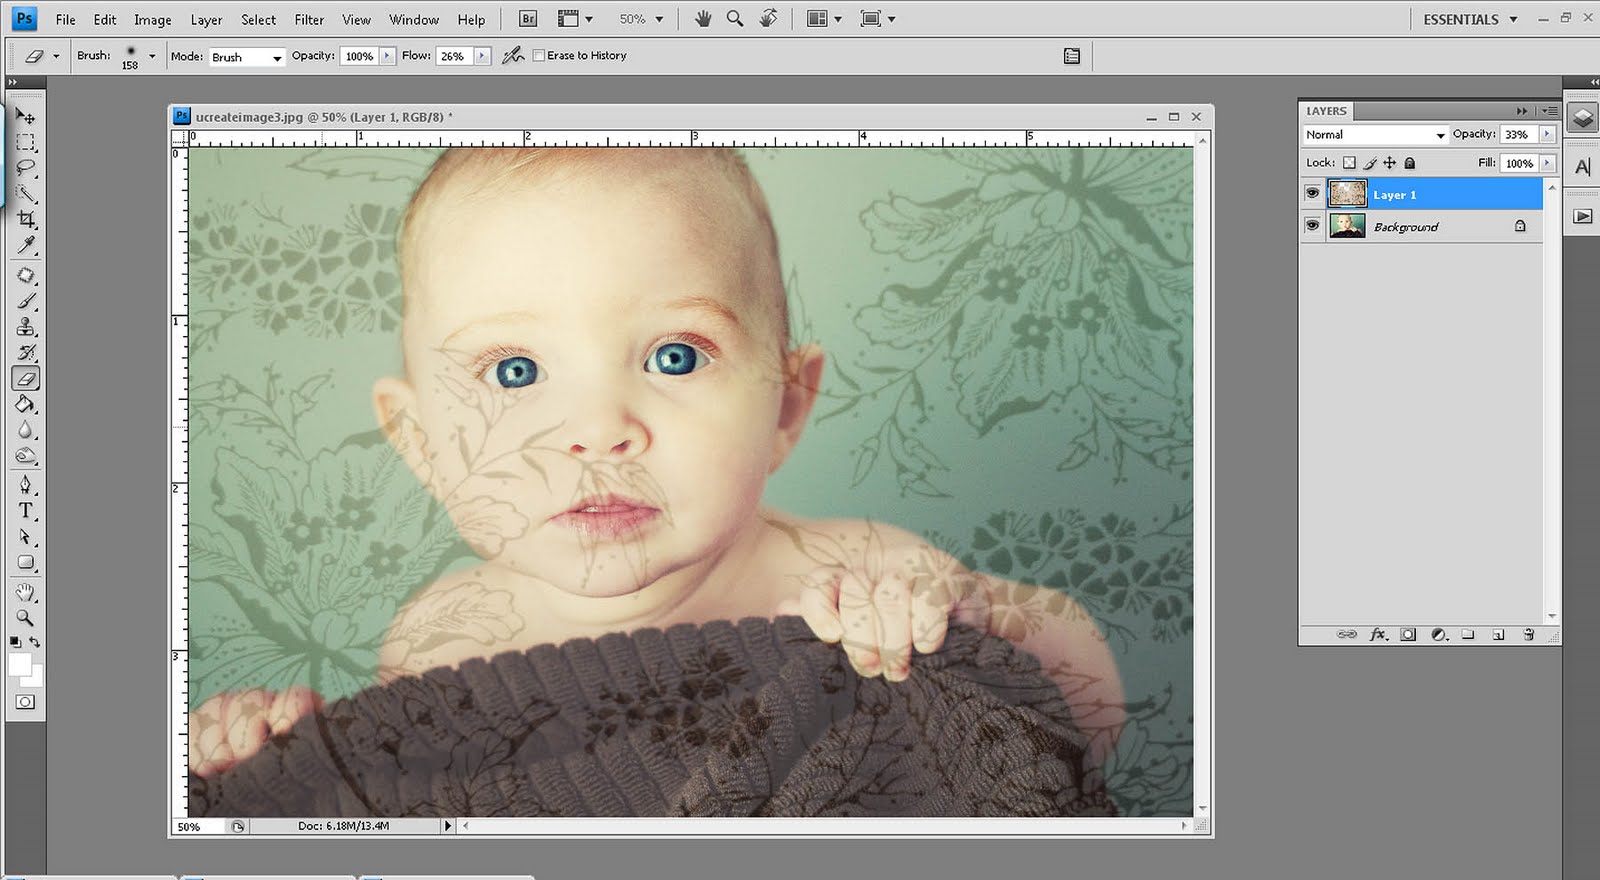
You can now see the photo through the texture layer. Adjust the opacity until you get the look you desire.
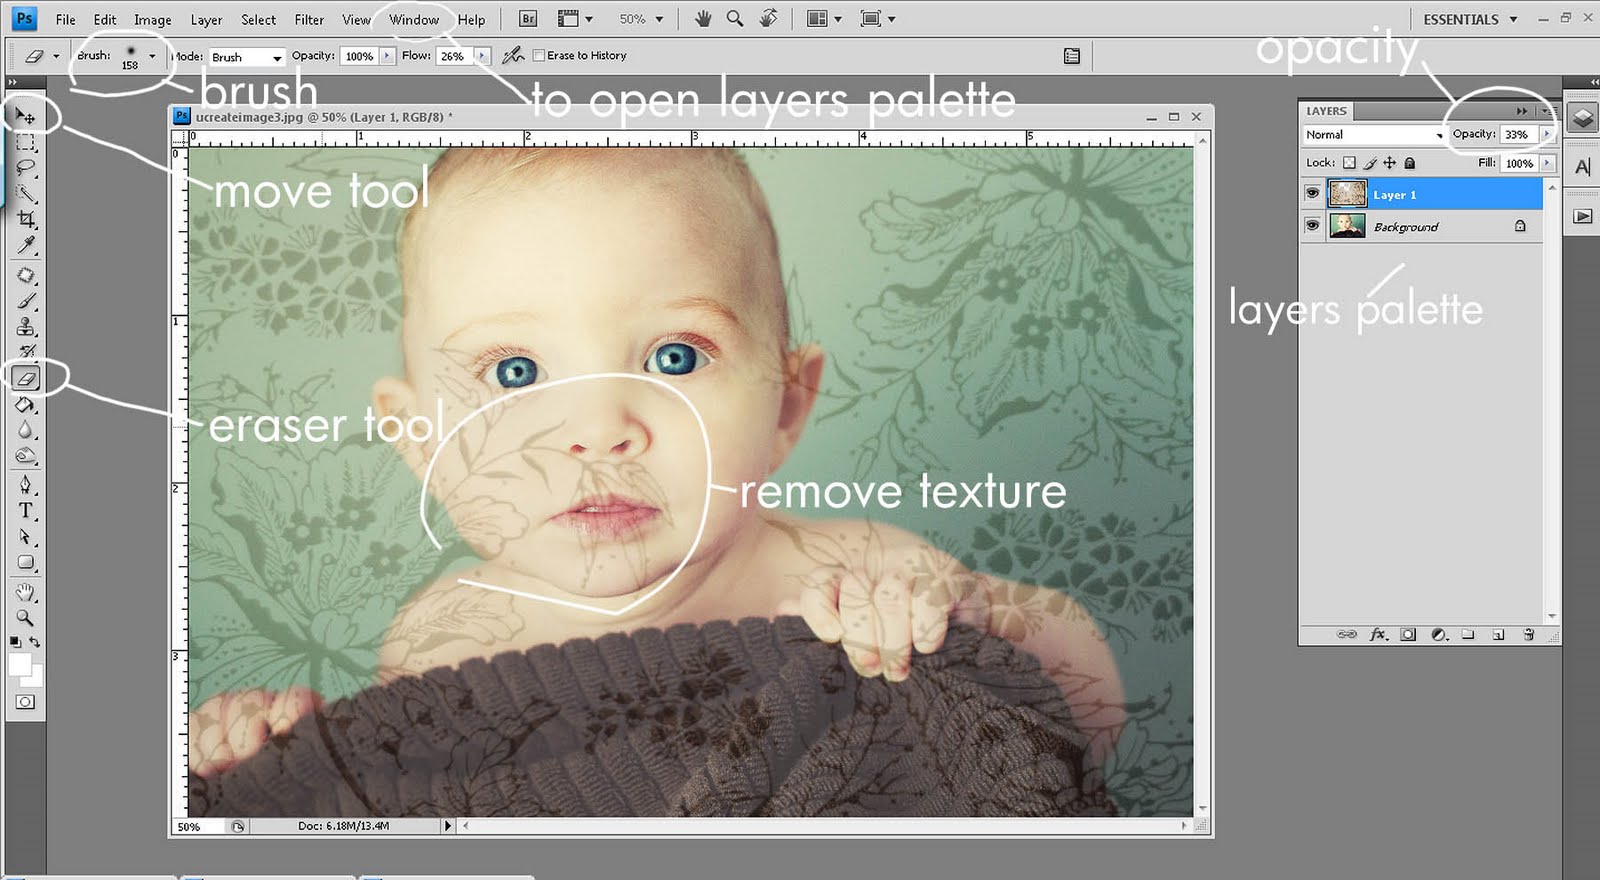
6.What we want to do next is remove the texture from any areas on the photograph where we don’t want it to appear, ie. skin, clothing. To do this we will use the Eraser tool (on the left tool bar, it actually looks like an eraser). Once you have selected the eraser tool you will notice in the upper right corner of the screen a drop down menu that says Brush, click on the small arrow within this drop down menu and select the diameter/size and hardness of your brush. I prefer to use a soft brush and will also adjust the opacity of my brush depending on the area on the photo I’m working on so that I can blend the areas with texture and without texture smoothly. Use the eraser tool by clicking your mouse and while holding drag it over the areas of your photo where you wish to remove the texture. Be sure you are still on the texture layer while doing this.
7. Once you have successfully removed the texture from the areas you selected the final step is to flatten the two layers we created (Layer -> Flatten Image).
Now that you know how to add a texture to your photos, try experimenting with different textures and see what fun things you can come up with. For this photo I even used a digital scrapbook paper file that I had purchased for my background texture.

I hope you enjoyed this photo tutorial. If you are looking for more easy-to-follow photography tips check out my downloadable e-book 40 Top Tips for Better Photos.

Rebecca Cooper is a 42-year-old wife and mother of four from Alberta, Canada. As a photographer, crafter, author, and blogger, she finds joy and fulfillment in celebrating everyday moments. She loves to read and eat chocolate, and is a firm believer in afternoon naps. Rebecca shares her family’s adventures, photo tips, simple craft projects + more right here at Simple as That.
Latest posts by Rebecca (see all)
- Printable 2023 Calendar - Monday, December 5, 2022
- SMART Goal Setting Bookmarks - Sunday, June 12, 2022
- Free Printable 2022 Calendar - Thursday, September 9, 2021

That is wicked awesome. I know how to apply textures, but, I’ve never considered doing that.
And thanks for the scrapbook paper idea!
You rock! <3
Wow! I just assumed you had a beautiful piece of really expensive wallcovering that you used as a backdrop. Thanks so much for sharing this Rebecca, I can’t wait to give it a try!
This is an amazing tutorial Rebecca. I never would have imagined this when I looked at the picture. Thanks for letting us in on this technique!
I seriously love you for this tutorial… like mega huge!
I had another go today – and came up with a photo that I have now ordered for a canvas print I love it so much!
Thanks for sharing this!
http://scrappyfairy.blogspot.com/2010/09/more-photoshop-fun.html
Sarahjane xxxx
Must try this! I have Adobe Photoshop CS on my pc but haven’t dared to sit and play around with it, yet.
I would love to know how to watermark my own photos for my blog. Any good tutorials you know of or perhaps you could post one? Thank you 🙂
This will be attempted SOON! Thank you for the tips. You’re great!
Thanks for sharing this!
Hi Rebecca,
I just wanted to say thanks for sharing this snazzy, little tip. I love it. Also, I gave you a shout out on my blog http://www.my-version-of-reality.blogspot.com
Thanks again. Happy Blogging!
Very cool thanks for the tutorial!
Awesome tips. I love using textures on my photos but had never thought about taking pictures of some of my scrapbook pages.
Thanks!
I recognize the paper from the last photo…Hobby Lobby! Great tip! Thanks!
Holy cow, coolest tips ever! Did I just say cow? Hooo boy, guess my roots are showing. 🙂 Thanks for taking the time to share this.
Thank you so much!! We would all be lucky if everyone was as kind to help others learn photoshop and be so kind to take the time to do so!!
Thanks so much for this! I found you on Pinterest, and totally followed your tutorial while my girls napped! So easy and cool!!!
I am so glad I found your blog!! Thanks for sharing.
Thank you so much! Seeing this was the incentive I needed to buy Photoshop. I found a good deal on Elements and I just gave this a try and I love it! VERY easy to follow instructions, which I appreciate as sooo many tutorials have me baffled after step 2. Thanks again. 🙂
wow! your newest follower! stop by sometime!!
Thank You so much for this valuable tutorial.
Amazing tutorial! Thank you very much for sharing! It will make my work even easier and faster! You’re wonderful for sharing this!!!! Thanks again!!
Do you have any tips on how to deal with erasing areas that do not have a smooth edge? Like fly away hair?