It’s friday craft day again and I’m so excited to have Margie guest posting today!
Follow along as she shares some crafty fun and a little bit of chinese culture with us!
. . . . . . . . . . . . . . . . . . . .
Make your own contemporary chinese folk art and eat it too
My name is Margie and I am a Californian who has been living in Beijing, China with my husband and three boys for the past three years. When I’m not exploring the city or volunteering at one of Beijing’s orphanages, I spend my time decorating cupcakes, dabbling in photography, scrapbooking and making things with my kids. I’m visiting today from my blog that I started the same time I moved to Beijing.
I’m excited to be here for Friday Craft Day and share with you a little bit of traditional Chinese culture.
One of my favorite things about living abroad (I’ve lived in four different countries but only one state) is learning about and immersing myself in the local culture. So much of a culture can be experienced by participating in holidays and their related traditions!
Last April during the ancient Qing Ming Festival holiday, I signed my family up for a Qing Ming Festival pastry class at a neighborhood cooking school called The Fig Tree. I wanted to learn more about this holiday and its traditions and what better way than through food?
The pastries or breads we made were shaped into animals and then twice cooked; steamed first and then baked. Between these two steps, the creations were painted with food coloring, making simple Chinese folk art. To see that process in detail and learn more about the Qing Ming Festival holiday, please visit my post all about it.
I wanted to figure out a way to share this fun activity with friends outside of China. So this meant finding a bread-like recipe that used something other than rice flour as its base and a twice cooked bread that didn’t include steaming as one of its steps. Afterall, how many of us outside of Asia have bamboo steamers in our homes? Or keep a ready supply of rice flour? That’s what I thought!
So instead of using the Chinese recipe for Qing Ming pastries, I turned to a pretzel recipe I found in my son’s Williams-Sonoma Kids Baking book.
This ‘craft’ idea is a little more involved so it is great for keeping the interest of older kids. For younger ones, an adult or older sibling can handle the prep work and the more complicated steps.
LET’S GET STARTED!
Since our craft involved making food,
FIRST: we washed our hands
SECOND: we mixed the flour, sugar, salt and yeast
THIRD: we added the water making sure it was the exact right temperature so that it wouldn’t ‘kill’ the yeast if it were too hot
FOURTH: we kneaded the dough
FIFTH: we let the dough raise in a warm place in our kitchen until it doubled in size (about 45 min)
SIXTH: we shaped our dough into animals and other shapes, sometimes using very simple cooking cutters. We placed each shape on an oiled cookie sheet to rise for another 20 minutes
SEVENTH: we added baking soda to a large pot of boiling water and boiled each shape for 30 seconds on each side using a mesh spoon (or slotted spoon works too) and returned them back to the cookie sheet
WARNING: this step is not for young children! It should be done by an adult or under very close adult supervision. Please use caution when allowing a minor to give this step a try.
Nicholas was hoping to make bagels so he shaped his pretzel into a bagel!
EIGHTH: we painted each shape with liquid food coloring
We used a variety of standard paint brushes I bought at Ikea strictly for this purpose.
TIP: Using less food coloring on your brush is better so that the colors don’t run or bleed when painting your pretzel. If using more than one color, wait a few minutes between colors to let the first color set. This way the two colors are less likely to run together.
NINTH: after sprinkling each shape with a pinch of salt, we baked the decorated shapes at 425 F degrees F for 10 minutes. The recipe calls for 15 minutes, but since I didn’t want my shapes to turn golden brown, I shortened the cooking time.
TIP: We found it easiest to make our basic shapes with very simple cookie cutters. All the shapes on the cookie sheet above were made using cookie cutters except the snake.
TENTH: we took our pretzels out of the oven, let them cool and then ate our creations!
One bonus of using the pretzel recipe over the traditional Qing Ming recipe is flavor! The Qing Ming pastries are meant to last for up to six months and are even hung in the house as decoration. My kids gave theirs a try after a few weeks and although they were edible, they were quite dry and tasteless. I have both of my Qing Ming pastries still hanging in my house to add a touch of Chinese folk art to our decor.
We plan to eat all of our pretzels within the next few days because they are DELICIOUS!
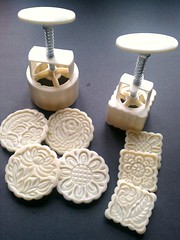
Our next adventure into ‘Contemporary Chinese Crafty Food’ will likely be the mooncake, eaten during the Mid-Autumn Festival earlier this month. We went to the local market, found our selves some mooncake molds like these and now we want to get creative.
photo By OggiG on Flickr
We are thinking about using pie crust and chocolate filling or I’d like to take my favorite mooncake style, Wuren (from Beijing), and alter the recipe to perfectly fit my taste.
I hope you had as much fun as we did experimenting with Contemporary Chinese Qing Ming Pretzels! Please let me know if you have any questions.
. . . . . . . . . . . . . . . . . . . .
Thank you so much for sharing this fun craft with us Margie and for giving us a small glimpse at life in Bejing! To see more beautiful images from Bejing, China and learn more about Margie and her family’s adventures be sure to visit her blog here!
. . . . . . . . . . . . . . . . . . . .
Please join me in welcoming simple as that‘s newest sponsor Bit O Whimsy!
Bit O Whimsy sells these {and so many more} gorgeous handmade hats! Don’t you love!?
Stay tuned next week for a super fun giveaway sponsored by Bit O Whimsy!


O my son would love to do this 🙂 Great pics & directions! Simple…right up my alley! Thanks for sharing!
i will come and check your blog. love learning about different cultures. i wish we could come and adopt one of those orphans. why does it have to be so expensive? a little girl 3-5 years old would find a nice home with us if we just had ton of money…
LOVED this post. My kids would die to do this project..anything they can paint is game in their book. (and anything that keeps them busy is game in mine!)
How fun is this?! I love learning about different cultures!!
kisses
heather
ooo my son would LOVE doing this together! Thanks for sharing!
My kids would have a blast doing this! I will bookmark this 🙂
I’m so glad you like this craft idea! Please let me know if you try it. I’d love to see how it turns out.