• About
    • About Rebecca
    • Meet the Team
    • Media Kit
    • FAQ
  • Photography
  • Holidays
  • Recipes
  • Printables
  • 2019 Calendar
  • Write for Us
  • Beyond Snapshots

Simple as That

Making Everyday Beautiful

Blog

Simple and Sweet Pineapple Zipper Pouch

Monday, May 2, 2016

Cute Pineapple Zipper Pouch

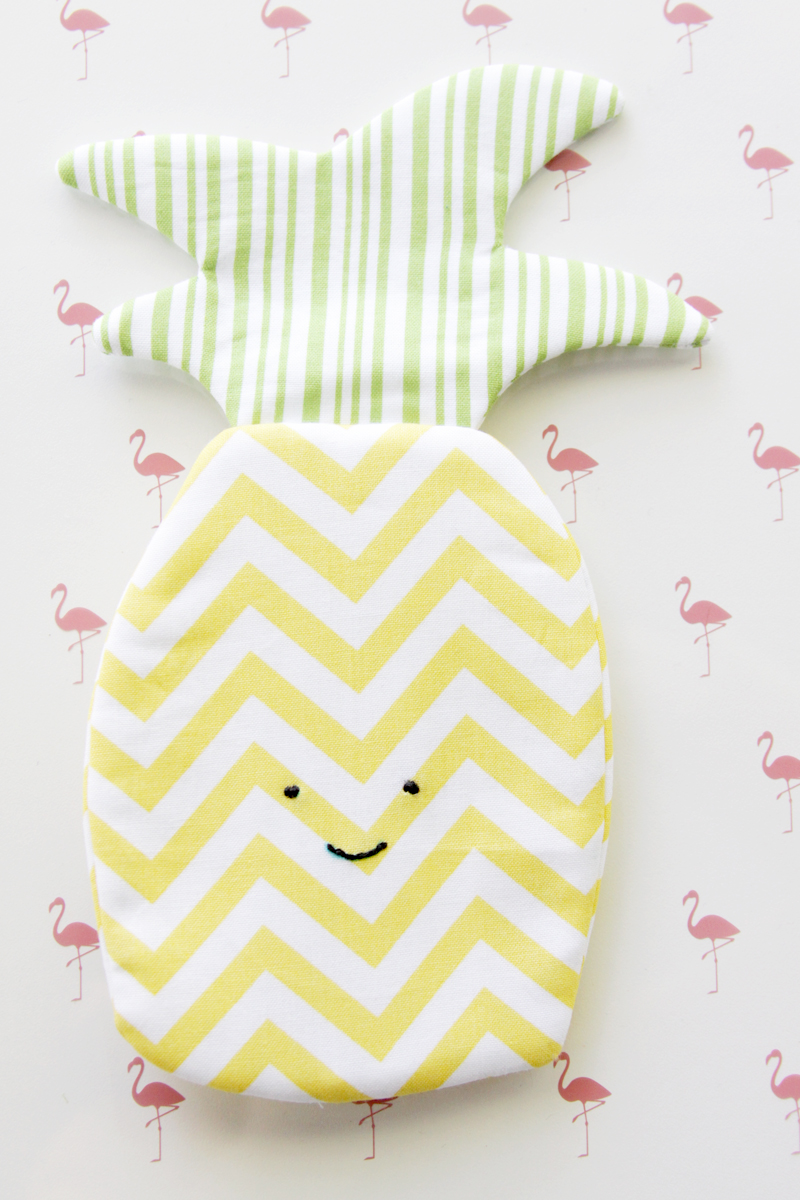
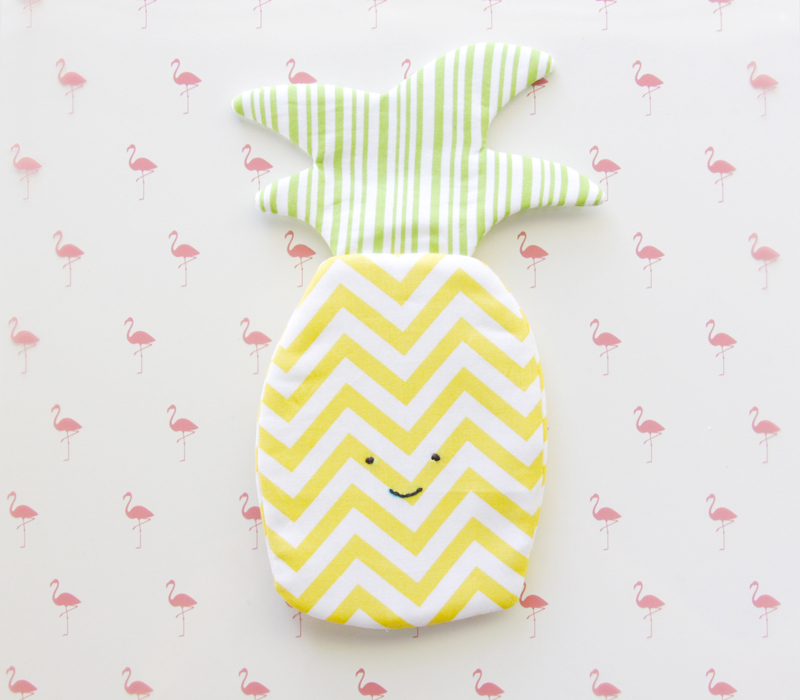
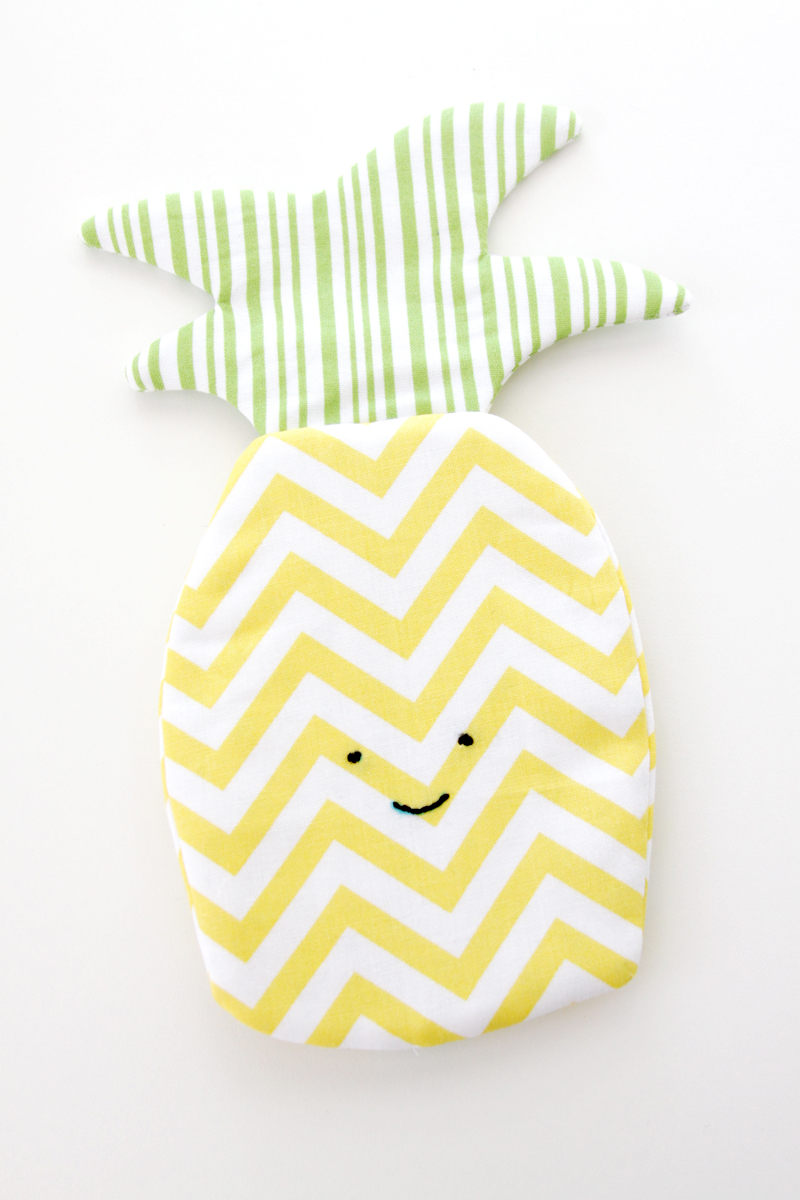
I’m kind of all about the pineapples – which is pretty perfect because pineapples are everywhere right now! They are so cute and fun and you can really get creative with things to make with them – like this little simple and sweet pineapple zipper pouch tutorial I have for you today!

Easy and Fun Pineapple Zipper Pouch

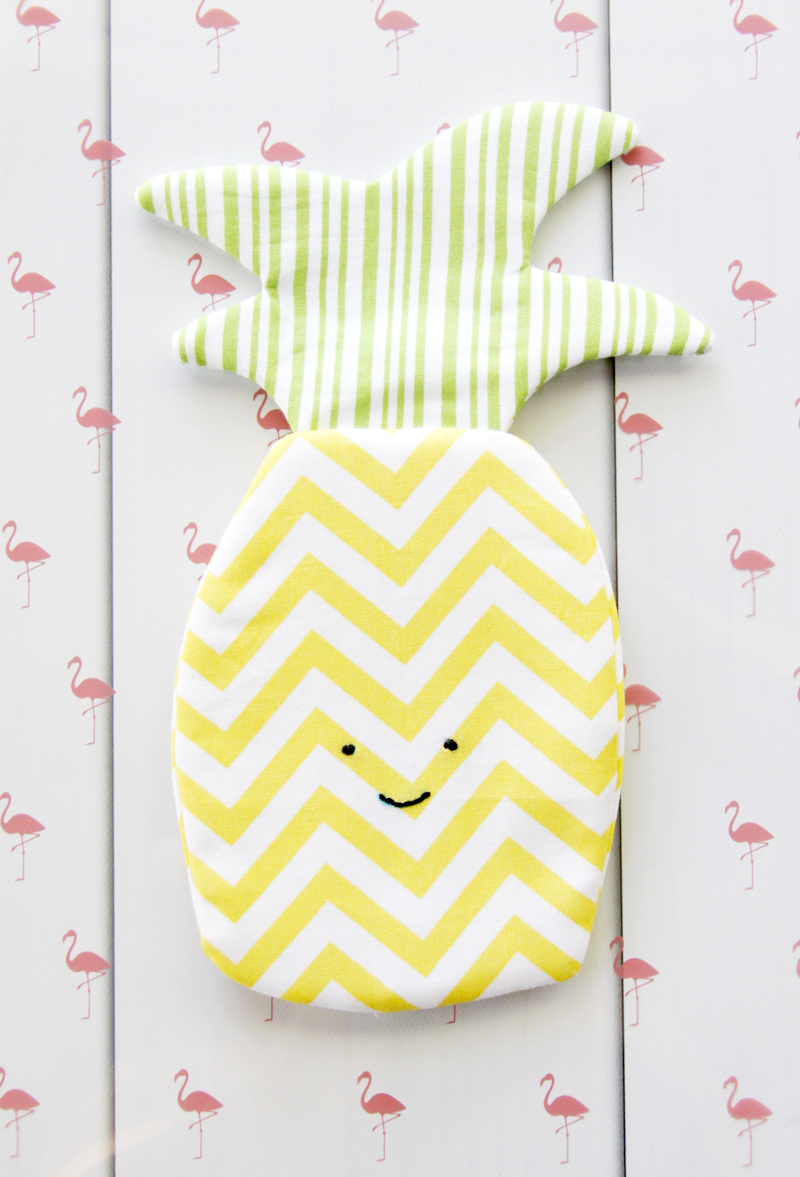
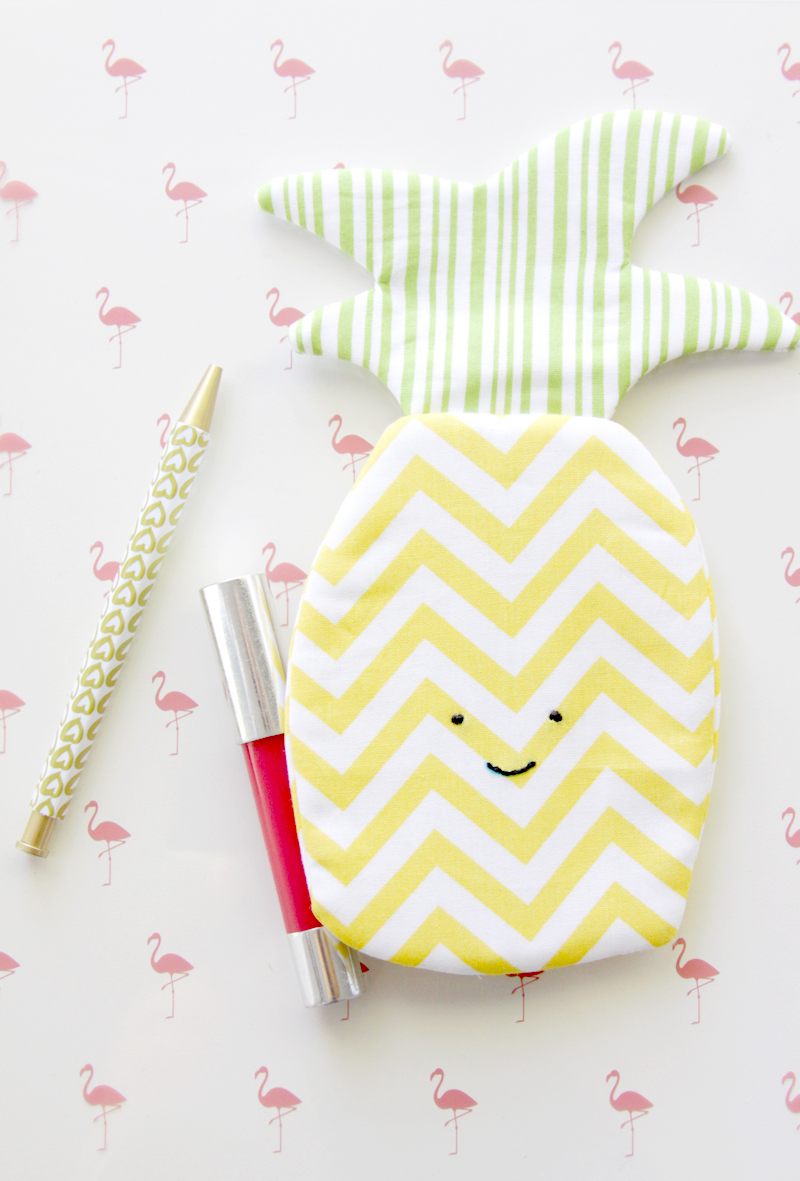
This little zipper pouch is so easy to sew up and so fun! It’s embroidered with a cute little smiley face – because if you can add a smile to a pineapple, why wouldn’t you? 🙂

Summer Pineapple Zipper Pouch

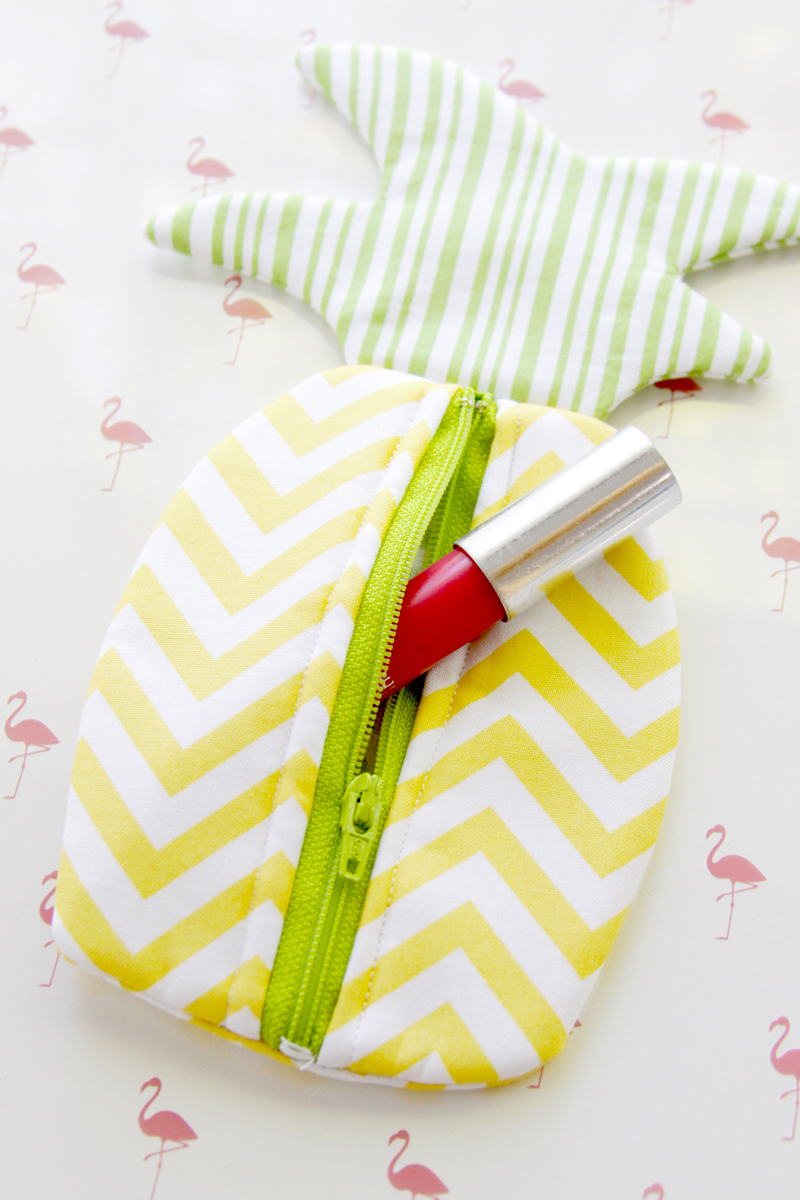
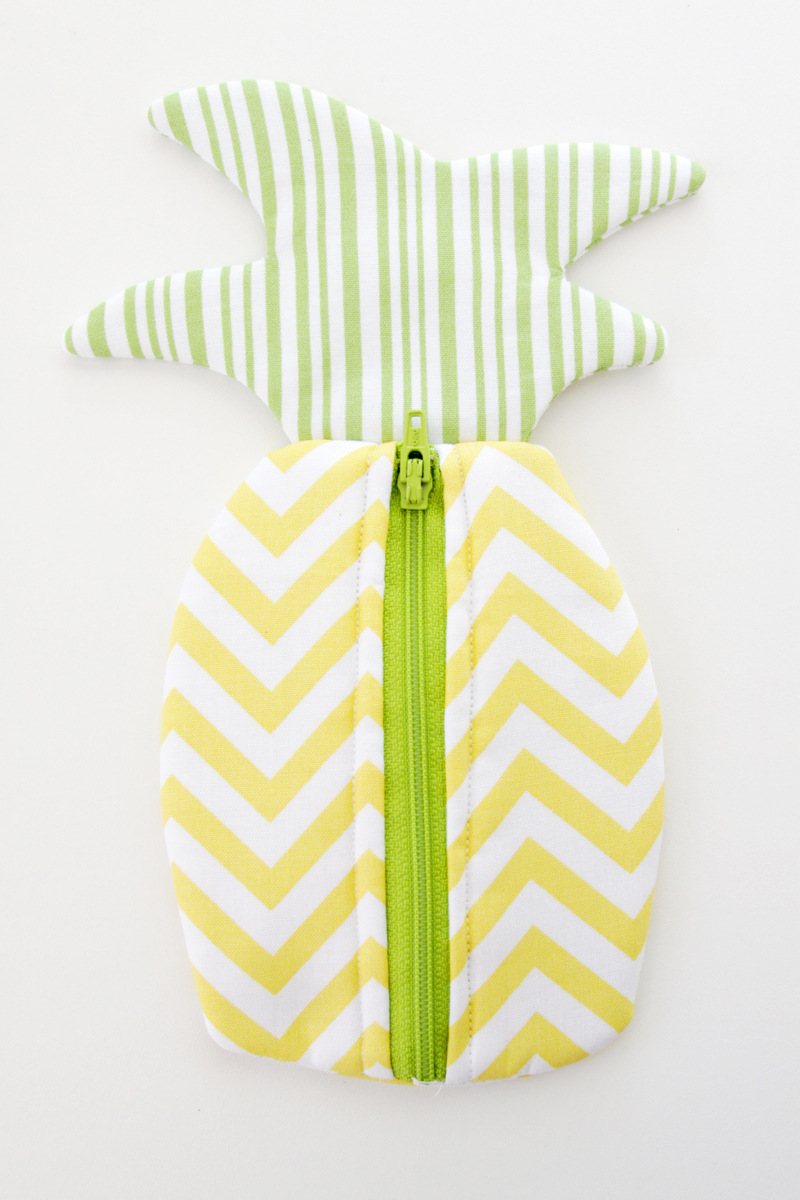
The back side of the pineapple has a little zipper and it’s just the right size for holding a chapstick, pen, or some cash! It’s a little small for a phone, but if you want to use it for that, you could easily enlarge the pattern and make yours just a bit bigger.

It would be such a great gift for a friend or teacher too – you could even add a little gift card inside!

Cute Summer Pineapple Zipper Pouch

Here’s what you need to make your own:

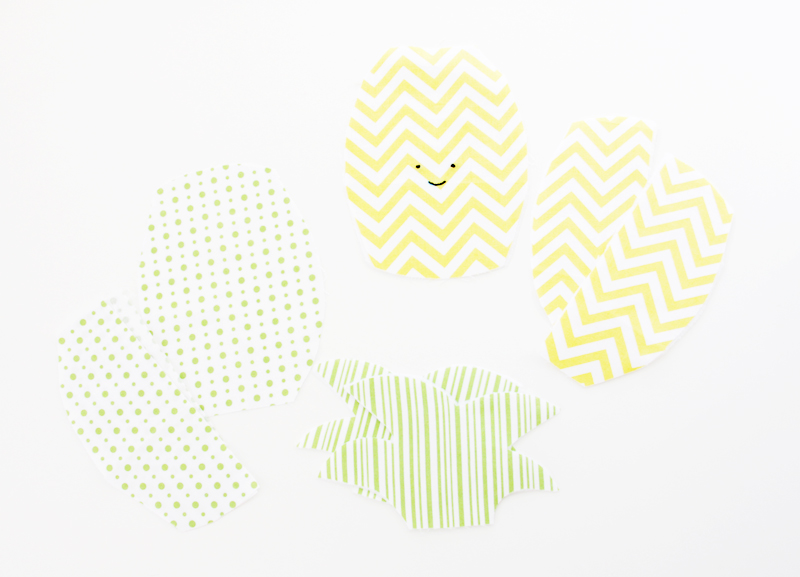
  • fat quarter of yellow print
  • 2 fat quarters of green prints
  • 7″ zipper
  • 1/4″ yard of fusible fleece
  • 3″ embroidery hoop
  • DMC black pearl cotton embroidery thread
  • Pineapple Zipper Pouch Pattern

Trace your pineapple shape and little pineapple face. Embroider the face by using a back stitch on the smile and small satin stitches on the eyes.

Pineapple Face Embroidery

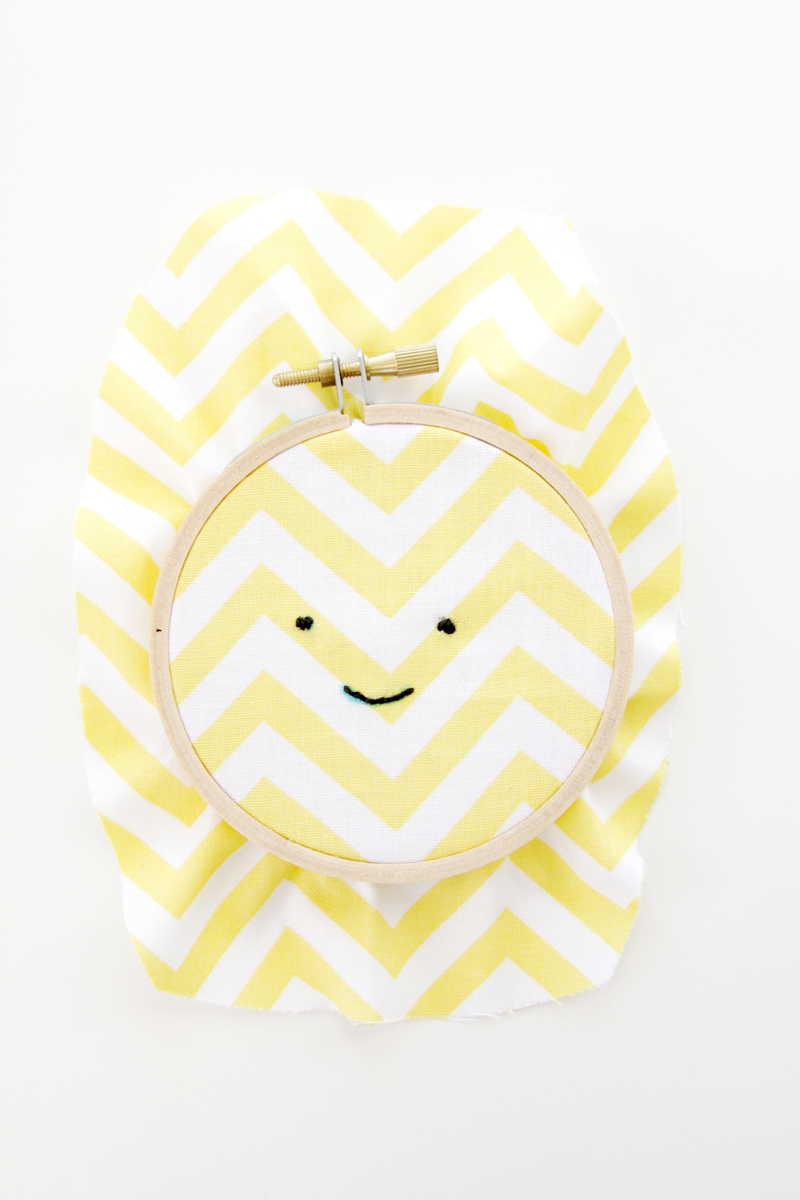
Remove the piece from the hoop and press. Iron the fusible fleece to all the yellow pieces, plus the front and back of the top greenery pieces.

Pineapple Zipper Pouch Pieces

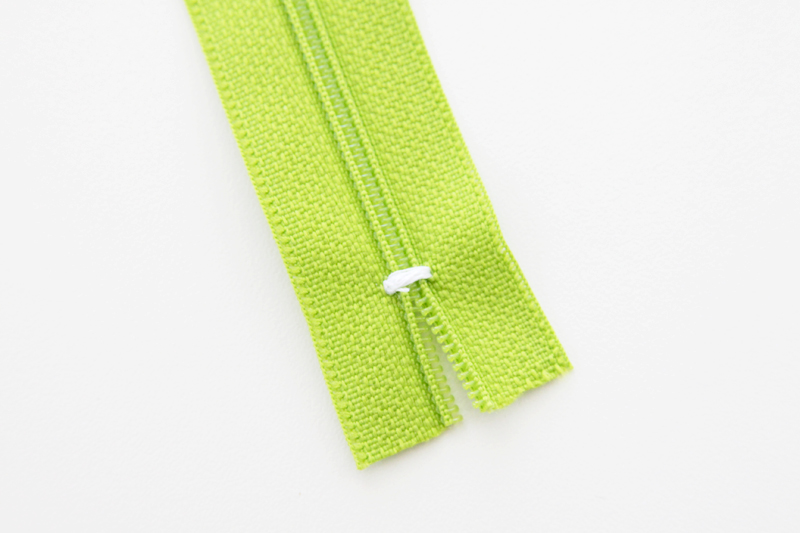
Now we need to shorten our zipper. This is easier than it sounds! Mark where you’d like your zipper to end. Set your sewing machine to a zig zag stitch and shorten the stitch to almost a zero. Then widen the width so the needle hits on either side of the zipper. Sew a small zig zag stitch in place on the zipper. (I recommend doing this in a matching thread, I just used this so it would show up in the photo.)

Shortening a zipper

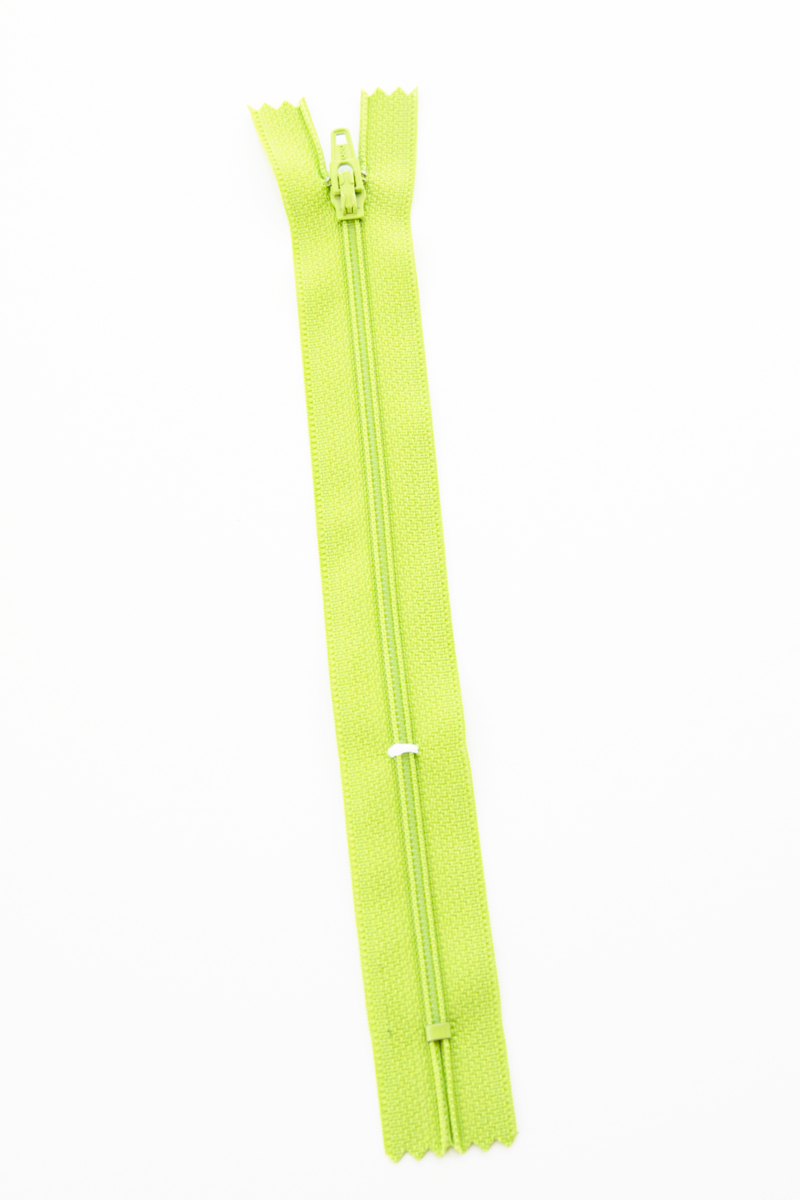
Trim the zipper about 1/2″ below the stitching.

Trimming a shortened zipper

To sew the zipper in place, put one half of the back yellow piece face up. Lay the side of the zipper face down on the straight edge. Place the matching lining piece face down on the zipper, lining up the straight sides. Sew the zipper in place along the straight edge with a 3/8″ seam.

Sewing zipper to back of fabric

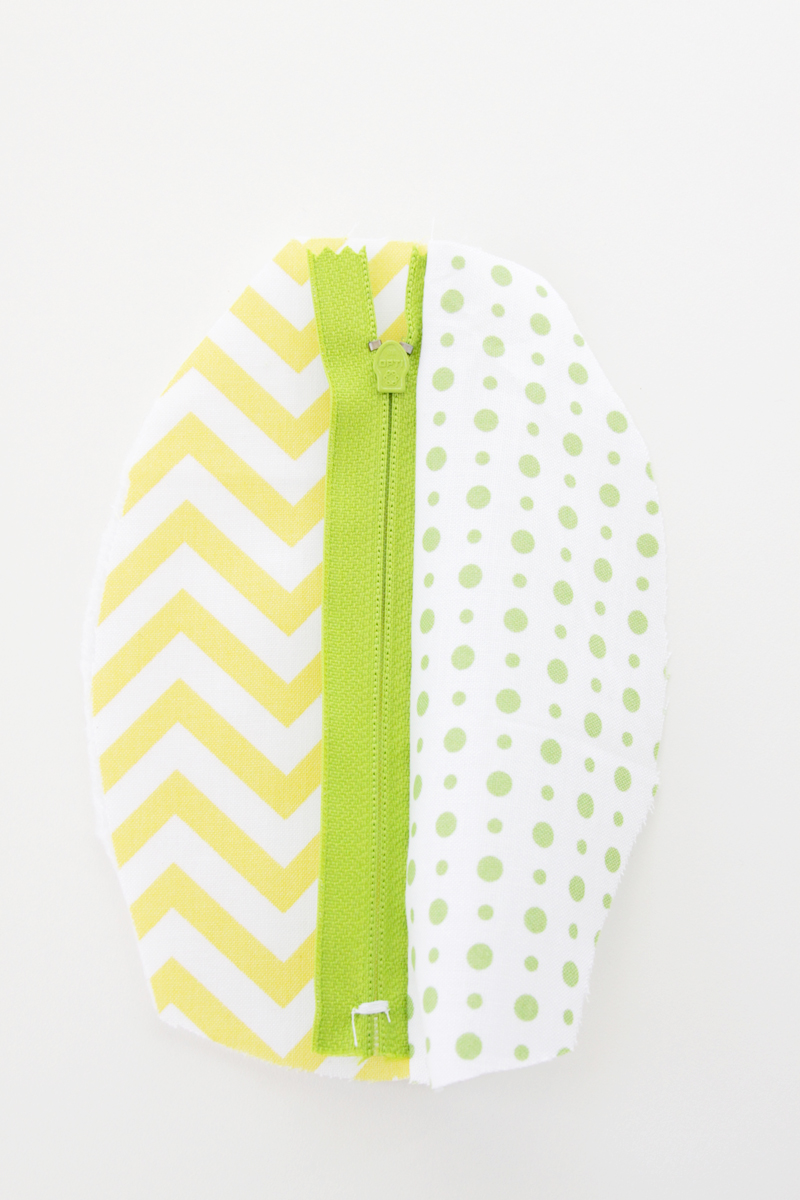
Open up the fabrics and press them away from the zipper. Repeat for the other side of the zipper, making sure the yellow fabrics are on the same side and will show when the right side of the zipper is facing up. Press and then sew along the edges of the fabric just outside the zipper seams.

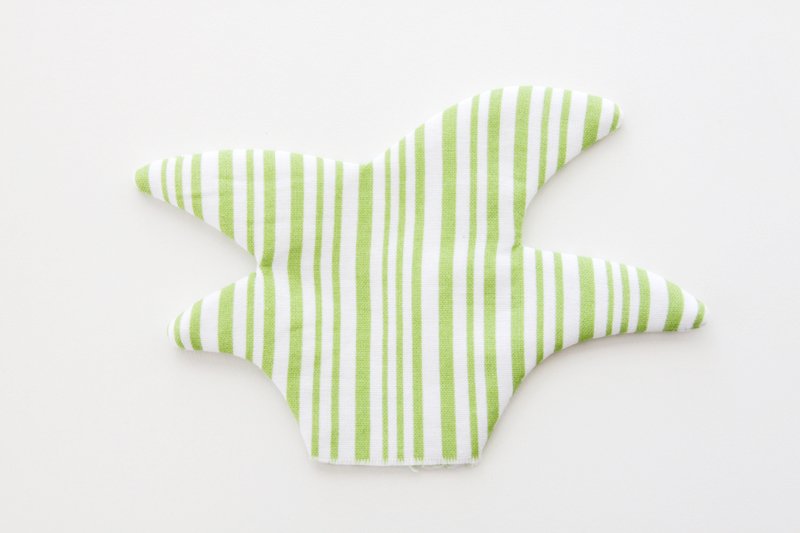
Place the two pieces of the top right sides together. Sew around all the leaves and leave the bottom open. Clip all your corners and curves. Turn the leaves right side out and press.

Top of Pineapple

Place the leaves on the top of the front pineapple piece, facing down. Sew the straight end of the leaves to the top of the pineapple with a 1/4″ seam allowance. Pin the long side leaves in towards the center so they don’t get caught when you’re sewing your side seams.

Now we’re going to sew the whole thing together. Start by laying the front lining piece face down. Then place the main front piece face up. Place the back pieces on top of this, with the zipper facing in. (So the lining faces out.) Pin everything together. Open up the zipper a bit now, or you will have trouble turning everything right side out later.

Sewing Zipper Pouch sides

Sew all the way around the pineapple with a 1/2″ seam allowance and trim all the seams.

Trim Edges of zipper pouch

Turn the pineapple right side out and press – and you are all finished!

Simple Pineapple Zipper Pouch

I think even the zipper side looks cute!

Pineapple Zipper Pouch

I’d love to see a photo if you make one up!

Happy Little Pineapple Zipper Pouch

Trying Something New | Candle Making

Monday, May 2, 2016

This month’s Michaels Makers challenge was to stretch our creativity and try something new!

DIY Candle Making

Michaels has everything from sewing kits to art kits and everything in between! My girls and I decided to try our hand at candle making. We’d never tried it before and this kit was the perfect way for us to get our feet wet!

DIY Candle Making

This candle making kit made it so easy and we loved it so much  we’re already making plans to create our own candles again soon!

Did you know that Michaels offers free classes in their stores? You can try out a new craft skill for just the cost of supplies.

DIY Candle Making

As you can see, another great way to explore your creativity is by trying out a craft kit.

DIY Candle Making

An InLinkz Link-up


A Family that Celebrates | 7 Easy Ways to Spice Up Cinco de Mayo This Year

Saturday, April 30, 2016

Celebrate Cinco de Mayo with Your FamilyI know a family who celebrates. They take crazy, seven-person selfies and wear color-coordinated clothes for the smallest reasons. They get donuts on birthdays and go out to their favorite restaurant when a kid passes the driving test or gets onto the basketball team or loses her first tooth.

No occasion is too small. `

I was recently listening to one of my favorite podcasts when the host, Gretchen Rubin, started talking about how they like to celebrate even the smallest holidays. Leap Day, Grandparents’ Day, National Pet Lover’s Day… The sky’s the limit!

I love the idea of being a family who celebrates.

The only thing is—in order for me to pull this off, it’s going to have to be Easy. With a capital E. I don’t want to get my holidays tangled up with stress, and I want to be able to follow through with what I plan.

This year, I’m starting with Cinco de Mayo because it’s right around the corner. I can’t wait to infuse a bit of spice into our family’s day. Want to join in?

Looking to add more traditions to your family? Here are 7 EASY ways to spice up Cinco de Mayo this year!7 Easy Ways to Spice Up Cinco de Mayo This Year

1. Collect some universal holiday decorations. 

How about a multicolor package of streamers? You’ll be set for any occasion. For Cinco de Mayo, you can go with the colors of the Mexican flag—green, white and red.

2. Turn on some Latin-inspired music.

I love Pandora’s “Latin workout” station because it has a fast tempo and you can’t help but smile while listening.

3. Cook something simple but delicious. 

We suggest this slow cooker tortilla soup, or make tacos (always a win!) with refried beans and this Mexican green rice on the side.

TampicoThis Cinco de Mayo, my family and I will be eating unreasonable amounts of guacamole, with Tampico orange juice to wash it down! I’ve already stocked up on the mango flavor to keep with our South American vibe for Cinco de Mayo. 🙂 Thanks to Tampico for sponsoring this post.

4. Skip cooking altogether, and go out to your favorite Mexican restaurant. 

Looking to add more traditions to your family? Here are 7 EASY ways to spice up Cinco de Mayo this year!5. Have your family dress for the day in the colors of the Mexican flag—green, white and red.

Done and done.

6. Go to the beach.

Did you know Mexico has almost 5,800 miles of coastline? If you happen to live near the beach, why not replicate the ambiance of a Mexican vacay by heading to the ocean. School day and all!

Looking to add more traditions to your family? Here are 7 EASY ways to spice up Cinco de Mayo this year!7. ¡Buy a piñata! 

For a tradition with big impact, this is it. Especially if you have young kids. If our family buys a piñata this year, I guarantee my kids won’t let us forget it next year. I’d take that as a very good sign. 🙂


Keep in mind that you in no way have to do all of these. Simply choosing one or two will go a long way toward spicing up your day and building traditions and memories that will become part of your family culture and your kids’ identity.

We’d love to hear—Does your family celebrate any of the small holidays?

Disclosure: This post was sponsored by Tampico Beverages. While I was compensated to write a post about Tampico, all opinions are my own. 

Ultimate Homemaking Resource Bundle

Friday, April 29, 2016

Does being a mom and homemaker ever feel a little too hard?

There’s no question that you love your family like crazy and you’d do anything for them, but we all know it can be an exhausting job.

If you’re anything like me, I bet you wish your home felt more put together and peaceful, you kept up with housework better, you were more consistent about serving healthy, homemade meals and you weren’t running ragged so much of the time.

The Ultimate Homemaking Bundle - over 90 eBooks, eCourses and practical printables filled with useful tips and tricks on homemaking... for moms by moms!

Because these families of ours? They matter more than anything else. Our job is so important, and we really want to do it right.  But so often, we end up feeling discouraged and even like we’re failing.

Maybe you wonder how you can keep up with it all and still have the energy and intentionality to be the kind of mom, wife and woman you want to be.

Now, I know as well as you do that homemaking is never going to be stress-free (though it sure sounds nice). But what if you had more (and better) tools to help make it stress-less?

That’s why I’m over the moon to tell you about something very special happening right now called The Ultimate Homemaking Bundle 2016.

The Ultimate Homemaking Bundle - over 90 eBooks, eCourses and practical printables filled with useful tips and tricks on homemaking... for moms by moms!

It was created to give you a plethora of amazing, high-quality resources to take some of the stress, overwhelm and difficulty out of homemaking and mothering.

To make you feel like you’re winning more often.

And to bolster you in the work you’re doing, because every awesome, hard-working mom deserves a little help sometimes.

The Ultimate Homemaking Bundle includes 93 hand-picked eBooks, eCourses, and printables, on topics that matter to moms such as:

  • organization, routines & creating a cozy home
  • recipes, grocery shopping and meal planning
  • budgeting and saving money
  • motherhood (no matter what age your kids are)
  • cultivating a strong marriage
  • faith (for you & your kids)
  • and even self-care (like exercise, weight loss, life planning and coloring books!)
  • and much more…

The Ultimate Homemaking Bundle - over 90 eBooks, eCourses and practical printables filled with useful tips and tricks on homemaking... for moms by moms!

You have a full year to download the eBooks and printables and take the online eCourses, and everything you’ve downloaded becomes part of your permanent library, so you can go back to it whenever you need it.

Plus, it comes with these FREE bonus offers from companies who know what homemakers need and want. Some are 100% free; other are yours for the cost of shipping only. You’ll get:

  • FREE Mrs. Meyer’s Dish Soap, Mrs. Meyer’s Multi Surface Spray, Grove Collaborative Spray Bottle, Grove Collaborative Scrubber Sponges and FREE 60-day VIP trial with FREE shipping from Grove Collaborative ($30 value)
  • FREE Online Class from Craftsy ($29.99-$69.99 value)
  • FREE Kids Discovery Box from GreenKidCrafts.com ($19.95 value)
  • $15 Gift Certificate to InkWELL Press ($15 value)
  • $15 Credit to Hope Ink Shop PLUS Two FREE 8×10 Art Prints with Any Purchase ($71)
  • FREE SPOT Treatment for Acne & Eczema OR a $15 Gift Certificate from Bloom Naturals ($15 value)
  • FREE 90-Day Pro Membership to ListPlanIt.com ($30)
  • FREE 1-Year MollyGreen.com Membership ($29 value)
  • FREE Hand Massage Routine Videos from Melt Couples Massage ($24 value)

It’s available for just 6 days – from now until Monday, May 2nd, 2016 at 11:59pm EST. That’s why the Ultimate Bundles team can offer so much, because they only have permission to sell it for such a short period of time.

The total value is an astonishing $1000+ (plus over $300 in bonuses), but you get it for just $29.97. That’s 97% off what it would cost to buy everything individually!

If you think getting all those homemaking & mothering helps for less than $30 sounds like a steal, then make sure to go HERE to see exactly what it includes and grab yours before this deal ends!

The Ultimate Homemaking Bundle - over 90 eBooks, eCourses and practical printables filled with useful tips and tricks on homemaking... for moms by moms!

“But Mommy, I’m Only a Little Bit Big.”

Thursday, April 28, 2016

It had been a really long day. I had a newborn, and our daughter Emily was in the midst of potty training. When she wet her pants for the fifth time that day, I did not think I could handle it anymore.

I angrily marched her to the bathroom, sat her on the toilet, and mumbled something about how she needed to be a big girl.

When eight words from my daughter stopped me in my tracks—

I’m ashamed to say, as I look back on this experience, that my anger brought her to tears.

As I stood there in the tiny bathroom with my arms folded across my chest, she looked up at me with her big brown eyes and said—

“But Mommy, I’m only a little bit big.”

It stopped me cold. My mood, my attitude, my perspective were all changed in that moment. I scooped her up and just held her, telling her how sorry I was for getting angry.

I knew I had been tough on her since I’d had the baby, and I had felt our relationship suffering because of my negativity.

But it wasn’t until this exchange that I realized where I had gone wrong and what I could do to make things better. I was expecting too much of her.

When eight words from my daughter stopped me in my tracks—

She was right; she was only a little bit big. And I needed to make sure my expectations of her were realistic.

I went on from this day changed for the better. It didn’t make this stage of life easier. The potty accidents and sleepless nights didn’t disappear—as much as I wish I could say they did! But my ability to handle them improved.

It’s moments like this one that change me—almost as much as I’ve been changed by the “big” days in my life. The day I left home. My wedding day. The day each of my children were born.

When eight words from my daughter stopped me in my tracks—


But what affects me most today—right now—are these small moments of realization.

When I begin to understand someone else’s point of view. When I align my expectations with reality.

When a line in a book stands out to me and answers a question in my heart. When a late-night conversation with my husband changes the course I’d been taking.

When I look at my children and catch a glimpse of who they really are and realize just how big they’re getting.

It’s the quiet, easy-to-miss moments that happen within the walls of my home that are changing me.

These moments are not often celebrated; pictures aren’t taken to mark the occasion. But they are recorded in my mind and written on my heart forever.

If you liked this post you might also enjoy…

  • Dear Mom of Big Kids
  • 18 Ways to Treat Yourself with More Love
  • 6 Ways Photography Helps me Savor Motherhood

It was the young-mom perfect storm. A newborn and a potty trainer. How eight words from my toddler changed me forever.


Whole Wheat Strawberry Muffins

Tuesday, April 26, 2016

Whole Wheat Strawberry Muffins – delicious muffin recipe made with whole wheat flour and fresh strawberries.  Perfect for breakfast or snacks!

Whole Wheat Strawberry Muffins - delicious muffin recipe made with whole wheat flour and fresh strawberries.  Perfect for breakfast or snacks!


Hello there!  This is Katie from The Casual Craftlete blog.  Last month I shared a recipe for an Easy Slow Cooker Chicken and Wild Rice Soup and today I am changing things up a bit.  One of my favorite foods to eat in the morning are muffins.  I thought I would make a muffin recipe with just a bit healthier ingredients by using whole wheat flour instead.  These Whole Wheat Strawberry Muffins do not disappoint.  They are full of flavor and taste great!

Whole Wheat Strawberry Muffins - delicious muffin recipe made with whole wheat flour and fresh strawberries.  Perfect for breakfast or snacks!


The weather is warming up here in Southern Illinois and soon it will be strawberry season.  They are generally ready to be picked Memorial Day weekend and I can’t wait.  In my opinion there is nothing better to eat than a fresh strawberry.  I usually buy a whole flat of strawberries, so I like to come up with several recipes to incorporate the berries.  I have a feeling I will be making these whole wheat strawberry muffins a lot this summer.

5.0 from 1 reviews
Whole Wheat Strawberry Muffins
 
Print
delicious muffin recipe made with whole wheat flour and fresh strawberries. Perfect for breakfast or snacks!
Author: Katie @ The Casual Craftlete
Recipe type: Breakfast
Cuisine: American
Serves: 11
Ingredients
  • 1 cup fresh strawberries, diced (plus extra for topping)
  • 1¾ cup whole wheat flour
  • ½ cup granulated sugar
  • ½ teaspoon salt
  • 2 teaspoons baking powder
  • 1 egg
  • 1 teaspoon vanilla extract
  • ½ cup whole milk
  • ¼ cup canola oil
Instructions
  1. Preheat oven to 35o degrees F. Line muffin tin with cups.
  2. In a large mixing bowl, combine flour, sugar, baking powder, and salt. Set aside.
  3. In a separate bowl, whisk together milk, oil, egg, and vanilla until well combined.
  4. Add diced strawberries to flour mixture and gently mix to coat.
  5. Pour the milk mixture into the flour mixture and stir until combine.
  6. Fill muffin cup ⅔ full and bake in preheat oven for 20 to 25 minutes, or until toothpick comes out clean.
  7. Eat right away or store in an airtight container up to one week.
3.4.3177

Whole Wheat Strawberry Muffins - delicious muffin recipe made with whole wheat flour and fresh strawberries.  Perfect for breakfast or snacks!

Since I am using whole wheat flour for this recipe, the muffin batter is thick.  Whole wheat flour is more dense than all-purpose flour.  The batter can quickly be made with just a few ingredients and mixed by hand.

Whole Wheat Strawberry Muffins - delicious muffin recipe made with whole wheat flour and fresh strawberries.  Perfect for breakfast or snacks!

I like to fill my parchment paper muffin cups 2/3’s of the way full.  The batter will rise just slightly while baking in the oven.  I also add extra strawberries to the top of each muffin just before baking.  That way you get more strawberries to eat and the muffins themselves look pretty.

Whole Wheat Strawberry Muffins - delicious muffin recipe made with whole wheat flour and fresh strawberries.  Perfect for breakfast or snacks!


These whole wheat strawberry muffins are easy to make and bake.  They are a delicious and slightly more healthy breakfast or snack option.

Whole Wheat Strawberry Muffins - delicious muffin recipe made with whole wheat flour and fresh strawberries.  Perfect for breakfast or snacks!


Thank you for letting me share my Whole Wheat Strawberry Muffins recipe.  I hope you enjoy these muffins as much as I do.  Have a fantastic summer!

YOU MIGHT ALSO LIKE:

Fatigue Fighter Muffins

Fatigue Fighter Muffins

Blueberry Banana Parfait

Blueberry Banana Parfait

 Applesauce Muffins

Applesauce Muffins

7 Ways to Encourage Family Connection on the Road

Tuesday, April 26, 2016

When was the last time you spent multiple hours with your family, distraction-free? Road trips provide just the opportunity. Enjoy these 7 ways to encourage family connection on the road.

When was the last time you spent multiple hours with your family, distraction-free? Road trips provide just the opportunity. Enjoy these 7 ways to encourage family connection on the road.

I know a lot of people feel like spending 10+ hours in the car isn’t their idea of a fun family vacation.

“Are we there yet?” Sibling fights. Bathroom breaks every few miles. The list goes on…

As a family of six, traveling by road is the most economical way for us to get out and explore, and we’ve been on some long road trips together. We have our moments, but in the end, these trips are always remembered fondly and we’ve learned a lot from the hours spent in the car together.

When was the last time you spent multiple hours with your family, distraction-free? Road trips provide just the opportunity. Enjoy these 7 ways to encourage family connection on the road.

On our spring break travels from Yosemite to the California Coast, traveling by RV reminded me of all of the up sides to family road trips. In the RV, I loved having the chance to sit in the back with the kids, rather than sitting up in the captain seat. The kids and I played cards, cuddled, watched movies, and laughed together for hours on end. It made the hours on the road pass by quickly and provided so many opportunities for connection.

I’m fully converted to the benefits of RV travel. 🙂

Thanks to Outdoorsy, an online service that makes it easy to rent a recreational vehicle from an owner near you, RV travel is more accessible than ever for families. We picked up our RV from the company Heightened Path RV Rentals in Phoenix, Arizona.

When was the last time you spent multiple hours with your family, distraction-free? Road trips provide just the opportunity. Enjoy these 7 ways to encourage family connection on the road.

But no matter your seating arrangements, road trips provide a rare opportunity to interact with each other for a sustained amount of time. There’s no wifi, no friends or activities pulling your kids all different directions.

If you can get past the hiccups—from traffic detours to a cranky kid—you can really use road travel to build those family bonds.

7 Ways to Encourage Family Connection on Road Trips

Reading

I love the feeling of diving into another world through a good book, but what I love even more is doing it with my family. By listening to audio books in the car, the story becomes something we share, and we learn life lessons and stretch our imaginations in the process. Here’s a great resource from Modern Mrs. Darcy: 40 Favorite Audio Books for Kids.

Conversation

With the kids strapped into the car, you have their undivided attention. 🙂 Make it a point to have some meaningful family conversations. Even just taking a few minutes to share a story from your childhood or a grandparent’s life will bolster your intergenerational family identity.

This list of conversation starters for the dinner table can be applied so well to your time on the road.

When was the last time you spent multiple hours with your family, distraction-free? Road trips provide just the opportunity. Enjoy these 7 ways to encourage family connection on the road.

Games

Playing games together is always a fun way to pass the time and laugh together. My kids love to play Road Trip BINGO, and I really appreciate that it keeps them engaged with the world around them as we pass through it.

Other favorites of ours include the alphabet game, the license plate game, twenty questions, and—my personal favorite—”Would you rather?”

Music

Music is a huge part of our road adventures. I usually leave it up to our oldest to put together a playlist for our trips. We listen to it over and over again, and more often than not, one song will become our theme song for a specific trip. I still remember the song we connected with on our trip from Canada to Arizona, and every time we hear it now, it brings back the excitement and jitters of moving to a new place.

I think music has such a strong power to connect us with memories. It’s an amazing tool for parents wanting family travel to leave an impression on their kids.

When was the last time you spent multiple hours with your family, distraction-free? Road trips provide just the opportunity. Enjoy these 7 ways to encourage family connection on the road.

Down Time

Time apart may not directly strengthen our connections, but it allows us to bring our best selves to the group when we’re ready. That, to me, is worth everything.

When siblings (or spouses!) are in close proximity with each other a for hours at a time, disagreements are bound to arise. Encouraging everyone to have some alone time is essential for building connections on the road.

This is one thing that was SO great about traveling by RV. We had so much room to spread out and take a quiet moment when we needed it.

So how do you make space for alone time in a vehicle? Try switching spots at rest stops along the way so the kids are sitting by someone new. Bring electronics and headphones so your kids can enjoy some time to tune out and recharge. And of course, I like to encourage naps! (Sometimes by example…) 😉

When was the last time you spent multiple hours with your family, distraction-free? Road trips provide just the opportunity. Enjoy these 7 ways to encourage family connection on the road.

Attitude

The most frustrating times I’ve experienced on road trips is when the ideal I had in my head just wasn’t a reality. The kids will fight; you will get on each other’s nerves; you may have car troubles; and you may have traffic or weather delays along the way.  Expect these moments, and don’t let them bring you down. They’re all part of the overall experience. No family road trip will go off without a hitch; it’s how you react to these imperfect moments that will set the tone for your vacation.

When was the last time you spent multiple hours with your family, distraction-free? Road trips provide just the opportunity. Enjoy these 7 ways to encourage family connection on the road.

Re-live Road Trip Memories

For our family, travel experiences don’t end the moment we get home.

As parents, we work hard to provide meaningful experiences that we want our children to remember throughout their lives. Exchanging photos, posting them to a shared photo stream, putting together a slideshow—all are excellent ways to reinforce your memories so that they stay with your children for much longer.

I especially love to document our travel with photography {8 Travel Photography Tips to Help You Capture the Heart of Your Experience} and make a vacation photo book that we can look through again and again.

You may also consider encouraging your kids to journal about their experience on the road when you get home or even give the kids a journal while ON the trip to record their memories as you go.


If you’ll be hitting the road this spring or summer, I hope these tips and resources help you create the most memorable (if imperfect!) road trip your family has taken yet.

Learn more about Outdoorsy and check out some cool RVs to rent for a holiday by visiting Outdoorsy.co. Get personalized help by calling 1-415-930-4841, chatting with a member of the team on the site, or emailing [email protected]. They’d love to help you plan your next Outdoor Family Adventure!

When was the last time you spent multiple hours with your family, distraction-free? Road trips provide just the opportunity. Enjoy these 7 ways to encourage family connection on the road.

Treasure Box for Collecting Nature

Sunday, April 24, 2016

Hey everyone, it’s Jennie from The Lovely Little Nest with a project that me and my two-year-old are really excited about!  It’s a Treasure Box for collecting nature.

Create a Treasure Box for Collecting Nature this summer with the kids.

I’m so happy that the weather has been beautiful and we’ve been able to resume our daily routine of taking a walk outside.  I’ve quickly realized that walking with a two-year-old can result in collecting rocks, leaves, flowers, and sticks, and bringing those little treasures home.

Create a Treasure Box for Collecting Nature this summer with the kids.

I remember when I was young, and how precious (and messy) my collections were to me, so I decided to create a treasure box for my little one to house her collection of nature items.  This box is where she keeps all her little treasures, and when it’s full, she has to sort through what she wants to keep and get rid of what doesn’t fit.  It’s become a fun activity and a great way to stay organized!

Create a Treasure Box for Collecting Nature this summer with the kids.

Supplies:

Wooden Box

Pencil

Scrapbooking Paper

Wood Burning Kit

Stain

Rag

Rubber Gloves

I found a pretty good selection of wooden boxes at the dollar store, and the wood burning kit was from a craft store with a 50% off coupon, which came to about $15.  It’s definitely addictive, and I’ve used it on quite a few projects already!

Create a Treasure Box for Collecting Nature this summer with the kids.

Create a Treasure Box for Collecting Nature this summer with the kids.

Instructions:

1.  Using your pencil, draw your design onto your raw box.  For mine, I sketched my little one’s name, and then let her have the pencil and scribble on the sides until I thought there was enough space covered.  This step was really fun for her, she loved being a part of it and seeing her design come to life.

Create a Treasure Box for Collecting Nature this summer with the kids.

Create a Treasure Box for Collecting Nature this summer with the kids.

2.  Plug in your pen to heat up, and then go over your child’s pencil designs, burning them into the wood

Create a Treasure Box for Collecting Nature this summer with the kids.

Create a Treasure Box for Collecting Nature this summer with the kids.

3.  Once you’ve burned everything in to the box, take your stain and wipe it on with a rag, wiping off any excess right away for a lighter finish.  My absolute favourite stain colour is Minwax Colonial Americain 230.

Create a Treasure Box for Collecting Nature this summer with the kids.

4.  Once the stain has dried, pick some cute scrapbooking paper, cut it down to size, and glue it into the box.  I love how much more feminine and lovely it made the box when you open it, and Georgia loved picking out the paper herself.

Create a Treasure Box for Collecting Nature this summer with the kids.

Create a Treasure Box for Collecting Nature this summer with the kids.

Create a Treasure Box for Collecting Nature this summer with the kids.

5.  Go on a walk and start this summer’s collection!

Create a Treasure Box for Collecting Nature this summer with the kids.

Create a Treasure Box for Collecting Nature this summer with the kids.

Create a Treasure Box for Collecting Nature this summer with the kids.

Create a Treasure Box for Collecting Nature this summer with the kids.

Create a Treasure Box for Collecting Nature this summer with the kids.

Frozen Coconut Pudding Graham Sandwiches

Thursday, April 21, 2016

Just 5 ingredients make up these no bake frozen coconut pudding graham sandwiches. Freeze them individually for an easy warm weather snack!

frozen-coconut-pudding-graham-sandwich-8

Hi there! It’s Julie from Tastes of Lizzy T.

Has spring weather hit your town yet?  We live in Ohio where the weather is crazy. Within a span of just 6 days we went from a snowy 30 degrees to sunny 80 degrees. We’ve had beautiful sunshine and warm temperatures the past week, though. I’m hoping spring is here to stay!

With warm weather comes lots of play outside. It seems like my kids always need more snacks during the warm weather season since they are so much more active. Graham sandwiches are super easy to make and serve. I love keeping these Frozen Coconut Pudding Graham Sandwiches on hand for a quick, cool solution for those hungry appetites.

frozen-coconut-pudding-graham-sandwich-2

These graham sandwiches are no-bake, take minutes to put together, and have just 5 ingredients:  graham crackers, a box of pudding, milk, cool whip and coconut.

frozen-coconut-pudding-graham-sandwich-6

Here’s how to put them together:

In a bowl, mix a small box of pudding with 2 cups of milk. Coconut pudding has actual pieces of coconut in it so the pudding mixture won’t be completely smooth.  Set this bowl in the fridge to firm up.

Line an 8×8 pan with waxed paper or aluminum foil. Layer graham cracker halves to fill the bottom of the 8×8 pan. As you can see in the above picture I fit 3 graham cracker halves across the pan, then had to take 1/4 of a cracker to fill in the last little bit. In total I used 21 graham cracker halves.

Mix an 8 ounce container of whipped topping with the coconut pudding, then spread this mixture over the graham crackers. Top with another layer of graham crackers. The graham sandwiches hold together best if the top and bottom layer of graham crackers are facing the same direction.

frozen-coconut-pudding-graham-sandwich-10

Freeze for at least 4 hours or until the bars are frozen. Cut the bars along the graham crackers lines. If you’d like, you can allow the bars to sit for 3-5 minutes to soften the filling just a bit, then dip the edges in shredded coconut.

frozen-coconut-pudding-graham-sandwich-11

Wrap the bars individually in waxed paper. My kids love them this way. Their own personal “ice cream” graham sandwiches.

I hope you’re enjoying a lot of sunshine this spring. Let me know your favorite thing to do with your kids in the springtime!

Frozen Coconut Pudding Graham Sandwiches
 
Print
Just 5 ingredients make up these no bake frozen coconut pudding graham sandwiches. Freeze them individually for an easy warm weather snack!
Author: Julie
Recipe type: Dessert
Serves: 9
Ingredients
  • 21 honey graham cracker halves
  • 1 box coconut instant pudding (3.4 ounces)
  • 2 cups milk
  • 8 ounces frozen whipped topping, thawed
  • ¾ cup shredded coconut (sweetened or unsweetened)
Instructions
  1. Line an 8x8 pan with wax paper or aluminum foil.
  2. Lay down 9 squares of graham crackers on the bottom of the pan. (Break a cracker into fourths if there is still more room in the pan to completely fill the bottom.)
  3. In a small bowl, combine the dry pudding mix with 2 cups of milk. Whisk together until the mixture is smooth. Place the bowl into the refrigerator for 4-5 minutes to set.
  4. Once the pudding has soft-set, fold in the Cool Whip.
  5. Gently pour and spread this mixture over the graham crackers. Smooth the pudding mixture so that it is even on top.
  6. Place the remaining squares of graham crackers over top the pudding mixture, lining up the crackers in the same way as you did the bottom. (The graham sandwiches will stay together the best this way.)
  7. Cover and freeze for 4 hours, or until they are set.
  8. Once the grahamwiches are set, cut the bars into 9 squares. Allow the bars to sit for 3-5 minutes at room temperature.
  9. Place the shredded coconut on a plate. Take the grahamwiches and press their sides into the coconut so that some sticks into the frozen pudding. Wrap each sandwich individually in waxed paper if desired. Freeze until serving.
3.4.3177

5 Ways to Weave More Storytelling into Your Family’s Life

Thursday, April 21, 2016

I’m often a bit stunned at how my lectures fall on deaf ears, where my stories are received with rapt attention.

It’s just one of the many benefits of telling family stories.

Want to pass on your values and raise kids who are brave and kind? 5 ways to use the power of story to help you achieve that!

I can tell my children to be kind or honest or hard-working. OR I can show them people who were.

But as you know, it takes a little more thought and creativity to tell a story, no matter how much we believe in their power.

I think these five tips will help you weave more storytelling into your family’s life and experience what a positive impact it can make.

5 Ways to Weave More Storytelling into Your Family’s Life

1. Start thinking of yourself as a storyteller.

I know that line makes some of us incredulous. You may feel uncomfortable in a storyteller’s shoes, worrying about your oration skills or preferring to listening instead of talk.

But a story isn’t a story unless it’s told. Your family stories NEED to be shared. Refer back to this post on the role you can play in family history RIGHT NOW, if you still need convinced. After returning home from RootsTech a few months ago this idea has been on my mind a lot and I’m determined to work at being a better storyteller!

Want to pass on your values and raise kids who are brave and kind? 5 ways to use the power of story to help you achieve that!

2. Brainstorm family stories that are applicable to your children. 

Think about what obstacles your grandparents faced in their lives, as well as your parents’ obstacles and your own. Stories of your family working through hard things are the very best stories you can tell your kids, because they help kids believe that they can do the same. Familysearch.org is a great place to turn when it comes to finding and researching those family stories!

Also, brainstorm other character traits you want your children to develop, and find stories that illustrate them.

And lastly, don’t forget the stories that are just plain fun. The fun and the funny stories build our families up and teach our kids to find humor and joy in life.

Want to pass on your values and raise kids who are brave and kind? 5 ways to use the power of story to help you achieve that!

3. Look for small pockets of time. 

It may sound challenging to make room in our busy lives to share family stories. But storytelling doesn’t need a designated day or time, it doesn’t require more than five minutes, and it can be done while you’re doing something else!

The family table is a natural time to tell stories. (I like it when my kids’ mouths are busy chewing!) And as parents, we spend a lot of time transporting our kids from one place to another. These are perfect times to open up and share some stories.

Want to pass on your values and raise kids who are brave and kind? 5 ways to use the power of story to help you achieve that!

4. Use photos to help family stories come alive. 

My personal favorite time to share some stories is right before bed, when I climb under the covers with one of my kids and bring along a favorite family photo book.

Photos—whether they are from a year ago or decades ago—have so much power to connect us to our stories.

For inspiration, check out these top 5 places to print photo books.

5. Reinforce the habit by asking your children this question:

“In one to three words, how did hearing that story make you feel?”

I think the answers you hear will motivate you to keep it up. Answers like “love” or “belonging.”

“When we turn our hearts towards our ancestors something changes inside us. We feel part of something greater than ourselves.” Russell M. Nelson

Want to pass on your values and raise kids who are brave and kind? 5 ways to use the power of story to help you achieve that!

If you enjoyed this post you might also like…

The Role You Can Play in Family History Right Now

One Year to Organized Photos

Top 5 Places to Print Photo Books

How to Tell Your Family Story in 5 Steps with Meaningful Photo Books

« Previous Page
Next Page »

Primary Sidebar

Rebecca Cooper — Founder, Simple as That Blog

Hello, I'm Rebecca. Welcome to my blog, Simple as That. Come along as we embrace simplicity in crafting, photography, travel, and family life. Read more about me.

Newsletter

Get the latest updates from Simple as That delivered to your inbox.

Join for Free

Beyond Snapshots: Mastering the Art of Mobile Photography

Connect

  • Bloglovin
  • Facebook
  • Instagram
  • Pinterest
  • Twitter

Follow On Pinterest

Visit Rebecca - Simple as That Blog's profile on Pinterest.

Categories

  • Crafts / DIY
  • Holidays
  • Motherhood
  • Organization
  • Photography
  • Printables
  • Recipes
  • Simple Living
  • Travel
  • Wellness

Our Privacy Policy

Follow on Instagram

Instagram has returned invalid data.

Printable 2023 Calendar

Our printable calendars and organizational pages have been essential in keeping our home and my life in order and I guarantee they will be a help to you too!

Click here to learn more

© Simple as That Blog, 2017 · Design by Brian Gardner

Simple as That Blog

Facebook / Instagram / Pinterest / Twitter / Contact