• About
    • About Rebecca
    • Meet the Team
    • Media Kit
    • FAQ
  • Photography
  • Holidays
  • Recipes
  • Printables
  • 2019 Calendar
  • Write for Us
  • Beyond Snapshots

Simple as That

Making Everyday Beautiful

Blog

Basic Buttercream Frosting Recipe

Tuesday, September 27, 2016

This Basic Buttercream Frosting Recipe is the only frosting recipe you’ll ever need! It’s light, fluffy and turns out perfectly every time!

This Basic Buttercream Frosting Recipe is the only frosting recipe you'll ever need! It's light, fluffy and turns out perfectly every time!

I love decorating cupcakes for my kids parties and we always make the same frosting. Let me rephrase that, my husband always makes the same frosting. He’s the designated frosting aficionado in our home. We make the perfect pair! He makes the frosting and I use it to decorate.

Basic Buttercream Frosting Recipe
 
Print
Ingredients
  • ½ cup unsalted butter, softened
  • 2 cups powdered sugar
  • 2 tablespoons milk
  • 1½ teaspoons vanilla or almond extract
Instructions
  1. Cream softened butter until smooth and fluffy.
  2. Beat in powdered sugar until mixed completely.
  3. Pour in milk and beat for an additional 3-4 minutes.
  4. Mix in vanilla / almond extract.
3.5.3208

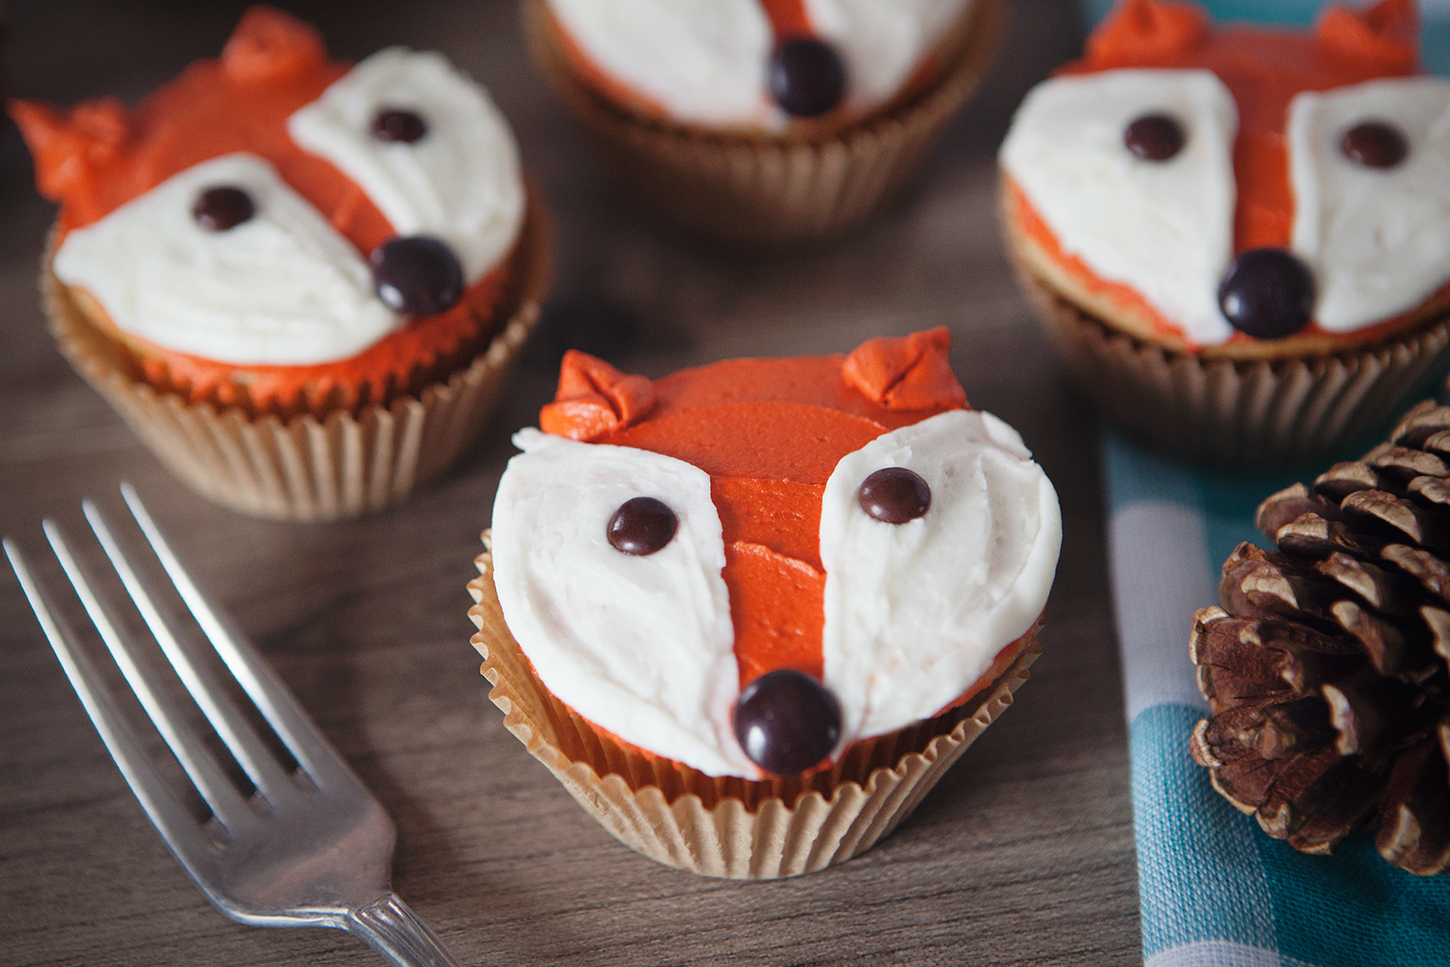
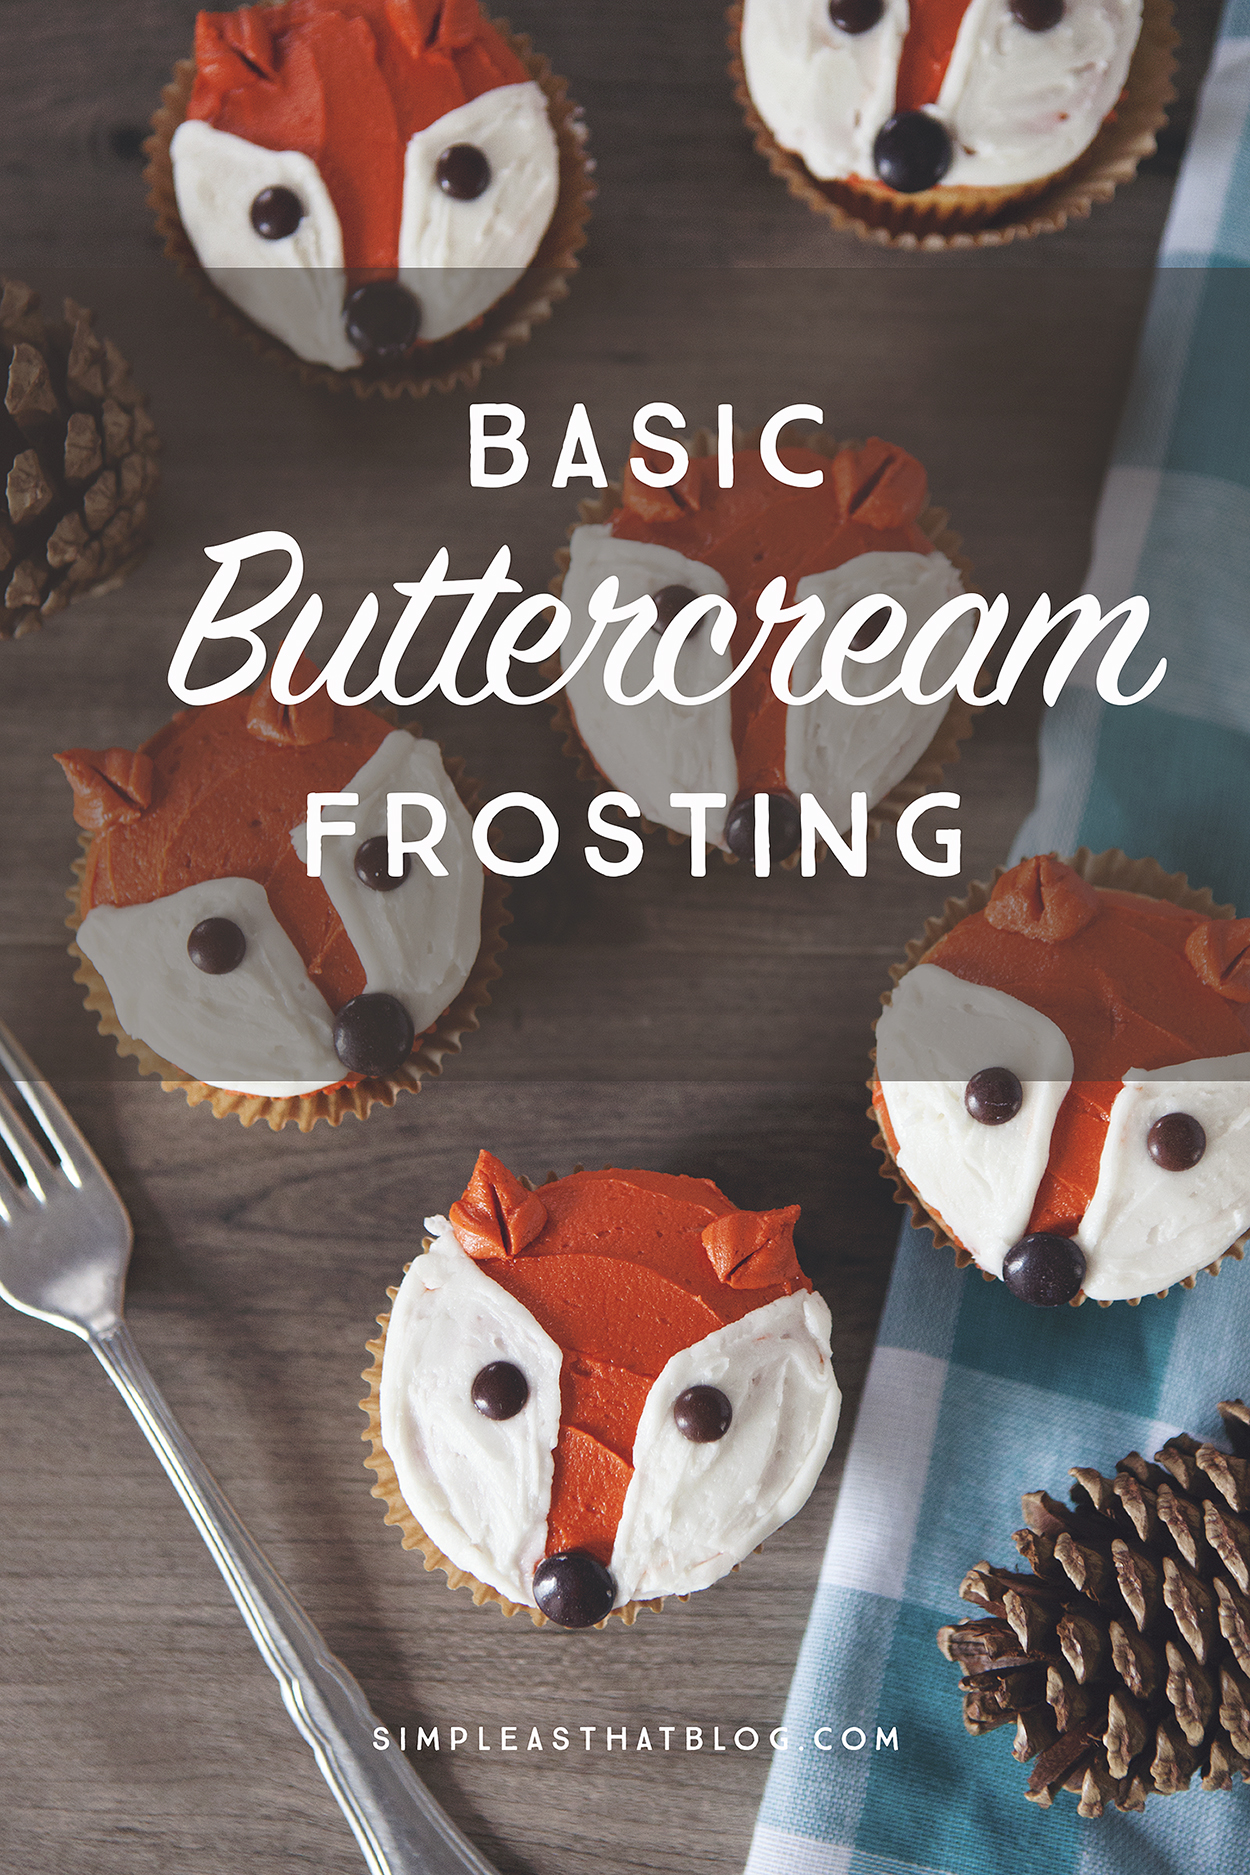
This basic buttercream frosting recipe is the one we use every time for cupcake decorating. We used it for these Snow Princess cupcakes, monster cupcakes and most recently these cute fox cupcakes.

The recipe calls for vanilla – but here’s our secret ingredient: almond extract. I just love the pop of flavor the almond extract gives the frosting.

If you’re looking for the full how-to for these fox cupcakes you’ll find the post here.

This Basic Buttercream Frosting Recipe is the only frosting recipe you'll ever need! It's light, fluffy and turns out perfectly every time!

Chocolate Covered Halloween Pumpkin Pretzels

Tuesday, September 27, 2016

Cute, yummy and a fun treat to make with the kids, these chocolate covered halloween pumpkin pretzels can be put together in just a few minutes time!

Cute, yummy and a fun treat to make with the kids, these

Making the holidays memorable for our kids while keeping things simple can be a delicate balance at times. These Chocolate Covered Halloween Pumpkin Pretzels are just the right amount of spooky holiday fun while still being easy to make and easy on the budget!

Cute, yummy and a fun treat to make with the kids, these

If you’re looking for something you can make in bulk for a school party or for your kids friends this Halloween these little pretzel treats are just the thing!

Cute, yummy and a fun treat to make with the kids, these

Ingredients

Orange and Black Wilton Candy Melts

Pretzel Twists

Wax Paper

Toothpicks

Candy Eyes

Lime Tootsie Rolls

Instructions

Chop lime flavored tootsie rolls into small pieces. Mold with fingers to form pumpkin stems.

Melt orange candy melts in a microwave safe bowl. Heat in 30 second intervals, stirring well in between until chocolate is completely melted.

Cute, yummy and a fun treat to make with the kids, these

Dip pretzels in chocolate, covering generously. Place on cookie sheet lined with wax paper. Fill in entire pretzel with melted chocolate.

Add eyeballs and tootsie roll stems to each pumpkin pretzel while chocolate is still warm.

Cute, yummy and a fun treat to make with the kids, these

Place in refrigerator to cool. Remove when chocolate is completely hardened.

Melt black candy melts according to directions above. Using a toothpick give each of your little pumpkin pretzels a unique personality by adding silly faces. I think my favorite has to be the little vampire pumpkins we made – aren’t they cute!?

Cute, yummy and a fun treat to make with the kids, these

Place pretzels in refrigerator again to cool. Once the black chocolate has completely hardened, remove from refrigerator and they’re ready to eat!

Cute, yummy and a fun treat to make with the kids, these

This batch of pumpkin pretzels disappeared quickly at our house and my kiddos are already asking when we can make some more!

Cute, yummy and a fun treat to make with the kids, these

If you liked this post, more Halloween fun we thought you might enjoy!

Woodland Creature No-Carve Pumpkins

Raccoon and Fox No-Carve Pumpkins

Silly Spider Halloween Hairdo

Dress up a simple bun with this silly spider hairdo for Halloween!

Tips for Capturing Spooky Silhouette Photos with Your Phone

There are so many fun moments to capture at Halloween, why not try your hand at a spooky silhouette? It’s easier than you think, using nothing but your phone!

Bat Book Page Banner

Create a simple Halloween Banner

PopRocks Halloween Gifts

Inexpensive Pop Rocks Halloween Gifts


Cranberry Apple Stove Simmer Pot

Monday, September 26, 2016

Make a Cranberry Apple Stove Simmer Pot to celebrate the beginning of fall. Your house will smell of citrus and spice and all things cozy.

Cranberry Apple Stove Simmer PotWe have officially entered my favorite season – FALL! I cannot get enough fall. The changing leaves, the chill in the air, the pumpkin spice lattes… I love everything about fall. Fall is a very special time in New England. People come from all over the world to drive around and see our foliage. The trees are bright red, orange, and gold. It truly is stunning and a must-do once in your life.

I take my fall very seriously. As soon as the weather starts to change, I want everything in my house to be cozy and warm. I bring out the plaid blankets, pull the basket of sweatshirts to the back door (for easy grabbing when it starts to get chilly in the evenings), and want my house to smell like citrus and spice. A blog reader gave me the idea to have a simmer pot on the stove all day and I’ve taken her idea and run with it.

Cranberry Apple Stove Simmer Pot

The beauty of a simmer pot (think of a bowl of fresh potpourri) is that you can use what you have on hand. I had these things in my fridge and spice cabinet, so that’s what I used.

  • 1 cup apple cider
  • 1 cup fresh cranberries
  • 3 cinnamon sticks
  • 10-15 whole allspice
  • 10-15 whole cloves
  • 1 vanilla bean (I had this leftover from some whipped cream and it was dried out, I’m not normally this extravagant.)
  • peel from one lemon
  • peel from one orange

Feel free to add what you like to suit your tastes. You could add some essential oils, branches from a pine tree, cardamom, the possibilities are endless. 

Cranberry Apple Stove Simmer Pot

Put everything into a small to medium saucepan.

Cranberry Apple Stove Simmer Pot

Bring to a bubble over medium heat, then reduce to the lowest flame you can.

Cranberry Apple Stove Simmer Pot

Let simmer all day. Add more water if needed. You can probably reuse this mixture for a few days until the scent is gone. I’d transfer it to a container and keep it in the fridge. Add it back to a pot and reheat.

Cranberry Apple Stove Simmer Pot

How do you like to celebrate fall?


Pumpkin Pie Energy Bites

Saturday, September 24, 2016

Pumpkin Pie Energy Bites – Little bites of pumpkin pie that you can feel good about eating. These energy balls are packed with healthy ingredients that make them the perfect snack that tastes like dessert.

Little bites of pumpkin pie that you can feel good about eating. These energy balls are packed with healthy ingredients that make them the perfect snack that tastes like dessert.

Happy Fall Ya’ll!! It’s Tiffany from Feel Great in 8 back again with another new energy bite recipe I know you’re going to love.

Did you see the other delicious flavors?

Coconut Lime Energy Bites

No Bake Chocolate Energy Bites

You definitely need to try them all, but I totally understand if you try this one first. It might be my most favorite so far.

Fall is in the air and it doesn’t get much better than fall colors on the trees, crisp air, and of course pumpkin flavored everything. Am I right?

These pumpkin pie energy bites are the perfect way to indulge your pumpkin pie cravings. All the flavor and sweetness of pumpkin pie, but crammed with protein, healthy fats, and fiber to help you stay feeling full and satisfied for hours.

The only thing better than pumpkin pie is a pumpkin pie snack you can enjoy every day guilt-free!

Pumpkin Pie Energy Bites - Little bites of pumpkin pie that you can feel good about eating. These energy balls are packed with healthy ingredients that make them the perfect snack that tastes like dessert.

The flavor is just as good as it looks, I promise. Hurry and whip up a batch of these delicious bites and you’ll see exactly what I mean.

Before I share the recipe though, let me just give you a quick heads up on the ingredient list. There might be a few things on there that you don’t already have in your kitchen, but don’t let that scare you away. This recipe is super versatile, there are lots of adjustments you can make if you need to. Here are some ideas…

Pecans, chia seeds and flaxseeds all add healthy fats and fiber that are great at helping to keep you feeling full. You can also substitute any of them for the others in this recipe. Use 2 tablespoons of chia if you don’t have flaxseeds, or the other way around. Or, if you don’t have chia or flaxseeds, just add extra pecans.

The one thing I don’t want you to leave out through, are the dates. I know they feel intimidating if you’d never used them before, but they are an amazing natural sweetener and help bind everything together. You can find them at your locfal grocery store (I get mine in the bulk section), and I promise you can’t even taste them in this recipe.

Try them, you won’t regret it. 🙂

Pumpkin Pie Energy Bites
 
Print
Little bites of pumpkin pie that you can feel good about eating. These energy balls are packed with healthy ingredients that make them the perfect snack that tastes like dessert.
Serves: 24 bites
Ingredients
  • 2 cups pitted dates*
  • 2 cups old fashioned oats
  • ½ cup pumpkin puree
  • 2 tablespoons pure maple syrup
  • ½ cup pecan halves
  • 1 tablespoon chia seeds
  • 1 tablespoon flaxseeds
  • 1 tablespoon pumpkin pie spice
  • 2 teaspoons pure vanilla extract
  • ¼ teaspoon salt
  • *If the dates are dry or hard, let them soak in hot water for 10 minutes, then drain and pat dry.
Instructions
  1. Put dates in a 14 cup food processor (You'll need a large capacity food processor for this recipe. If you don't have one that big, just cut the recipe in half). Pulse dates until they are in small pieces and start to form a ball.
  2. Add the oats, pumpkin, maple syrup, pecans, chia seeds, flaxseeds, pumpkin pie spice, vanilla extract and salt. Pulse to combine.
  3. Transfer mixture to a bowl. Cover and refrigerate for 30-45 minutes. Scoop heaping tablespoons of the dough and roll into balls.
  4. Store in an airtight container in the refrigerator. These also freeze beautifully.
3.5.3208

Pumpkin Pie Energy Bites - Little bites of pumpkin pie that you can feel good about eating. These energy balls are packed with healthy ingredients that make them the perfect snack that tastes like dessert.

If you like this recipe, you’ll also enjoy the ones listed below along with these healthy recipes.

Coconut Lime Energy Bites

These little bites are the perfect snack! Gluten free, made with only four healthy ingredients and no refined sugar!

No-Bake Chocolate Energy Bites

No Bake Chocolate Energy Bites - The perfect healthy, high protein, low sugar snack that tastes like dessert!

Collect Moments, Not Things

Thursday, September 22, 2016

The rain lightly pounded the roof of our vehicle while we sat inside, safe and warm, sheltered from the sudden summer storm that had moved in.

We passed around sandwiches and chips, laughing together and watching tourists dash for their cars.

By the time the storm passed, we piled out of the vehicle and set off on our hike around Moraine Lake, which was by then damp, fragrant… and pleasantly tourist-free. 🙂

Do you ever feel caught in the race to put your kids in more extracurriculars and buy them more toys... To land a better salary and own a bigger house? My best (and simplest) antidote is this....

It’s now been several weeks since our last trip to Banff National Park, but my mind keeps going back to the minutes we spent in that parking space at the base of the trail, cuddled up in our vehicle while the rain dripped all around us.

It seems that whenever we finish a big outing or vacation together, the moments that stand out to me most aren’t always the “loud, shiny” ones, like walking on top of a glacier or canoeing the Bow River.

It’s the more unassuming moments that stay with me.

It’s the memory of standing side by side with my family at the trail head overlooking Peyto Lake, close to sunset, as we watched a squirrel scavenge for food and remarked to each other (for the millionth time) just how brilliant blue the water actually is in real life.

Do you ever feel caught in the race to put your kids in more extracurriculars and buy them more toys... To land a better salary and own a bigger house? My best (and simplest) antidote is this....

It’s the time we stopped in the middle of the road to let a herd of elk cross. All of us quiet, in awe of the animals being so close and not wanting to interrupt the moment.

It’s a rest stop along the trail with my middle daughter, while the rest of the tribe caught up to us.

It’s the kids’ excitement over a puddle filled with tadpoles—right in the grandeur of Banff National Park, no less.

It’s the thrill I see in my children’s eyes when I let them stay up late on our last night to wander downtown Banff under the first stars.

These moments are the only souvenirs I need from any adventure we go on.

Do you ever feel caught in the race to put your kids in more extracurriculars and buy them more toys... To land a better salary and own a bigger house? My best (and simplest) antidote is this....

When It All Began

My love for the small moments circles back to the year we spent on a tiny island in the Dutch Caribbean, away from family and so many of the comforts of home. It was then that we learned how richly you can live when you’re living with less.

Instead of collecting more after-school activities and Amazon packages, we began to collect memories—moments.

Our new mantra, “collect moments, not things,” then carried us through the transition back to living in the States, where hustle and accumulation can be so tempting. {How to Make Time for What Matters Most}

Collect moments, not things—an antidote to buying more, owning more, and feeling happy LESS. Plus, a simple but effective formula for finding more "moments" right in the middle of regular living.

A Simple Formula for Experiencing More “Moments”

In the years since our island adventure, we’ve experienced more of these precious moments—right in the middle of regular living—than I ever remember experiencing before we left. I think it’s partly because I’m more watchful, more mindful of them, but also because I’ve noticed a few elements that consistently help us create them:

1. A slower pace

When my mind is running faster than my feet, I know the special moments are going to be harder to spot. But when I clear some white space in our calendar, the magic is far more likely to happen.

Going hand in hand with pace is the distraction of our “things.” A mind that is occupied with its possessions has less room to notice and appreciate the nonmaterial joys of life.

Collect moments, not things—an antidote to buying more, owning more, and feeling happy LESS. Plus, a simple but effective formula for finding more "moments" right in the middle of regular living.

2. The great outdoors 

While nature is by no means the only place we can experience in-the-moment living, it seems to be the very best conduit.

“There’s no wifi in the forest, but you will find a better connection.”

With our Canadian roots, our family has been blessed to collect hundreds of moments in the majesty of Banff National Park. There’s something about exploring a new area that dismisses all the worries in your mind and allows you to take each minute as it comes. And although we’ve been to Banff several times as a family, we find that there is always something new to discover—a brand new memory to be made.

Collect moments, not things—an antidote to buying more, owning more, and feeling happy LESS. Plus, a simple but effective formula for finding more "moments" right in the middle of regular living.

3. A little curiosity. 

Do you ever wonder…

What would it feel like to order dinner in and go spend the afternoon in the yard with the kids instead of walking laps between the stove and the fridge?

What would it feel like to leave work an hour early and take the kids to the creek to build a dam out of rocks and sticks? {30 Simple Ways to Immerse Your Kids in Nature}

Or simply…

What would it feel like to convince this squirrel to eat out of my hand?

Thankfully, I have my children to help me with THAT kind of curiosity. Which brings me to my last point—

Collect moments, not things—an antidote to buying more, owning more, and feeling happy LESS. Plus, a simple but effective formula for finding more "moments" right in the middle of regular living.

4. A child 

Isn’t it incredible to see the world through a child’s eyes? They remind us not to hurry, to shrug off our worries and dwell in the present, and to embrace simple joys.

—

This isn’t to say that all four of these are necessary to create those unassuming moments we all treasure. Sometimes, when we’re in the right frame of mind, one or two will do the trick.

But on the occasions when the stars align and we have all four elements—a slower pace, a beautiful outdoor setting like Banff, a touch of curiosity, and a child’s vantage point—the moments we’re looking for are sure to come.

If this post struck a chord you might also enjoy….

Living Simply so We Can Explore More

What Families Gain from Time Spent Outdoors

Dear Mom of Big Kids

12 Life Lessons Children Learn from Hiking

The Value of Letting Young Kids Experience Nature

Collect moments, not things— When I feel like I'm stuck in a rut—when life is feeling more like a chore than an opportunity—I look at my calendar, clear some room, and follow this simple but effective formula to help me collect a few golden "moments" once again.

Pumpkin Spice Snickerdoodles

Wednesday, September 21, 2016

Pumpkin Spice Snickerdoodles are a soft and chewy cookie recipe made with the fall favorite flavors of pumpkin and cinnamon.

Pumpkin Spice Snickerdoodles are a soft and chewy cookie recipe made with the fall favorite flavors of pumpkin and cinnamon.

Hello there!  This is Katie from The Casual Craftlete blog.  Today, I am sharing a fall favorite cookie recipe.  These Pumpkin Spice Snickerdoodles are soft pillow cookies that have the great flavors of cinnamon and pumpkin.  This cookie dough recipe makes about 3 dozen cookies which might sound like a lot but these yummy cookies go fast.

Pumpkin Spice Snickerdoodles are a soft and chewy cookie recipe made with the fall favorite flavors of pumpkin and cinnamon.

Snickerdoodle cookies are typically made with cinnamon.  In this recipe I add pumpkin puree and pumpkin pie spice to the cinnamon flavor.  These cookies taste amazing!

Pumpkin Spice Snickerdoodles are a soft and chewy cookie recipe made with the fall favorite flavors of pumpkin and cinnamon.

Start by mixing the Pumpkin Spice Snickerdoodle batter in a large stand mixer fitted with the paddle attachment.  Cream together soften butter, granulated sugar, and brown sugar.  Once creamed, add one egg yolk, pumpkin puree, and vanilla extract.  Slowly add the dry ingredients which is a mixture of flour, cornstarch, cream of tartar, baking soda, baking powder, salt, cinnamon, and pumpkin pie spice.

Pumpkin Spice Snickerdoodles are a soft and chewy cookie recipe made with the fall favorite flavors of pumpkin and cinnamon.

Chill the dough for 1 hour then use a small cookie scoop to scoop out balls.  Roll the dough in a cinnamon and sugar mixture then bake in the oven.

Pumpkin Spice Snickerdoodles are a soft and chewy cookie recipe made with the fall favorite flavors of pumpkin and cinnamon.I hope you enjoy these Pumpkin Spice Snickerdoodles as much and my family and friends do.

5.0 from 1 reviews
iIPumpkin Spice Snickerdoodles
 
Print
soft and chewy cookie recipe made with pumpkin spice and cinnamon.
Recipe type: Dessert
Cuisine: American
Serves: 3 dozen
Ingredients
  • 3¼ cups all-purpose flour
  • 3½ tsp cornstarch
  • 1 tsp cream of tartar
  • 1 tsp baking soda
  • ½ tsp baking powder
  • ½ + ⅛ tsp salt
  • 1 tsp ground cinnamon
  • 1 tsp pumpkin pie spice
  • 1 cup granulated sugar
  • ¾ cup packed light brown sugar
  • 1 cup unsalted butter, softened
  • 1 large egg yolk
  • ¾ cup canned pumpkin puree
  • 1½ tsp vanilla extract
Instructions
  1. In a large mixing bowl whisk together flour, cornstarch, cream of tartar, baking soda, baking powder, salt, cinnamon, and pumpkin pie spice until well combined. Set aside.
  2. In a large stand mixer fitted with the paddle attachment, cream together softened butter, granulated sugar, and brown sugar just to combined. Mix in egg yolk, pumpkin puree, and vanilla extract. With the mixer on low, slowly add the dry ingredients until well combined. Divide cookie dough into two bowls, cover with plastic wrap, and chill in the refrigerator for 1 hour.
  3. In a small bowl, whisk together ¼ cup granulated sugar and 1½ tsp ground cinnamon. Use a small cookie scoop to scoop out round balls. Roll the balls into the sugar and cinnamon mixture then transfer to baking sheets lined with a Silpat or parchment paper 2 inches apart. Cookies will spread out quite a bit. Bake in a preheated 350 degrees oven for 12-14 mins. Cool on baking sheets for 5 minutes then transfer to a wire cooling rack to complete cool.
3.5.3208


Apple Slice Snack Sandwiches Three Ways

Monday, September 19, 2016

Apple Slice Snack Sandwiches Three Ways – Pep up your little scholars with this fun and healthy after-school snack in three yummy flavors that you can mix and match!

Apple Slice Snack Sandwiches Three Ways

The craziest thing happened to me a couple of weeks ago. My sweet little five-year-old scampered onto a big yellow school bus with his oversized backpack and a big smile on his face. On his first day of school, he was so ready and so excited to begin the adventure known as kindergarten. When three o’clock rolled around, and with it the school bus, my son stepped off the bus – this time with a shell-shocked and just plain exhausted expression on his face. When I asked him how his first day went I got the classic “I dunno, it was okay.” As we slowly walked home I thought, oh no, did it go badly!? [Read more…] about Apple Slice Snack Sandwiches Three Ways

14 Beautiful Things You Can Learn from a Child

Wednesday, September 14, 2016

A few weeks ago, on one of our last big summer hurrahs, I had this moment with my kids. The kind of moment that only lasts for a few seconds but stays caught in your heart for much, much longer.

We were treading in rich green water, deep enough that none of us could touch—life vests and pool noodles keeping us afloat. I looked at my three kids and had a flash of the future cross my mind. Only by then, none of them will really need those floaties anymore.

I could see them for one quick second as teenagers and then adults. It took my breath away.

14 Beautiful Things You Can Learn from a Child—while we still have little hands to hold and handprints to clean off the walls of our homes...

This parenting season is beautiful for so many reasons, but I think what makes it the most beautiful is the fact that it is fleeting.

So, while I still have little heads to squeeze into goggles and bodies to buckle into life vests, while I still have little hands to hold and handprints to clean off the walls of my house, I want to soak these children in and learn all I can from them.

14 Beautiful Things You Can Learn from a Child—while we still have little hands to hold and handprints to clean off the walls of our homes...

14 Beautiful Things You Can Learn from a Child

1. Simple pleasures bring the most joy.

I remember the first time I took my first baby on a walk around our apartment. He was only a few days old, but the feel of the wind on his cheek conjured up an involuntary smile. Since then, I’ve seen my children find joy in a million tiny pleasures. A bucket to fill with sand, a diving board to leap from, a flower to pick on the way to school.

2. Hurrying is rarely worth it.

Every time I walk behind a toddler, I repeat in my head, “You can’t hurry a toddler.” It’s just impossible. And when you let yourself see it, it’s actually pretty beautiful, too.

3. It’s okay to march to the sound of your own drum. 

In fact, it’s better than okay.

4. Just keep swimming.

14 Beautiful Things You Can Learn from a Child—while we still have little hands to hold and handprints to clean off the walls of our homes...(Those faces of concentration—Ha!)

5. There are no rules in personal style.

We have a son who is always leaving the house with a shirt on inside-out and his shoes on the wrong feet. (See also #3.) It’s just how he rolls. It often reminds me that personal style can be a fun and freeing expression of yourself—when you loosen your grip on “the rules.”

6. Take calculated risks.

Our other son is always climbing trees and lamp posts (much to the dismay of my home owners’ association). 😉 He knows his abilities because he’s constantly testing them.

7. Friendship can be simple.

“You wanna play?” That’s all it takes.

8. “Clean” isn’t everything.

As an adult with something of a Type A personality, I usually have a hard time seeing beyond a mess. But my children? A mess has never stopped them in their lives.

14 Beautiful Things You Can Learn from a Child—while we still have little hands to hold and handprints to clean off the walls of our homes...9. What matters more than family?

Kids just know this, inherently. We’re what they’ve got, so they invest their whole hearts.

10. Don’t sweat the small stuff. 

When we’re running late for school, one of my boys takes off running across the grass, to get to his room before the bell rings. My other boy continues to plod along, saying, “It’s okay if you’re a minute late. No one really notices.” It’s funny to me how one cares about timeliness and one doesn’t. The one who doesn’t reminds me over and over again not to sweat the small stuff. What is a minute of time, a spilled cup of water, or a lost shoe really worth?

11. A good book is a door.

A window. An invitation. Whatever you want to call it, a good book welcomes you to a new world. Get lost in it.

12. Time heals a lot of wounds. 

Not all wounds, of course, but I remember this when I see my preschooler wail like nobody’s business over something that seems so important in the moment but is completely forgotten within the hour.

13. Everything is an invitation to creativity. 

A jar with a lid? The perfect container for catching bugs. Cheese and crackers? An opportunity to invent the next culinary masterpiece. You don’t need paint sets or a blinking cursor to spur your creativity. Think outside the box and look for opportunities everywhere.

14. Forgive and forget. 

Possibly one of the hardest lessons for adults to master—and one of the most inspiring to watch children live out.

14 Beautiful Things You Can Learn from a Child—while we still have little hands to hold and handprints to clean off the walls of our homes...

“While we try to teach our children all about life, our children teach us what life is all about.” Anonymous

I’d love to hear—What have YOU learned lately from a child? 

How to Shoot in Aperture Priority Mode on your DSLR

Monday, September 12, 2016

How to shoot in Aperture Priority with your DSLR camera to get better pictures!

If you want to take better photos of your kids, but haven’t yet managed to venture away from the Auto Mode on your camera, then this is the tutorial for you!

I’m going to teach you, step by step,  how to shoot in Aperture Priority Mode; which will help you get more control over how your images look, without going the full hog of shooting in manual mode. It’s a great first step toward learning how to take great photos, so let’s get cracking!

Aperture Priority Mode // Get more control over how your images look, without shooting in manual. It's a great first step toward learning how to take great photos, so let's get cracking!

Before we start, let’s take a moment to understand what your camera is going to do on “Auto” and why we want to move away from it.

What’s Wrong with AUTO?

In AUTO, all your camera can do is have a look at the light available and try to come up with the correct exposure by balancing the three elements of exposure – aperture, shutter speed and ISO – for you. Although this sounds ideal, the problem with that is that the camera doesn’t know what you are trying to photograph or what you want the scene to look like, so it simply aims for a middle ground to try to cover any many situations as possible.  This is why you will often end up with photos that have that “middle of the road” look to them, since that is exactly what your camera is aiming for!  In order to get the images you hope for, you need to at least give the camera a nudge in the right direction.

Using Aperture Priority Mode

An easy way to start doing that is by using something called Aperture Priority Mode. In this semi-automatic mode, you tell the camera which Aperture and ISO setting to  use, and the camera works out the correct exposure by setting the remaining element,  Shutter Speed, for you.  Although you are only choosing two settings yourself, and the camera is still doing all the balancing for you, this gives you SO much more control than simply shooting in AUTO!

If you want to take better photos of your kids, but haven't yet managed to venture away from the Auto Mode on your camera, then this is the tutorial for you!

What is Aperture?

Before we get onto how to shoot in Aperture Priority Mode, we first need to have a quick lesson in what Aperture is, and what it does.

Aperture is basically an opening in your camera lens – a hole really – which lets light into the camera. When you change the aperture setting, you change the size of this opening, making it bigger or smaller. This is measured in something called F stops (such as F1.8 or F5.6 or F8) and the smaller the F-stop number, the bigger the Aperture. So for example, F5.6 is a smaller opening than F1.8.  (It does seem like it should be the other way around I know!)

As you would probably imagine, a bigger hole lets in more light; and a smaller hole, less light. This is useful to keep in mind because if you are shooting indoors where there is less light,  you might want to use a wider aperture (small F number) so you can make the most of the light available, and not have to resort to the dreaded pop up flash.

The other important bit to know about Aperture is that it also changes how our images look, by controlling something called ‘depth of field’. Depth of field is simply how much or how little of your scene will be in focus. Photographs with a large depth of field will have a larger area, from front to back, in focus, whilst images with a shallow depth of field will have a small area, again from front to back, in focus.


You can see this effect in the images below – the image taken with an aperture setting on F1.8 has a very blurry background, the one taken at F6.3 has some blurring in the background, whereas at F22, the entire background is also in focus – that’s depth of field in action!

If you want to take better photos of your kids, but haven't yet managed to venture away from the Auto Mode on your camera, then this is the tutorial for you!

You can use this to great effect, by blurring out parts of the scene you want to draw attention away from – for example a messy background; or by getting a slightly larger area in focus for a group shot, or having the whole scene from front to back in focus, for example when shooting a landscape.

To do this, simply remember that using a smaller F number will give you a smaller area in focus, and a larger F number will give you a larger area in focus.

What about ISO and Shutter Speed?

You cannot really talk about Aperture without also mentioning the other two elements of exposure, Shutter Speed and ISO.

Let’s start with ISO.  ISO is simply how sensitive your camera is to light. On a bright sunny day, you would use a low ISO to make your camera less sensitive to all that light, and on a dark overcast day, or indoors, you would use a high ISO to “boost” the light available.   ISO is written as a number from 100 to 6400 (or higher on some models) sometimes with “ISO” written in front of it.

Shutter Speed is how fast the shutters (think of them like curtains) over your aperture opens and closes. For now, what’s important to know about shutter speed is that it affects how motion is captured – too slow a shutter speed and you will get motion blur, where parts of the image are soft and unfocused (and not the areas you want!) so in most cases we want to make sure we have a high enough shutter speed to prevent this.  Shutter speed is a number, usually with a 1/ in front of it, so 1/125 or 1/800.

I know that all these different numbers are a bit confusing, but it does become easier with time, I promise! To help you with this I’ve created a little “cheat sheet” for you, which has all the information about Aperture, ISO and Shutter Speed on it, along with suggested numbers to use for each one, which will totally help you with this. You can download the cheat sheet here.

The very best way to learn how to shoot in Aperture Priority Mode is simply to go out and practice with it! Here’s what to do:

STEP ONE –  Change From Auto to Aperture Priority Mode

Set the dial at the top of your camera to A (Nikon) or AV (Canon) for Aperture Priority Mode, like in the images below.  (Goodbye little green box!)

How to shoot in Aperture Priority mode with your DSLR camera to get better pictures!

STEP TWO – Set Your Aperture

Now you need to choose your Aperture number – the F stop. If you want a larger area of the scene to be in focus, for example if you were shooting a landscape, then you would choose a bigger F number, such af F9 or F16. If you want to get that yummy blurred background, say for a portrait shot, then choose a smaller F number, such as F2.8 or F4.5.

How to shoot in Aperture Priority mode with your DSLR camera to get better pictures!

STEP THREE – Set the ISO

Now you need to set the ISO number.  As a general rule you can set this based on how much light there is in the scene you are trying to photograph.  On a bright sunny day choose a small number like ISO100 or ISO200, but indoors where there is less light or a dark overcast day, choose something like ISO800.

If you feel that setting both the aperture and the ISO is too much for you right now, don’t worry, you can set the ISO to AUTO, which means that the camera will balance both the ISO and the Shutter Speed for you, so you only need to worry about which one to choose. Although this does give you less control, it might be a great starting point until you get comfortable choosing both.

STEP FOUR – Check your shutter speed

Your camera will then balance the exposure for you by setting the Shutter Speed for you. Try to make sure that your shutter speed never falls below 1/100 (otherwise you risk getting blurry, out of focus images) if it does, change your ISO to a higher number, or choose a smaller aperture number.

STEP FIVE – Take your Picture!

Half depress your finger on the shutter to set focus, then depress fully to take your picture!

I hope you have enjoyed this tutorial. Don’t forget to pick up your cheat sheet which you can print out and refer to when shooting to make sure that you know which numbers to use and when!

If you liked this post you might also like…

  • 5 Tips for Capturing Magical Everyday Photos
  • The Private Capture Life Photography Facebook Group
  • 50 Photos to Take With Your Kids

8 Ways to Step Back and See Life with New Eyes

Tuesday, September 6, 2016

This is a sponsored conversation written by me on behalf of Maui Jim. The opinions and text are all mine.

Next time you feel the pressures of life building, turn to one of these 8 ways to step back and see your life with new eyes!

At the end of too many of my days, after I’ve scrubbed the dishes and shuttled the kids to bed, I can feel it in my back.

The stress—the tension—from working too hard and carrying too many worries.

In the past, I’ve carried the tension for so long that I’ve forgotten it’s even there—until I do something that relieves it, and I’m reminded how much better I feel without it.

Next time you feel the pressures of life building, turn to one of these 8 ways to step back and see your life with new eyes!

For me, this realization is exponentially more likely to wash over me when I’m in one place: nature.

As I see a golden sun sink behind the beautiful mountains of Banff National Park, I imagine my worries and concerns going with it.

As I watch a seagull, once perched on a piece of driftwood, soar above the Pacific, I remember that nothing really matters except the people standing next to me as I watch that bird take flight.

Nature helps me see my life with fresh eyes.

Next time you feel the pressures of life building, turn to one of these 8 ways to step back and see your life with new eyes!

On my family’s most recent adventure into nature, I was able to bring along my Maui Jim sunglasses. I’ve realized that spending money on premium sunglasses is SO worth it! Lightweight and oh-so-comfortable, these sunglasses have quickly become the pair that I reach for. With patented glare and UV protection, as well as color enhancement lens technology, the view really is better with Maui Jim. 🙂

I’ve never owned a pair of sunglasses that makes the outdoors look as beautiful as these lenses do. Through them, the world is brighter, sharper, and more alive.

Next time you feel the pressures of life building, turn to one of these 8 ways to step back and see your life with new eyes!

As I watched the most important people in my life wander through an open meadow, in our new home of North Dakota and see the sunflower fields around us stretch on for miles, I couldn’t help but feel renewed by the beauty beyond my lenses.

But sometimes immersing myself in nature isn’t a ready option during the middle of a busy week. Thankfully, I’ve noticed other ways I can achieve the same peace and refreshed perspective that I gain from time spent outdoors.

The next time you feel the pressures of life building, I hope you’ll turn to one of these 8 ways to step back and see life with new eyes.

8 Ways to Step Back and See Life with New Eyes

1. Alone / quiet time

(typically in the form of a nap)

We all know that alone time is hard to come by as a parent, but I do my best to find it in even small pockets of time, such as in the shower, on a drive to pick up the kids, or on the occasional late-night Target shopping trip all by myself. But I have to say, my very favorite form of alone time is a Sunday afternoon nap. 😉

No matter what form my quiet time takes, I find myself much more able to engage with my family afterward.

Next time you feel the pressures of life building, turn to one of these 8 ways to step back and see your life with new eyes!2. Reading a new book

Isn’t it incredible how you can be transported by words on a page? Walking alongside brave characters as they struggle through their own challenges helps me appreciate the life I’m living.

3. Time spent in nature

Of all the outdoor adventures our family participates in, I find that a simple nature walk or relaxing hike is the most restorative outing for me. The rhythm of my footsteps seems to allow me to process my thoughts, and the occasional viewpoint helps me get a bird’s eye view of my life.

And with my Maui Jims, everything just feels a little bit more beautiful. #enjoytheview

Next time you feel the pressures of life building, turn to one of these 8 ways to step back and see your life with new eyes!

4. Slowing down and seeing the world through my child’s eyes

Children are incredible teachers, when our eyes are open to it. Through my children I learn that hurrying is rarely worth it and that ordinary things are really treasures.

5. Disconnecting from technology

Disconnecting from technology and being out in nature helps me get my priorities realigned and refocused.

6. Travel

There’s nothing like being away from home to help you appreciate the greater world around you—and what you have at home.

A pair of Maui Jim sunglasses would make a great travel companion, as they’re sturdy enough to hold up to the rigors of travel and beautiful enough to appear in all of your vacation photos. 🙂

Next time you feel the pressures of life building, turn to one of these 8 ways to step back and see your life with new eyes!

7. A visit with a close friend

So often something a friend of mine says is the catalyst for positive change or a renewed perspective. And sometimes she doesn’t have to say anything at all; simply talking to a friend who can hear my story with empathy is often just what I needed.

8. Exercise that I enjoy 

That simple cause—”exercise that I enjoy“—makes all the difference, doesn’t it? Whether it’s running or hiking, yoga or barre, exercise is a sure way to work out your thoughts and find more personal clarity.

Next time you feel the pressures of life building, turn to one of these 8 ways to step back and see your life with new eyes!

I was happy to team up with Maui Jim sunglasses for this post, in coordination with their #enjoytheview campaign. I love that they offer so many stylish options to suit any lifestyle. Go check out their cute styles!

« Previous Page
Next Page »

Primary Sidebar

Rebecca Cooper — Founder, Simple as That Blog

Hello, I'm Rebecca. Welcome to my blog, Simple as That. Come along as we embrace simplicity in crafting, photography, travel, and family life. Read more about me.

Newsletter

Get the latest updates from Simple as That delivered to your inbox.

Join for Free

Beyond Snapshots: Mastering the Art of Mobile Photography

Connect

  • Bloglovin
  • Facebook
  • Instagram
  • Pinterest
  • Twitter

Follow On Pinterest

Visit Rebecca - Simple as That Blog's profile on Pinterest.

Categories

  • Crafts / DIY
  • Holidays
  • Motherhood
  • Organization
  • Photography
  • Printables
  • Recipes
  • Simple Living
  • Travel
  • Wellness

Our Privacy Policy

Follow on Instagram

Instagram has returned invalid data.

Printable 2023 Calendar

Our printable calendars and organizational pages have been essential in keeping our home and my life in order and I guarantee they will be a help to you too!

Click here to learn more

© Simple as That Blog, 2017 · Design by Brian Gardner

Simple as That Blog

Facebook / Instagram / Pinterest / Twitter / Contact