• About
    • About Rebecca
    • Meet the Team
    • Media Kit
    • FAQ
  • Photography
  • Holidays
  • Recipes
  • Printables
  • 2019 Calendar
  • Write for Us
  • Beyond Snapshots

Simple as That

Making Everyday Beautiful

Blog

Quick, Easy, and Healthy Little Lunch Ideas for Back to School

Friday, September 22, 2017

It’s me, Kelsey, back guest posting from Simple Life by Kels. I get a lot of questions about little people lunch ideas. Let’s look at my favorite re-usable lunch boxes and some ideas to fill them.

What do my kids eat for lunch? My 8 and 6-year-old began going to school outside of our home for the first time last year, so I started packing lunches. I keep things simple in most areas of my life, and my lunch ideas are no exception!

I know what my kids like, what they will eat over and over again, and what they don’t like. My 6-year-old is a little bit pickier than the 8-year-old who will eat anything just because she knows it’s good for her and because I took the time to make it.

Their lunches vary slightly day to day, but I have a basic system I like to follow. They get protein of some kind and a healthy fat. I want them full and happy at school, not crashing in the middle of the day for their poor teachers!

healthy kid lunch simple life by kelsEasy Lunch Ideas:

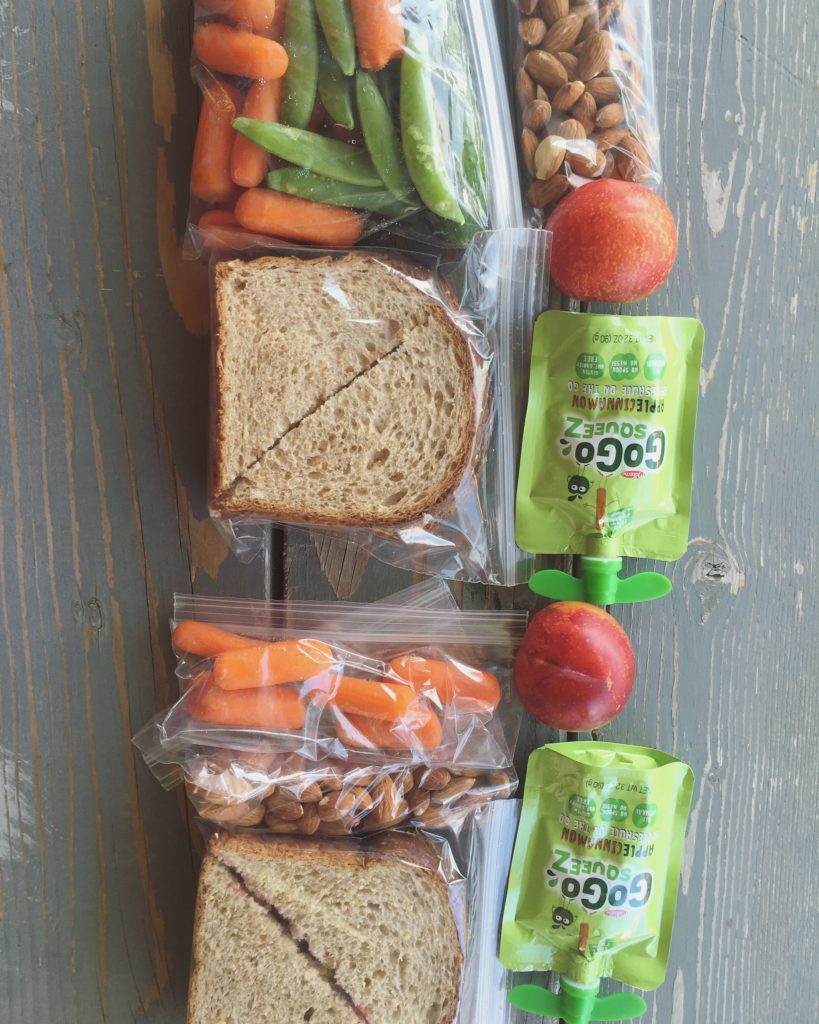
  • sandwich — classic, but great. My girls get a jam sandwich if there is bread made (which is most of the time)
  • ham/turkey rolls — I like the Hormel Naturals Ham
  • chicken apple sausages — my kids love these cold
  • carrot sticks
  • grape tomatoes
  • mini cucumbers
  • sugar snap peas
  • bell peppers
  • apple slices– throw into a bowl with water and 1/8 tsp of salt, then drain and rinse to keep from browning
  • berries
  • mandarin oranges
  • homemade jello — I try to have this on hand most of the time
  • nuts or dried fruit — we love almonds, pistachios, dried mangoes, and raisins
  • freeze dried fruit packets
  • fig bars
  • applesauce pouches
  • yogurt — the few times I have done this I put yogurt into one of their lunch box compartments, then put some granola in another one so they can mix it at school
  • cheese sticks

Making lunches takes me a few minutes.

My kids don’t have access to a microwave at school or I would send more leftovers and things they could heat up.

It’s always a cold lunch, but they are fine with that. My 6-year-old often comes home with food still in her box, and it then becomes her after school snack. She knows it must be eaten. It’s important to me to send real food with my kids to school.

My oldest told me almost every day what other kids had to eat, and she was a good little advocate for healthy eating amongst her friends!

She introduced classmates to pomegranate seeds, pistachios, bell peppers, and homemade natural yeast breads and muffins. I love when she tells me that someone asked to try her roll or have some of her pomegranate seeds AGAIN. lunch ideas

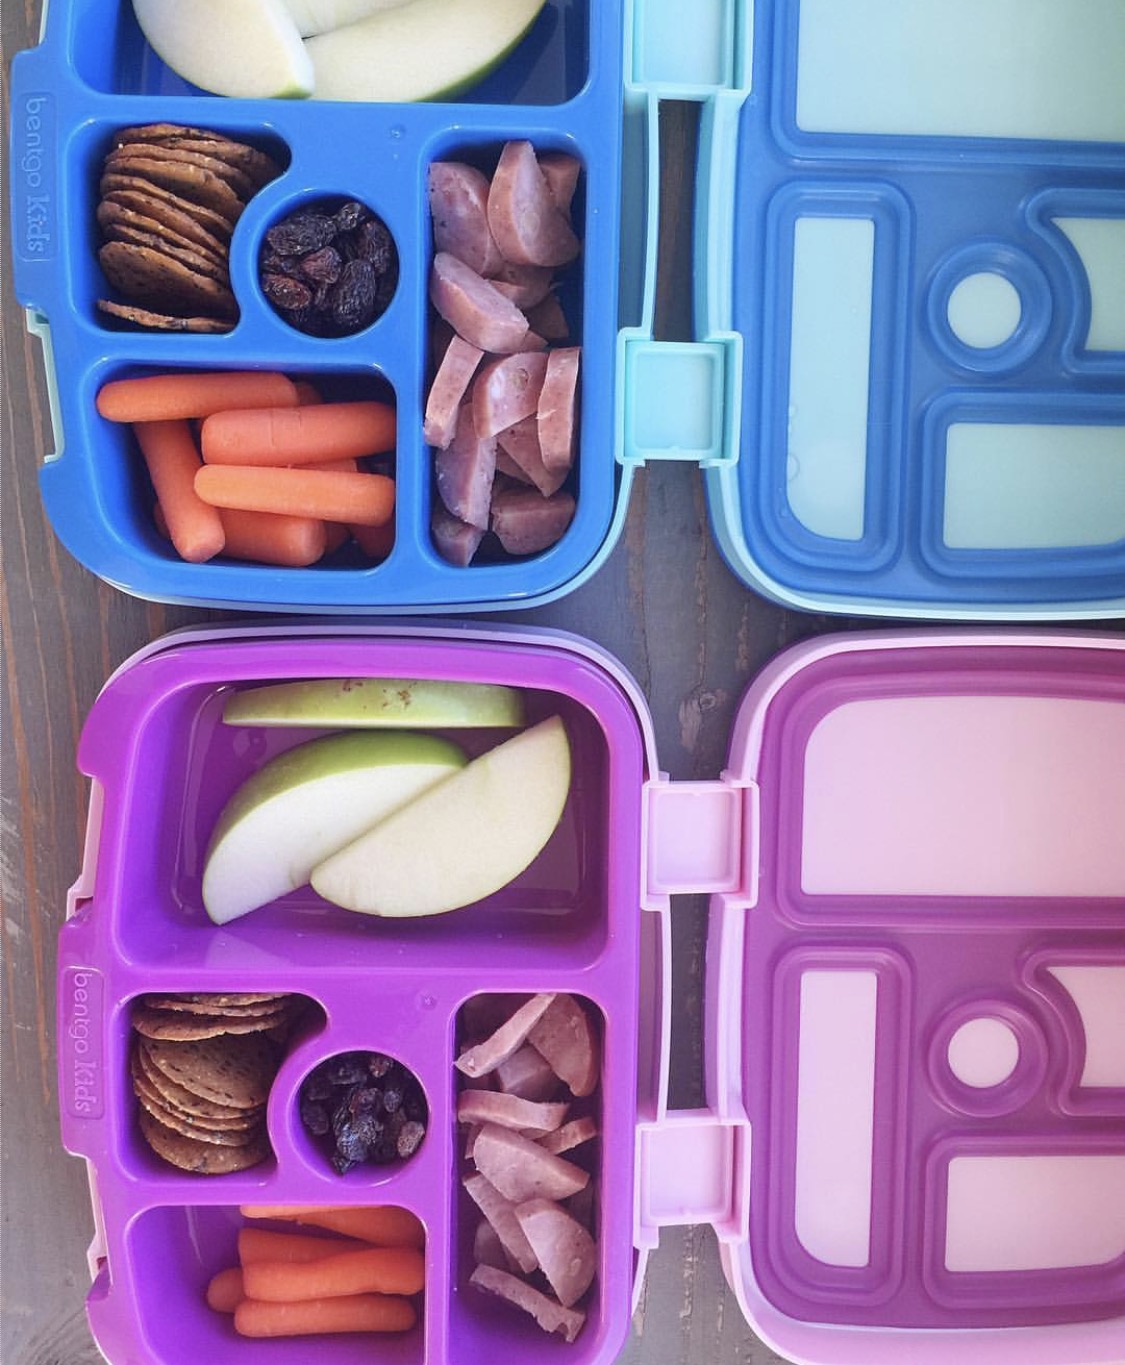
It might be small, but those kids go home and tell their parents they tried something new. Who knows what the trickle-down effect could be? As far as lunch boxes go, I used plastic bags for the first week and knew that wasn’t sustainable or practical. I ordered some YumBox lunch boxes. We liked them a lot.

Then I got some Bentgo Kids boxes as well to try.

I love both, but am slightly partial to the Bentgo. They are perfect for smaller children. They have room for more options, but little portions of each thing, which is great for my kindergartener. My older daughter could easily use the Yumbox every day and have a few things with bigger portions of each.lunch ideas

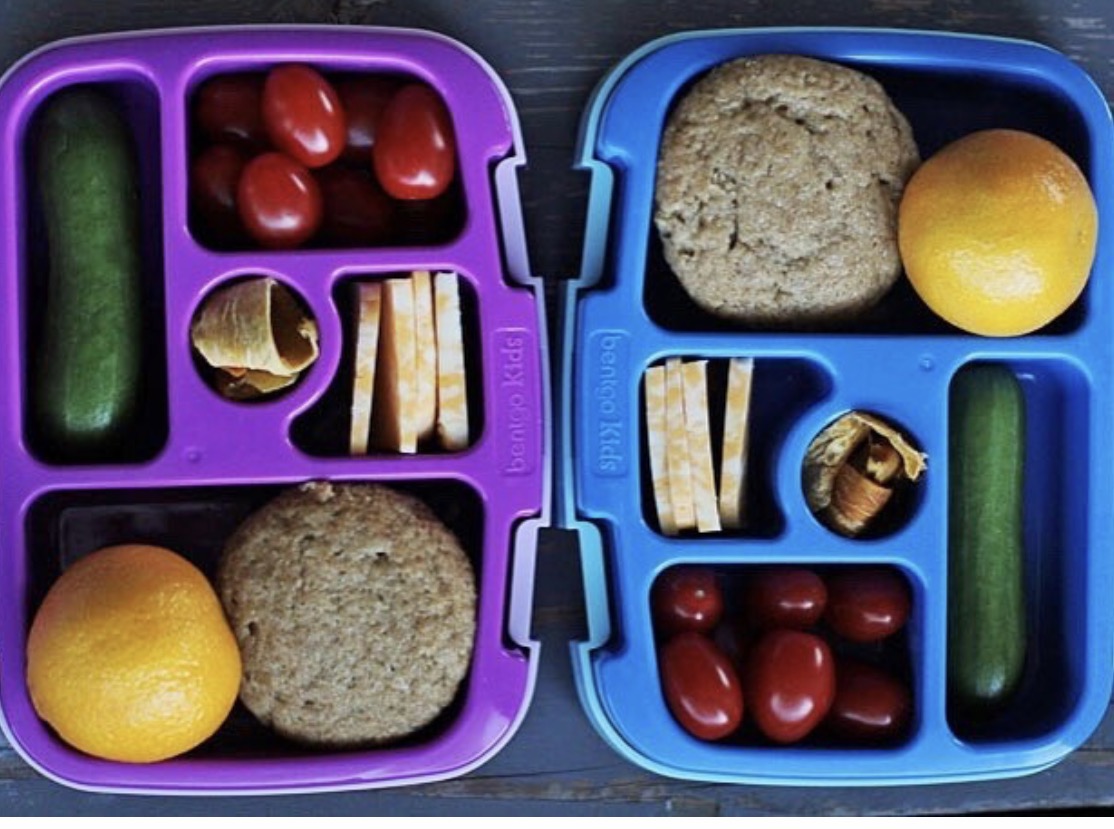
I tend to alternate between the two depending on what they are going to be eating. Sandwiches fit more easily into the YumBox. I would recommend both, depending on needs. The Bentgo are a little harder to close, but my girls haven’t had an issue with them.

They are easy to use and clean. I have loved having both options.

What do your kids love to have in their lunch?

Free Printable 2018 Calendar

Thursday, September 21, 2017

Kick off the year with a fresh start and a cute new calendar! This set of 12-month calendars are simple, stream-lined and the perfect planning tool to help you get organized in 2018. Click the link below to download for free.

Time to get organized! FREE 2018 Printable Calendars!

It’s the beginning of a new school year for us and just like New Years, this time of year presents a fresh start! The opportunity to get back into daily routines, recommit to staying organized and a fresh perspective.

Organizing My Days

When it comes to organizing my days, there are a few things I use over and over again to keep me on top of things. As a wife, mother, and work-at-home creative, I know staying organized is essential. An organized day leads to an organized week, which leads to an organized life. These calendars, my printable planner pages and a few other essentials help me to stay on top of things!

Get organized with these 2018 Printable Calendars!

My favorite pens to use

With a background in art, it’s no surprise I’m picky about my pens and paper. When I write on my calendar and jot down to-do notes I like to use a good set of pens.

When it comes to pens here are my favorites:

  • Paper Mate Flair Felt Tip Pens
  • Le Pen set from Marvy Uchid
  • Staedler Fine liner Pens

I write recurring appointments and commitments in pen, but the rest I record in pencil.  I especially love these stainless steel mechanical pencils. Dates and times can change frequently and I like being able to erase so that my calendar stays neat and tidy.

Download our FREE 2018 Printable Calendar

I love the vertical format of these calendars and the handy things to do list included at that bottom. You can print them in color or in black and white by changing your printer settings.

These calendar printables are just begging to help you get organized in 2018. Download, print and fill them up with all of your exciting plans for the year ahead!

Download our FREE 2018 Printable Calendar!

Time to get organized! FREE 2018 Printable Calendars!

More Free Organizational Printables

Looking for more help to keep things simple and get organized throughout the year? These calendars co-ordinate with the Simple as That organizational printables. I’ve got everything you need – a meal planner, grocery list, and an AMAZING daily docket that is my secret weapon for staying on top of things!

Also be watching for our updated version of our Printable Holiday Planner. Planning early for the holidays is my secret to a calmer December. This planner is the perfect tool to help you get things done while staying focused on the kind of season you’re craving this year.

If you enjoyed this post you might also like…

  • Free Printable Fitness Planner
  • Tips for Organizing Kids’ School Papers
  • Printable Holiday Planner
  • Ways to Organize and Display Children’s Artwork

Sweet Potato Breakfast Bowl

Friday, September 15, 2017

Enjoy a different take on breakfast with this Sweet Potato Breakfast Bowl recipe.  This is a hearty and healthy breakfast option that is great for the fall and winter months.

Simple Sweet Potato Breakfast Bowl

I’ve been making a variation on this recipe since beginning the switch to a more whole foods diet. It’s so easy and I really enjoy eating a sweet potato breakfast bowl at breakfast time or as a sweet treat during the day.

Here’s my simplified version of this recipe

Cook 3 large sweet potatoes in the Instant pot. Set on manual for 15 minutes. When cool, peel off skins. Blend with a hand mixer with 2-3 tbsp of almond milk until creamy. Store in an air tight container in the fridge. When ready to serve re-heat, top with chopped pecans and a drizzle of pure maple syrup.

Delicious Sweet Potato Breakfast Bowl | SimpleAsThatBlog.com

Hello there!  This is Katie from The Casual Craftlete blog.  I am so excited for fall!  I love everything about the season especially the fall recipes.  Today, I am sharing a hearty recipe for a Sweet Potato Breakfast Bowl.  This recipe is made with a baked sweet potato, nut butter, milk, and cinnamon.  This breakfast bowl might not be what you think.  It is sweet, creamy, and delicious!  It You can enjoy it warm or cold.

Delicious Sweet Potato Breakfast Bowl | SimpleAsThatBlog.com

This Sweet Potato Breakfast Bowl starts with a baked sweet potato.  You can bake the potato just before you want to eat the breakfast bowl, or you can bake it the night before and store it in the refrigerator.  If I have time in the mornings, I like to bake it the same day to enjoy it warm but it is just as good cold.

I love sweet potatoes because they are packed with vitamins, fiber, beta-carotene and they taste good.

Delicious Sweet Potato Breakfast Bowl | SimpleAsThatBlog.com

In a blender, I combine the baked sweet potato, almond butter, almond milk, maple syrup, and cinnamon.  The nice thing about this recipe is that you can customize it to your taste.  You can incorporate any nut butter or milk that you typically use.  I add the maple syrup and cinnamon for a rich, sweet flavor.  This Sweet Potato Breakfast Bowl tastes like thanksgiving.


Sweet Potato Breakfast Bowl
 
Print
Ingredients
  • Sweet Potato Breakfast Bowl:
  • 1 large cooked sweet potato
  • 2 tablespoons almond butter or nut butter
  • ¼ to ½ cup almond milk or milk
  • 1 teaspoon maple syrup
  • ¼ teaspoon ground cinnamon
  • Toppings:
  • chopped pecans or nuts
  • frozen dark cherries
  • cinnamon sugar mixture (1 tablespoon cinnamon, ⅛ teaspoon sugar in the raw)
Instructions
  1. Preheat oven to 400 degrees F. Cut sweet potato into 1 inch pieces. Place on a baking sheet and toss with olive oil. Cook for 25 to 30 minutes or until fork tender.
  2. In a blender or food processor, combine all the sweet potato breakfast bowl ingredients. Blend until smooth.
  3. Top with nuts, and cherries that have been tossed in a cinnamon sugar mixture.
#version#

How Changing Our Love Language Can Simplify (and Enrich) Family Life

Tuesday, September 12, 2017

Have you heard of the theory of the five love languages? They are: gift giving, words of affirmation, acts of service, quality time and physical touch.

It’s said that each of us can experience love through all of these languages, but for most of us one or two will dominate.

The further I travel in my adventure as a parent and journey to embrace simplicity, the more I wonder if our society is experiencing an imbalance in the way we express love. Is gift giving becoming a dominant force in our consumer-driven society? Is physical clutter a by-product of our desire to express affection for our loved ones and a reflection of our waning ability to communicate love in other ways?

Making sure that we include as many of the five love languages into our family life as possible enriches our relationships but also has the positive knock on effect of reducing clutter and limiting toys as we naturally tend towards expressing love through other means.

Photos courtesy of Sarah Moan Photography

Join the Free 5 Day Natural Parenting Superpowers Challenge to learn easy, practical tips that inspire joy, connection and cooperation. 

Are we experiencing an imbalance in the way we express love?

I am all for gift giving – I believe it is a wonderful way to give and receive love. But, the other four love languages are becoming endangered species in our most sacred relationships.

As a mother who follows a natural parenting path, devoid of conventional discipline techniques, I rely almost exclusively on connection; on strengthening the bond I have with my son, which means that when I need him to, he will willingly give up what he wants to do and cooperate with what I need him to do instead.

Our children are primed for connection

Young babies want to be held close to us most of the time. Children love inviting us into their worlds to connect through play, through one on one time.

Making sure that we include as many of the five love languages into our family life as possible enriches our relationships but also has the positive knock on effect of reducing clutter and limiting toys as we naturally tend towards expressing love through other means.

Making sure that we include as many of the five love languages into our family life as possible enriches our relationships but also has the positive knock on effect of reducing clutter and limiting toys as we naturally tend towards expressing love through other means.

Let’s teach our children that they don’t need to receive countless gifts in order to feel loved. Let’s challenge ourselves to express love in other ways. It will ripple out into our lives in a myriad of positive ways.

Ways to express love through languages other than gift giving

Physical touch

From the moment our children are born our society suggests that we can “spoil” our babies if we hold them “too much”. Nothing could be further from the truth. Babies thrive with physical touch.

Newborns rely on their mother’s touch to help regulate their temperature, heart rate, blood pressure, breathing, blood glucose and more. When mothers hold their babies, especially skin-to-skin, their physiology mimics their mother’s and they thrive. So hold you baby.

And then hug your kids. Family therapist Virginia Satir famously said, “We need four hugs a day for survival. We need eight hugs a day for maintenance. We need twelve hugs a day for growth.”

Hug your child good morning, good-bye and hello. Snuggle in bed at nighttime and on the couch watching a movie.

Quality time

In our modern world it seems as though we’re always with our phones. Distractions are moments away and those we’re with can start to feel second best. Prioritize your family when you’re actively spending quality time together. Leave your phone at home, let your child decide what they’d like to do and remember that as cliché as it may sound, children spell love T.I.M.E and perhaps so do we.

Connection is the antidote to coercion. Join the Free 5 Day Natural Parenting Superpowers Challenge, a snackable email series with practical tips that inspire joy, connection and cooperation. And connect with Tracy of Raised Good on Facebook and Instagram.

If you liked this post you might also enjoy…

  • How Fear of Missing Out Is Hurting our Kids
  • 6 Tips to Simplify Children’s Lives
  • How to Trade Screen Time for Green Time

Making sure that we include as many of the five love languages into our family life as possible enriches our relationships but also has the positive knock on effect of reducing clutter and limiting toys as we naturally tend towards expressing love through other means.

DIY Old Fashioned Kite

Monday, September 11, 2017

This DIY old fashioned kite is not only a great craft to do with your kids, young and old, it also turns into a memorable activity.  If you need an excuse to spend more time with your family, this is a perfect opportunity.

This DIY old fashioned kite is not only a great craft to do with your kids, young and old, it also turns into a memorable activity.

Hello there, it’s Jennie again, this time with a tutorial to make a DIY Old Fashioned Kite.  My daughter is currently on a Mary Poppins kick, and hearing her 3 year old voice singing “Let’s Go Fly a Kite,” provided me with some inspiration for some good, old fashioned, family fun.

This DIY old fashioned kite is not only a great craft to do with your kids, young and old, it also turns into a memorable activity.

I actually designed this old fashioned kite after the exact kites in the movie, which feels fun and nostalgic for me, and was very exciting for the children.  I let my daughter pick out the fabric from my scrap collection, which she loved, and our kite ended up being pink, of course!  We made ours on the small side because my kids are still small, but it’s not hard to adjust the measurements to make it larger.  The tutorial is below, have fun making this old fashioned, DIY kite all your own.

This DIY old fashioned kite is not only a great craft to do with your kids, young and old, it also turns into a memorable activity.

SUPPLIES:

  • 3/8″ Dowel, cut in 3 pieces (12″, 20″, and long enough for the handle on your spool)
  • School glue
  • Embroidery thread
  • Fabric (or paper)
  • Fabric scraps for bows
  • 24″ of ribbon
  • Wooden spool (or some other kite spool)
  • Lightweight string or fishing line

DIY old fashioned kite

DIY old fashioned kite

INSTRUCTIONS:

1.  Cut small notches in both ends of your 12″ and 20″ pieces of dowel for your embroidery thread to sit in.  Cut an indent at the halfway point on the 12″ piece, and one-third of the way on the 20″ piece, for the two pieces to fit together.  Glue them together (with hot glue, super glue, etc.), making sure all the angles are right angles. Tie in place with embroidery thread for added security.

DIY old fashioned kite

DIY old fashioned kite

2.  Wind the embroidery thread around the outside of the frame twice, making sure the thread is tight and in all the notches.  This is the frame for the shell of your kite.  Tie the thread in place and trim the ends.

DIY old fashioned kite

DIY old fashioned kite

DIY old fashioned kite

DIY old fashioned kite

3.  Place the frame on top of your fabric and cut around the whole thing, leaving an extra inch or so around the perimeter to fold over.  Using your school glue to secure them, start with the four corners and fold them in enough so that the dowel frame will show past it just a bit.  Now set the frame on the back of your fabric and glue all of the edges over the string.  This DIY should be looking like an old fashioned kite by now!

DIY old fashioned kite

4.  Tie some more embroidery thread at the top and bottom of the vertical dowel support.  I secured mine through the notch to make sure the ends won’t slide around.  This is what you will tie your kite string to.

Making the tail!

DIY old fashioned kite

DIY old fashioned kite

DIY old fashioned kite

5.  For the kite tail, tie your ribbon to the dowel at the bottom of the kite.  Cut some fabric scraps into long skinny pieces (approximately 1″ x 9″) and double knot them around the ribbon.  I tied on four at about 5″ intervals.

DIY old fashioned kite

6.  Put your remaining piece of dowel through your wooden spool and glue in place if it’s not snug enough.  Tie your string onto your dowel and wind it all on.  Tie the other end of your kite string onto the embroidery thread you previously attached to the kite, at the height where the dowels cross.

DIY old fashioned kite

Go find a breeze and fly your DIY old fashioned kite!

DIY old fashioned kite

DIY old fashioned kite

DIY old fashioned kite

DIY old fashioned kite

DIY old fashioned kite

We definitely made some memories, and can’t wait to do it again.  I think we will be making a few more of these!

If you liked this post you might also enjoy…

  • Children’s Fox Apron Tutorial
  • Traditional Children’s Games
  • 25 Simple Screen-Free Activities for Kids

A Fresh Take on Travel: The Benefits of Exploring Close to Home

Thursday, September 7, 2017

In partnership with South Dakota Tourism as part of their Good Times Great Places campaign.

Scheduling and budget constraints don't have to dampen your wanderlust—6 benefits of exploring close to home.

This wasn’t our summer to see the world.

With my husband working tirelessly as a medical resident and with so many responsibilities falling on me, I knew long before school ended last year that we wouldn’t be checking off any of our exotic bucket-list items this summer.

Have you been in that place before? Maybe even this summer?

Make Building Family Connections a Priority

Schedule constraints, budget constraints… Some seasons are for living a little smaller, and that’s okay.

That said, those limitations don’t have to stomp out your wanderlust—that craving for fresh air and adventure to somewhere unknown.

For our family, travel and adventure is really about being together—connecting—and that can be done miles away or close to home.

You don’t need to venture far to find the connection that travel fascinates.

You can explore close to home, with a curious mind and a tourist’s point of view. You can see even the familiar with new eyes.

Scheduling and budget constraints don't have to dampen your wanderlust—6 benefits of exploring close to home.

Finding Travel Adventures Close to Home

This June our family took the opportunity to get out and explore in beautiful South Dakota. A short drive from our new home state of North Dakota was just what we needed, and it ended up being one of our most memorable road trips to date.

There were so many things for the kids to see and do, including a visit to Falls Park, the Butterfly House and Aquarium, the Great Plains Zoo, and so much more! You can read all about our trip in this post: 8 Kid-Friendly Things to do in South Dakota.

One of the highlights was definitely the Ingall’s Homestead—It’s worth seeing for yourself if you’re ever driving through South Dakota!

Scheduling and budget constraints don't have to dampen your wanderlust—6 benefits of exploring close to home.

5 Benefits of Exploring Close to Home

1. You won’t have to spend so much time planning.

While some people thrive on the excitement of planning a big trip, others drag their feet at it—hungry for the experience and the memories but less eager to flesh out the logistics. Local travel requires considerably less planning, so you can capture the feelings you want from an adventure without spending so many hours in front of the computer beforehand.

2. You’ll save money. 

The benefits here need no explanation!

3. You’ll save time. 

As my children enter the teen years, I’m noticing a big shift in our schedules. Let’s just say the family calendar is much fuller than it was when they were toddlers. Even so, I want to prioritize the connection we experience when we explore together, and I love that close-to-home excursions allow us to adventure during the small windows of time when we’re all free.

Scheduling and budget constraints don't have to dampen your wanderlust—6 benefits of exploring close to home.

4. No jetlag! 

I remember some long-distance trips with our little ones when they could barely hold themselves together because of the jetlag, the missed naps, and the accumulated loss of sleep! While it’s absolutely worth it from time to time, I’m not going to complain about the lack of jetlag on our local outings!

5. You and your kids will learn about local history. 

This is the benefit of close-to-home travel that I’m most passionate about. I think knowing the local history and culture adds so much richness to your experience in the place you live.

When we moved to the Midwest a year ago, I didn’t know much the Dakotas beyond Mount Rushmore. But with each place we visit, from the Dacotah Prarie Museum to Falls Park to the Ingalls Homestead, I fall a little bit more in love with our area.

I’ll close with this simple reminder:

In dreaming of far-off travel, don’t miss the beauty that surrounds you in your own city, state and country. 

Scheduling and budget constraints don't have to dampen your wanderlust—6 benefits of exploring close to home.

If you enjoyed this post you might also like…

  • 8 Kid-Friendly Things to Do on Your South Dakota Trip
  • Step Back in Time at the Ingall’s Homestead De Smet, South Dakota
  • 7 Ways to Encourage Family Connection on the Road

Scheduling and budget constraints don't have to dampen your wanderlust—6 benefits of exploring close to home.

5 Tips to Make Healthy Habits Stick

Monday, August 21, 2017

Hello, friends! I’m Rachel Gainer of rachelrebuilt.com, personal trainer and fitness nutrition specialist here at Simple as That. Summer freedom is splendid, but there’s something truly powerful about the onset of fall and the return to routine. Did you know habits are most flexible during times of transition? That makes back-to-school the ideal time to chase new goals and start new routines that keep you healthy, happy, and energized throughout the year. Today, I’m sharing five tips to make healthy habits stick when you’re just getting started or coming back after a little break.

Chase new goals and start new routines that keep you healthy, happy, and energized throughout the year. Here's how to make those healthy habits stick!

How to Create Healthy Habits

TIP 1: Revisit the big picture

When you’re down in the trenches, focusing on food and fitness and trying to make big lifestyle changes, it’s easy to get trapped in an all-or-nothing mentality. But health is a life-long pursuit. Schedule time to step back and ask yourself: Where do I want to be in one year? Am I moving in the right direction? What’s working? What needs to change? Then make micro-adjustments to move you closer to your goal.

TIP 2: Set specific, measurable goals

Your “big picture goal” is an idea of how you want your life to change over the next year. But to get there, you’ll need to set concrete, actionable micro-goals that you can track and measure. For example: “Drink 50 oz. of water before lunch.” Focus on just one or two micro-goals at a time. Add more as you build confidence and consistency. Be persistent, not perfect. Don’t sabotage a whole day because you miss one goal.

TIP 3: Establish a baseline, and record progress

You live in your body and look in the mirror every day. No matter how much progress you make, you will acclimate to the changes, adopting a new “normal.” This makes it easy to get discouraged, because you can’t recall how you looked or felt when you started. No matter how awkward you feel: take progress pictures, record body measurements, perform a fitness test (like the one below), or keep a fitness journal for thoughts and feelings. Refer to these concrete records whenever you begin to doubt yourself. I’ve created a simple Measurements & Fitness Test Tracking Sheet to help you get started. Visit my website to download your free copy.

Chase new goals and start new routines that keep you healthy, happy, and energized throughout the year. Here's how to make those healthy habits stick!

TIP 4: Create an accountability system

Find a simple way to hold yourself accountable. Make it easy to follow through by checking off daily actions or awarding yourself a star. (I love a gold star!) These methods work great for those who are internally motivated. But if you find it easier to follow through when other people are counting on you, look for an accountabilibuddy to cheer you on and challenge you to push beyond your current limits. Choose someone who will be compassionate when you stumble but who also believes in your potential and expects you to follow through.

TIP 5: Pinpoint barriers to success

There will be days when your motivation and will power fail. Days when you want to eat your feelings or skip your workouts. In a moment of strength, take time to write down your weaknesses, triggers, and old habits. Be honest but kind to yourself. Make an action plan for each potential obstacle. For example: “When I want to eat for emotional reasons, I will take a 5-minutes walk or write my feelings in my journal, giving myself time to clear my head.” Then put that plan into action, and refine as needed.

Fitness Test Instructions

Fitness is more than pounds, percentages, and inches. It’s also increased strength, endurance, and speed. You can use a fitness test to establish a baseline and set some performance-based goals.

Chase new goals and start new routines that keep you healthy, happy, and energized throughout the year. Here's how to make those healthy habits stick!

This fitness test includes nine simple exercises and a one-mile run. Perform each exercise for 1 min, giving maximum effort. You should be breathing hard and feeling exhausted after each exercise. Rest 1 min between each exercise (trust me, you’ll need it). Then rest 10 min before running 1 mile (either outside or on a treadmill). You may substitute another distance-based cardio option, like biking, rowing, or elliptical. Just be consistent test to test.

Perform this test again in about four weeks, and track how your numbers are improving and how much stronger you feel. You can use my free Measurements & Fitness Test Tracking Sheet to help you record your progress.

Full Sit-ups

Push-ups

Switch Kicks

Mountain Climbers

Squat Jumps

Plank Jacks

Plyo Jacks

Spiderman Abs

Burpees

To finish up your fitness test,  run one mile on the treadmill or outside and record your time. Retest every four weeks, while following a regular fitness routine. Don’t forget to grab my free Measurements & Fitness Test Tracking Sheet to help you track your progress.

If you liked this post you might also enjoy…

  • A Beginner’s Guide to Strength Training at Home
  • Free Printable Fitness Planner
  • 5 Tips to Make Healthy Habits Stick

Chase new goals and start new routines that keep you healthy, happy, and energized throughout the year. Here's how to make those healthy habits stick!

Campfire Kids Snack Mix

Friday, August 18, 2017

Campfire Kids Snack Mix – Inspire your little ones with thoughts of the fall season with this fun and simple back-to-school snack mix!

Campfire Kids Snack Mix

Hi, this is Rachel from Simple Seasonal again! Today I’m excited to be bringing another easy recipe to Simple As That. I love contributing to this blog because it’s all about fun and simple ideas for the family. Today’s recipe is just that, as it’s super easy to make and it’s inspired by my first grader!

My son is always getting these crazy culinary creation ideas that he wants me to make with him. I blame this on the fact that he has a food blogger Mom. Some of his creations are pretty, well… Ummm… gross. Others, however, are surprisingly inspired!

Campfire Kids Snack Mix

Today’s recipe is one of those first-grade-boy-inspired ideas. A few weeks ago he came to me and said, “Mom, I want to make my own snack mix, and I want it to have marshmallows, and I want it to be about camping.” Ummm, okay… Challenge accepted!

Campfire Kids Snack Mix

After a little brainstorming session, we came up with today’s recipe for Campfire Kids Snack Mix. The logic is as follows… Pretzel sticks for tinder. Red, orange, and yellow M&Ms for the fire (because kids like campfires of course). Marshmallows for roasting over the fire. Consequently some Teddy Grahams, because the bears would probably like to eat some marshmallows. Hence, Honey Chex cereal to distract the bears with the honey flavor so that there’s more marshmallows for the kids!

Campfire Kids Snack Mix

All that to say, this snack mix is just plain fun to nosh on. It’s perfect for making for your family’s next camping adventure. And speaking of my first grader, with back-to-school just around the corner, this whimsical snack will be a fun addition to your student’s lunch box. Most of all, I know mommy is going to be packing some for herself for work!

Campfire Kids Snack Mix
 
Print
Inspire your little ones with thoughts of the fall season with this fun and simple back-to-school snack mix!
Author: Rachel Hanawalt
Recipe type: Snack
Cuisine: American
Serves: 8 servings
Ingredients
  • 2 C Honey Chex
  • 2 C chocolate chip Teddy Grahams
  • 1½ C red, orange, and yellow regular or peanut M&Ms
  • 1½ C marshmallows
  • 1 C pretzel sticks
Instructions
  1. Measure all of the ingredients into a large bowl.
  2. Gently stir snack mix to evenly combine.
  3. Store up to two weeks in a ziplock bag.
3.5.3226

You may also enjoy…

  • Homemade Kettle Corn
  • Apple Slice Snack Sandwiches
  • Homemade S’more Granola Bars

Campfire Kids Snack Mix

3 Tips To Help You Get Flattering Light For Portrait Photos

Tuesday, August 15, 2017

Are you planning on taking your own family portraits this year? Then the one thing that can make or break your photos is the light you use!

Here are 3 simple tips that will help you get flattering light for your portrait photos.

#1 – Look at your subject’s eyes

One super simple way to tell whether the light is flattering is to look at the eyes of your subject!  The eyes will tell you everything you need to know about the light.

If your subject is struggling to open their eyes, then the light is too bright for them and you are simply going to end up with squinty eyed subjects.  (Not exactly the most flattering look!)

In this case, all you need to do is turn your subject away from the light source (usually the sun!) instead.

On the other hand, if the eyes are dull and dark with no light in them, then you simply aren’t getting enough light on your subject, and your portrait will look dull and lifeless.  This time, turn your subject around until you see the light hitting the eye and producing catchlights.  

This means you will have found the best light for your subject!

#2 – Avoid Taking Pictures in Full Sun

Bright sunny days can actually be the WORST time to take portrait pictures. This is because the light is simply too strong and harsh to give you soft, beautiful light – the type of light that gives you flattering portraits.

If you want to get a good portrait, then I suggest that you try to move your subject into shade instead, so that they are out of the full glare of the sun. 

Move your subject into the shade of a tree or a building.  Have them on the edge of the shaded area, looking out into the light. This gets rid of the harsh sunlight, and will give you soft, flattering light instead.

Cloudy days can also be incredibly flattering for portraits, since the light is softer, and therefore more flattering.

If shooting indoors, then choose a window that does not currently have direct sunlight coming in, or any window on an overcast day. 

#3 – Avoid taking pictures at noon

High noon, or the hours before or after it, are also the worst time for taking pictures!

This is because you are effectively lighting your subject from above.  This causes shadow to fall in the eyes, giving that racoon eye look! Again, not the most flattering 🙂 

Instead, choose a time of day when the sun is lower in the sky. The Golden Hour (which is the hour just before sunset or the hour just after sunrise)  is the most pleasing, but I appreciate you may not wish to be up that early or keep your kids up that late! In which case, just try to shoot as early or as late in the day as you can, so that the sun is not directly above your subject.

There you go: three simple tips that will help you get the best light for flattering portraits! 


Everything You Need to Know about the Route of the Hiawatha Mountain Bike Trail

Monday, August 7, 2017

This 15-mile, downhill rail-to-trail conversion is an unforgettable activity that the whole family will enjoy! Here’s everything you need to know about the Route of the Hiawatha mountain bike trail.

This 15-mile, downhill rail-to-trail conversion is an unforgettable activity that the whole family will enjoy! Here's everything you need to know about the Route of the Hiawatha mountain bike trail.

We finally checked an item off our outdoor adventure bucket list this past week! After years of wanting to, we finally road the Route of the Hiawatha mountain bike trail in Northern Idaho and it was just as incredible as we thought it would be!

This trail combines the fun of mountain biking with breathtaking views all in a ride that’s easy enough for all ages and skill levels. Winding through 10 tunnels and 7 sky-high trestles, this 15-mile route traverses through the beautiful Bitterroot Mountains.

We travelled the trail at a leisurely pace stopping to take photos many times along the way and completed our ride in about 2.5 – 3 hours.

You can view some breathtaking video footage from our trip here.


This 15-mile, downhill rail-to-trail conversion is an unforgettable activity that the whole family will enjoy! Here's everything you need to know about the Route of the Hiawatha mountain bike trail.

History of the Hiawatha

Between 1906 – 1909 the Milwaukee Railway Company constructed this unbelievable stretch of track through the rugged Bitterroot Mountains. It was truly an engineering marvel! It was one of the most scenic stretches of railroad in the country, and after it’s abandonment in 1980 it was opened to bikers and hikers.

The train track has been removed for years but the route is still just as it was when trains made their way across the country in the 1900s.

This 15-mile, downhill rail-to-trail conversion is an unforgettable activity that the whole family will enjoy! Here's everything you need to know about the Route of the Hiawatha mountain bike trail.

When and Where to Access the Route of the Hiawatha

The trail is open daily May through September 24th. Trailheads and facilities are open 8:30am-5:30pm during peak season.

The trail location is remote and travel to and from made it a very full day for us. We came from Big Fork, Montana which was a 2.5 hour drive away. Staying in nearby Wallace, ID or making a trip of it and staying in Coeur d’ Alene or Sandpoint are great options if you’re traveling from a distance.

There are detailed directions on the official Route of the Hiawatha website. You can reserve trail and shuttle passes or rent bikes online. Lookout Ski Pass Area operates the trail and is where you’ll pick up passes and rentals. It’s located right alongside I-90, Exit 0. Head here first.

This 15-mile, downhill rail-to-trail conversion is an unforgettable activity that the whole family will enjoy! Here's everything you need to know about the Route of the Hiawatha mountain bike trail.

What to Expect as you Bike the Hiawatha

After picking up trail passes and rentals make your way to the East portal where you can park, unload bikes and get ready to hit the trail. Important to note: there are bathroom facilities and trail passes can be purchased at the trail head (cash only.)

The trail begins with the 1.7 mile long St. Paul Pass or Taft tunnel. You’ll be riding through this tunnel for a good 10 minutes in complete darkness with only your headlamp to guide your way. It will be cool and damp inside so jackets are recommended. Along the trail you will pass through 9 more tunnels, none of which are as long as the Taft tunnel. On a hot day they’re a welcome way to cool off!

Keep your eyes open for wildlife! We saw deer and many hikers and bikers have spotted bear and other wildlife.

This 15-mile, downhill rail-to-trail conversion is an unforgettable activity that the whole family will enjoy! Here's everything you need to know about the Route of the Hiawatha mountain bike trail.

The trestle bridges are truly something to behold. Watch this video to get an idea of just how high these bridges are! There are 7 high trestles in total that travel through the mountainous terrain and that offer indescribable views of the forest floor below.

What makes the Hiawatha most suitable for all family members is the 2% downhill grade that you’ll enjoy as you make your way along the trail. It’s leisurely riding for sure! It took us about 2.5-3 hours total (that included a lot of stopping to take photos and enjoy the views) to reach the Pearson Trailhead where we caught the shuttle back up.

This 15-mile, downhill rail-to-trail conversion is an unforgettable activity that the whole family will enjoy! Here's everything you need to know about the Route of the Hiawatha mountain bike trail.

What you Need to Bring on the Hiawatha

  • Sunscreen and sunglasses – there are several areas along the trail without shade cover.
  • You need a day-use pass to access the trail – can be reserved online or purchased with cash at the East Portal trail head.
  • Pack lots of water and snacks. We encountered a longer than average wait for the shuttle at the end of the trail and realized we should have been prepared with more food.
  • Bring a good quality head lamp, you’ll need it for the tunnels.
  • Bike, helmet and lamp rentals are available at Lookout Ski Lodge.
  • Pack a light jacket – the tunnels can be cold, especially when riding back.
  • You can bring your own bikes or rent at Lookout Ski Pass, either way you still require a trail pass for everyone in your group.

This 15-mile, downhill rail-to-trail conversion is an unforgettable activity that the whole family will enjoy! Here's everything you need to know about the Route of the Hiawatha mountain bike trail.

Overall, this was such a fun family activity. We enjoyed ourselves and were in awe at every trestle bridge and around every corner as we took in the gorgeous views that stretched on for miles. It was a full day, but it was totally worth it!

For more information about the Route of the Hiawatha visit their website here and if you have any questions for us about our experience just let us know in the comments! We’re happy to answer them.

If you enjoyed this post you might also like…

  • Collect Moments, Not Things
  • 12 Life Lessons Children Learn from Hiking
  • 30 Simple Ways to Immerse Your Kids in Nature
  • What Families Gain from Time Spent Outdoors
« Previous Page
Next Page »

Primary Sidebar

Rebecca Cooper — Founder, Simple as That Blog

Hello, I'm Rebecca. Welcome to my blog, Simple as That. Come along as we embrace simplicity in crafting, photography, travel, and family life. Read more about me.

Newsletter

Get the latest updates from Simple as That delivered to your inbox.

Join for Free

Beyond Snapshots: Mastering the Art of Mobile Photography

Connect

  • Bloglovin
  • Facebook
  • Instagram
  • Pinterest
  • Twitter

Follow On Pinterest

Visit Rebecca - Simple as That Blog's profile on Pinterest.

Categories

  • Crafts / DIY
  • Holidays
  • Motherhood
  • Organization
  • Photography
  • Printables
  • Recipes
  • Simple Living
  • Travel
  • Wellness

Our Privacy Policy

Follow on Instagram

Instagram has returned invalid data.

Printable 2023 Calendar

Our printable calendars and organizational pages have been essential in keeping our home and my life in order and I guarantee they will be a help to you too!

Click here to learn more

© Simple as That Blog, 2017 · Design by Brian Gardner

Simple as That Blog

Facebook / Instagram / Pinterest / Twitter / Contact