• About
    • About Rebecca
    • Meet the Team
    • Media Kit
    • FAQ
  • Photography
  • Holidays
  • Recipes
  • Printables
  • 2019 Calendar
  • Write for Us
  • Beyond Snapshots

Simple as That

Making Everyday Beautiful

Blog

No Bake Apple Cinnamon Bites

Thursday, September 1, 2016

No Bake Apple Cinnamon Bites are a perfect easy snack or grab-and-go breakfast for fall!

No Bake Apple Cinnamon Bites are a perfect easy snack or grab-and-go breakfast for fall!

Hello there!  This is Katie from The Casual Craftlete blog.  Today, I am sharing a super easy recipe for No Bake Apple Cinnamon Bites.  These bites are a healthier snack option and are also great for busy mornings on the run.  They are packed with healthy and delicious oats, peanut butter, fresh apples, and lots of cinnamon.  You can make these no bake bites ahead of time and eat on them all week.  The best part is they taste like apple pie!

No Bake Apple Cinnamon Bites are a perfect easy snack or grab-and-go breakfast for fall!

The local apple orchards are bursting with apples and this is the perfect time of year for picking,  Apples and cinnamon are definitely my go-to for food recipes during the fall.  I love the freshness from the apples and the warm cinnamon flavor.  Peanut butter is also another great combination with apples.  You can substitute almond butter or sun butter if there is a nut allergy.  These bites would be great for packing in your kids lunch for school too.  I also added a special ingredient to make these bites taste even more like apple pie.

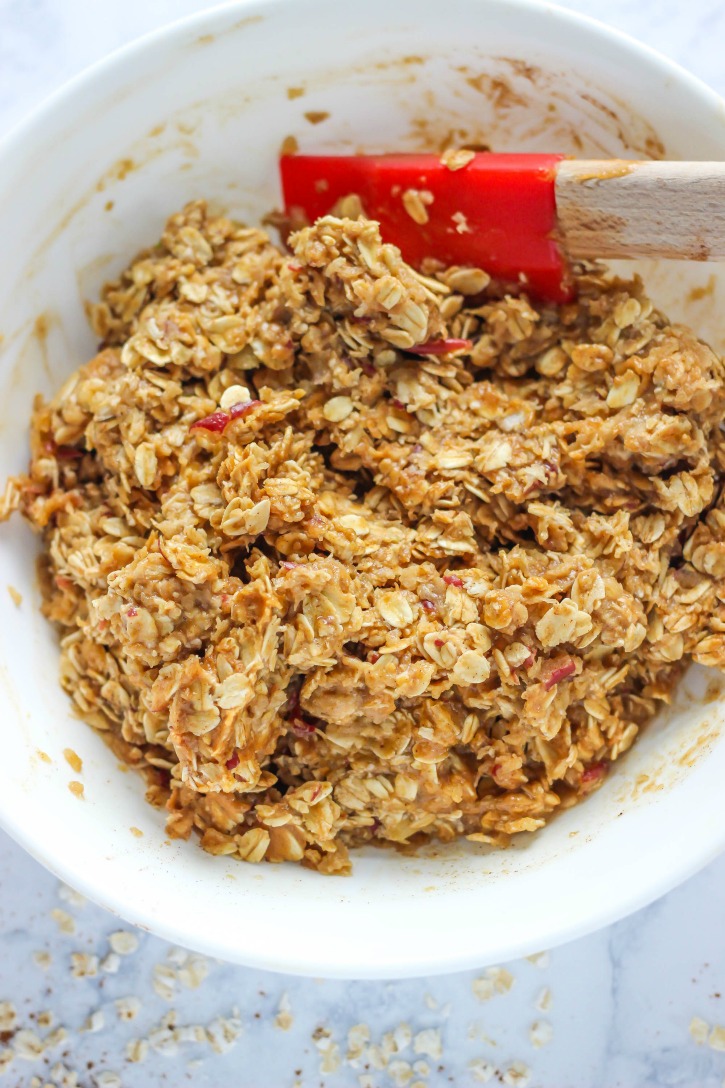
Just combine all the ingredients into a large bowl and mix until well combined.

No Bake Apple Cinnamon Bites are a perfect easy snack or grab-and-go breakfast for fall!

I like to use a small cookie scoop to scoop out the No Bake Apple Cinnamon Bites.  They make the perfect size bites.  With this recipe I am able to get about 2 dozen bites,  After you have portioned the bites, place in a well sealed container and refrigerate until ready to eat.  They bites should keep up to one week.

I love this recipe because it is easy to make, tastes great, and fills you up.  You can’t go wrong with these delicious bites!

4.0 from 2 reviews
No Bake Apple Cinnamon Bites
 
Print
Author: The Casual Craftlete
Recipe type: Breakfast
Cuisine: American
Serves: 24
Ingredients
  • 2 cups old-fashioned oats
  • 1 teaspoon cinnamon
  • ½ teaspoon apple pie spice
  • ½ cup creamy peanut butter
  • ¼ cup plus 1 tablespoon honey
  • 1 teaspoon vanilla extract
  • pinch of salt
  • 1 cup (not packed) grated apple (about 1 medium apple)
Instructions
  1. Combine all of the ingredients in a large bowl and mix until well combined.
  2. Use a small ice cream scoop or your hands to make 1 inch balls.
  3. Place in a well sealed container in the refrigerator until ready to eat. Bites should keep up to 1 week.
3.5.3208


No Bake Apple Cinnamon Bites are a perfect easy snack or grab-and-go breakfast for fall!

Thank you for letting me share my recipe for No Bake Apple Cinnamon Bites.  I hope you enjoy them and have a beautiful fall.

Usborne Shine-a-Light Books

Thursday, September 1, 2016

Have you guys seen these amazing Shine-a-Light Books from Usborne?

I’ve fallen in love with them and have a handful on order for my kids. They look amazing and we all know that Usborne quality can’t be beat!

Check them out in action.

Isn’t that the coolest! They are definitely not your average picture books. I know my girls are going to love these so much and I can’t wait for them to arrive so we can try them out.

Here are a few of the titles that caught my eye…

Secrets of Winter

Secrets of the Rain Forest

The Human Body

Secrets of the Seashore

See the entire collection of Shine-a-Light books here.


Woodland Creature No-Carve Pumpkins

Thursday, September 1, 2016

These Woodland Creature No-Carve Pumpkins are the perfect way to dress up your pumpkins this fall. If you love pumpkins, but loathe carving them, this is the project for you!

These Woodland Creature No-Carve Pumpkins are the perfect way to dress up your pumpkins this fall. If you love pumpkins, but loathe carving them, this is the project for you!

Hooray for September 1st! I am so excited for fall this year. I think it has to do with the fact that we just moved to North Dakota and we’ve heard the fall colors here are beautiful. We’ve been living in Arizona the past three years and we’re so excited to experience four seasons again!

Cute fox woodland no-carve pumpkin.

Find the darling fox socks here. We love ours!

We can’t wait to start decorating our new home for fall and we’re going start with these cute Woodland Creature Pumpkins!

The inspiration for these pumpkins came from these Woodland Creature Cups we made last year. We loved them so much we thought we’d try our hand at making them again, only this time using pumpkins!

These Woodland Creature No-Carve Pumpkins are the perfect way to dress up your pumpkins this fall. If you love pumpkins, but loathe carving them, this is the project for you!

These darling little pumpkins are a great craft to get the kids involved with and the best part is, because they’re made using faux pumpkins, they can be enjoyed again year after year!

These Woodland Creature No-Carve Pumpkins are the perfect way to dress up your pumpkins this fall. If you love pumpkins, but loathe carving them, this is the project for you!

Have I told you how much I’m loving the whole faux pumpkin craze! No more tossing our beloved fall creations in the trash when they’re begin to wilt. The best part of about faux pumpkins is that you can reuse them again and again AND no carving! Yay! 🙂

Supplies

  • Grey and Turquoise Craft Paint
  • Foam brush
  • Cardstock (grey and orange)
  • Felt (grey, orange, off-white, tan, black)
  • Black sharpie
  • Scissors
  • Hot glue gun


These Woodland Creature No-Carve Pumpkins are the perfect way to dress up your pumpkins this fall. If you love pumpkins, but loathe carving them, this is the project for you!

I’ve tried to make it as easy as possible for you to recreate these pumpkins at home. Simply print out and use the templates provided (links included below) to cut out all the felt and paper pieces you’ll need.

The templates are for the  woodland creature craft cups so depending on what size of pumpkin you’re using you can use the “scale” feature within your printer options to increase or decrease the size of the printed templates. For these pumpkins I printed at 125 percent.

These Woodland Creature No-Carve Pumpkins are the perfect way to dress up your pumpkins this fall. If you love pumpkins, but loathe carving them, this is the project for you!

Fox Pumpkin Instructions

Step 1

Gather supplies. Orange faux pumpkin, orange cardstock, sharpie, off-white felt, scissors, adhesive.

Step 2

Click to Download –> Fox Pumpkin Pattern

Remember to enlarge if using a bigger pumpkin. Print and cut out pattern pieces.

These Woodland Creature No-Carve Pumpkins are the perfect way to dress up your pumpkins this fall. If you love pumpkins, but loathe carving them, this is the project for you! Cute fox no-carve pumpkin.

Step 3

Use pattern pieces to cut out felt and orange card stock for the fox’s tail, ears and face.

Step 4

Glue tail pieces together

woodlandpumpkins10web Step 5

Attach paper pieces to pumpkin as shown using adhesive / glue gun.

Step 6

With a sharpie add a nose and eyes.

Raccoon Pumpkin Instructions

Step 1

Gather supplies. White paper cup, grey, black and white cardstock, sharpie, scissors, adhesive, grey craft paint and foam brush.

Step 2

Paint white pumpkin with grey craft paint. Allow to dry completely.

These Woodland Creature No-Carve Pumpkins are the perfect way to dress up your pumpkins this fall. If you love pumpkins, but loathe carving them, this is the project for you!Adorable no-carve raccoon pumpkin.

Step 3

Click to Download –>Raccoon Pumpkin Pattern

Print and cut out pattern pieces. Use pattern pieces to cut out black felt and grey card stock for the raccoon’s tail, ears and face.

No-carve Raccoon Pumpkin PLUS more woodland creature pumpkins.

Step 4

Using a sharpie color black stripes on Raccoon’s tail. Begin attaching paper and felt pieces to pumpkin as shown.

Step 5

With a sharpie add a nose and eyes.

These Woodland Creature No-Carve Pumpkins are the perfect way to dress up your pumpkins this fall. If you love pumpkins, but loathe carving them, this is the project for you!

Owl Pumpkin Instructions

Step 1

Gather supplies. Ooff-white pumpkin, turquoise craft paint, tan, off-white and orange felt, sharpie, scissors, adhesive.

Step 2

Paint white pumpkin with turquoise craft paint. Allow to dry completely.

Step 3

Click to Download –>Owl Pumpkin Pattern

Print and cut felt out using pattern pieces.

These Woodland Creature No-Carve Pumpkins are the perfect way to dress up your pumpkins this fall. If you love pumpkins, but loathe carving them, this is the project for you!No-carve owl pumpkin.

Step 4

Attach felt pieces to pumpkin as shown using adhesive.

Step 5

With a sharpie add a eyes and some feathers.

If you liked this post you might also enjoy…

  • DIY Hand Painted Pumpkins
  • 50 Photos to take this Fall
  • DIY Glinda and Wicked Witch of the West Costumes
  • Simple Fall Pumpkin Bunting
  • Tips for Capturing Spooky Silhouettes with your Phone

Dear Moms of Big Kids, As They All Go Off to School

Tuesday, August 30, 2016

One day last week, I tied the shoes, packed the lunches and zipped the backpacks, piled my four kids into the vehicle… And then walked them to their classrooms.

All while my heart demanded that I grab their hands and march them back home!

Dear Moms of Big Kids: "This is the challenge of motherhood: moving from one phase to another before truly we've learned to appreciate the one we're in."

This is my first year with all of my kids in school full time. It’s the day every mom “dreams of,” right?

I remember sitting on the couch one afternoon (messy hair, no sleep) with a newborn in my arms and a toddler snuggled up beside me. What I wanted more than anything in that moment was just to go to bed.

I found myself wondering, What would it BE like for these kids to be in school?

Dear Moms of Big Kids: "This is the challenge of motherhood: moving from one phase to another before truly we've learned to appreciate the one we're in."

In the middle of those years of potty training and sleepless nights, I pictured this day with eager anticipation. I pictured myself grocery shopping alone, making lunch for only one, and taking a nap just because I could. (A girl’s got to make up for those years of sleepless nights somehow!)

But here it is, the day all of my children are in school, and instead of whooping with joy I’m wandering the house noticing how quiet it feels. I’m watching the clock, begging it to speed up just a fraction so I can go get those big kids of mine and bring them back where they most belong.

Dear Moms of Big Kids: "This is the challenge of motherhood: moving from one phase to another before truly we've learned to appreciate the one we're in."

Granted, I do enjoy the ability to efficiently run errands and to work at the computer guilt-free. But during those quiet, solo moments, I can’t help but wonder…

Did I do enough with them while they were home?

Did we bake enough muffins, read enough of our favorite books? Did we snuggle on the couch enough, watching episodes of My Little Pony?

Did I work too much? Did I say “just a minute” one too many times?

Did I really, TRULY treasure the days of them being little?

I tried so hard.

Dear Moms of Big Kids: "This is the challenge of motherhood: moving from one phase to another before truly we've learned to appreciate the one we're in."

But this is the challenge of motherhood: moving from one phase to another before we’ve truly learned to appreciate the one we’re in.

First it was getting used to not having a baby in the home—getting used to walking into my youngest’s room without seeing a crib take center stage.

Then it was getting used to being needed less, like when I realized no one needed to be carried on our family hikes.

And now it’s getting used to the knowledge that a good portion of my children’s lives are experienced outside of our home.

Dear Moms of Big Kids: "This is the challenge of motherhood: moving from one phase to another before truly we've learned to appreciate the one we're in."

It’s a lot to wrap your mind around, especially when in many ways, it feels like just yesterday you were washing bottles and averting toddler tantrums.

But I’m trying to embrace this new stage of motherhood, because as I’ve learned so far, it won’t last.

Dear Moms of Big Kids: "This is the challenge of motherhood: moving from one phase to another before truly we've learned to appreciate the one we're in."

With two in elementary school, one starting middle school, and one starting high school, we’re trading in our little kids for “bigs.” We’re trading diapers and bibs for Pokemon cards and soccer cleats. Instead of celebrating first steps and new words, we’re celebrating learner’s permits and football wins.

Dear moms of big kids, let’s remember this:

This stage is beautiful in its own way. We just have to hold on to that.

With every year we get a fuller picture of the people our children are becoming. We get to see them grow in their independence and act on the lessons we’ve taught them all their lives.

Dear moms of big kids:

We have so much to look forward to.

Dear Moms of Big Kids: "This is the challenge of motherhood: moving from one phase to another before truly we've learned to appreciate the one we're in."

You May Also Like

If this post resonated with you, be sure to check out these articles….

“But Mommy, I’m Only a Little Bit Big”

When eight words from my daughter stopped me in my tracks—

4 Tips to Help Improve a Child’s Focus

4 Tips to Help Improve a Child's Focus

Pizza Buns | A Simple School Lunch Solution

Easy to make, homemade pizza buns make a perfect addition to your child's school…

How to Make Time for What Matters Most

How to Make Time for What Matters Most

Living Simply So We Can Explore More

18 Ways to Treat Yourself With More Love

18 ways to treat yourself with more love—in order to give the best version of yourself to the people around you! A perfect read for Mother's Day.

bigkids4quote

Painted Walking Stick

Monday, August 29, 2016

Hi everyone, this is Jennie again from The Lovely Little Nest, with a fun little craft for the kids, a painted walking stick.  Every time we go out for a walk, my two-year-old wants a walking stick, even if we are in the middle of the city with no sticks to be found.  We went hiking on the weekend and she found the perfect one, so we took it home to keep and then painted it to make it even more special for her.

Add some color to your next nature hike with a DIY painted walking stick. This craft is so simple it would be perfect for camping or at home!

This is such an easy project for little ones, and you don’t need much to complete it, which is also fantastic.

Supplies:

Walking Stick

Painter’s Tape

Paint

Paint Brush

Add some color to your next nature hike with a DIY painted walking stick. This craft is so simple it would be perfect for camping or at home!

Instructions:

1.  Tear of pieces of painter’s tape and place it on the stick in any design.  Since my two year old was mostly doing this step, it was more of a random pattern, and it turned out greater than if I had placed the tape every so carefully in a perfect sequence.  I love the carefree feel of it.

Add some color to your next nature hike with a DIY painted walking stick. This craft is so simple it would be perfect for camping or at home!

Add some color to your next nature hike with a DIY painted walking stick. This craft is so simple it would be perfect for camping or at home!

2.  Once all your tape is on the stick and pressed down quite firmly, pick some colours and get painting.

Add some color to your next nature hike with a DIY painted walking stick. This craft is so simple it would be perfect for camping or at home!

3.  Once all of the painting is done, let it dry.

Add some color to your next nature hike with a DIY painted walking stick. This craft is so simple it would be perfect for camping or at home!

4.  Peel off all of the tape and see how your design turned out!

Add some color to your next nature hike with a DIY painted walking stick. This craft is so simple it would be perfect for camping or at home!

Add some color to your next nature hike with a DIY painted walking stick. This craft is so simple it would be perfect for camping or at home!

Now all you have to do is go for a nature walk!  The other bonus about painting this stick is that it’s nice and bright, and will keep wandering kiddos more visible as they explore and wander with their new favorite walking buddy.

Add some color to your next nature hike with a DIY painted walking stick. This craft is so simple it would be perfect for camping or at home!

Add some color to your next nature hike with a DIY painted walking stick. This craft is so simple it would be perfect for camping or at home!

Oatmeal Granola Topping

Wednesday, August 24, 2016

6-Ingredient Oatmeal Granola Topping is lightly sweetened and crunchy – perfect for sprinkling on yogurt, ice cream, cereal, or fruit.
oatmeal-granola-topping

Hello Simple as That Readers! It’s Julie from Tastes of Lizzy T.  Are you ready for back-to-school season?

Pulling out the cute lunch boxes and colorful backpacks? Fun.

Setting the alarm and dealing with homework deadlines? Meh.

oatmeal-granola-topping

Although getting up before the sun rises isn’t on my love-t0-do list, I am ready to get back on a schedule. Summer travel and laziness has caught up with me and I’m ready to be productive again.

Starting the day with a good breakfast is key to helping my day get off on the right foot. I’m sharing with you today an oatmeal granola topping that makes breakfast just a little bit simpler. It’s made with just 6 ingredients, including oatmeal and whole wheat flour. This gives you and your children a full belly and energy to face those carpool lines, math problems and whatever else your day holds.

oatmeal-granola-topping

How do we like to eat this oatmeal granola topping?

  • Layered with Greek yogurt. Make parfaits with fruit, yogurt and this oatmeal granola topping. Yum!
  • On pancakes or waffles. Sprinkle this topping over your favorite pancake breakfast for a crunchy twist.
  • In a bowl with milk. I can eat this granola by the bowlful. Its that good!
  • Over fruit. Baked apples, sweet berries, pumpkin…this is a quick topping to give your fruit a crisp-like flavor.
  • On ice cream. This is one of our family’s favorite ways to end a day.

oatmeal-granola-topping

This oatmeal granola recipe makes about 7 cups. Store it in a Ziploc bag. It freezes well, so feel free to make up a double or triple batch to have ready for breakfast or those snack attacks!

Oatmeal Granola Topping
 
Print
6-Ingredient Oatmeal Granola Topping is lightly sweet and crunchy, perfect for sprinkling on yogurt, ice cream, cereal, or fruit.
Author: Julie
Recipe type: Breakfast
Cuisine: American
Serves: 7 cups
Ingredients
  • 2 cups whole wheat flour
  • 2 cups quick cook oatmeal
  • 1 cup dark brown sugar
  • ½ teaspoon salt
  • 1 teaspoon baking soda
  • 1 cup (2 sticks) salted butter, softened
Instructions
  1. Preheat the oven to 325 degrees.
  2. In a large bowl, combine the dry ingredients and mix well.
  3. Add the softened butter and mix until crumbly and well combined.
  4. Spread the mixture on a large baking tray.
  5. Bake for 10 minutes, then stir and bake for another 10 minutes.
  6. Allow the granola to cool, then store in an airtight container.
3.5.3208

Oatmeal Brown Sugar Granola Recipe
DSC_4678_edited-1

Paleo Granola Recipe

Paleo-Granola-Recipe-3

Simple and Easy Sign Painting Tutorial

Sunday, August 21, 2016


Simple and easy sign painting tutorialHope you all had a wonderful summer!

We are making the most of the late summer, and this weekend we’ll be going to a craft fair where we will bring our handmade goods. My hubby is bringing his recycled wood creations- like trays, crates, and shelves, and I will be bringing my hand lettered work.

So while prepping some new pieces for this fair, I thought I would bring you along while making a couple of my handpainted signs for the kitchen. I have described the steps, turning it into a small tutorial, which could maybe help you to make your own. These simple one-word signs are really lovely, and they could easily be a fun decor addition for your home, or maybe suit when decorating for some of the holidays coming up this fall.

Alright, let’s get started.
byannika_kitchen_sign_reference_images

I always start off with some inspiration. Pinterest is one of my favorite browsing places, where I usually find a couple of images, referencing color and style I like. If lettering or drawing is not your strong  suit, just find a font you like and copy that. You can even make print-outs and trace directly. See my lettering board for inspiration.

MATERIALS:

1 – Wood board (I used scrap wood pieces, measuring 15 x 55 cm)
NOTE: You’ll need a wood board, raw or painted. Anything could do, but I encourage you to sand down the surface on which you are painting, to make it easier to paint on.
2 – Pencil, eraser, paper and tape
3 – Piece of chalk/charcoal
4 – Paint and paintbrushes (I simply used acrylic paint)
5 – Name or word to paint

byannika_kitchen_sign_create_your_design
1) STEP ONE:

Cut a piece of paper equal to the size of your board.
Draw/ sketch your design on the paper.

byannika_kitchen_sign_fill_back_w._charcoal
2) STEP TWO:

Flip the paper and take a piece of charcoal and smudge the entire area of the back of the paper.

byannika_kitchen_sign_sketch_outline
3) STEP THREE:

Place your design face up on top of your board. Secure with tape in a few places around the edge.
Trace your design outlines with a pencil. Make sure to press firmly with the pencil.

byannika_kitchen_sign_transfer_outline
4) STEP FOUR:

Removing the paper, and you should see an outline of your design transferred to the board.

byannika_kitchen_sign_painting_outline_transfer_sketch
5) STEP FIVE:

Go over the transferred outline you just made on the board with a pencil, to clear up the lines of the design.

byannika_kitchen_sign_painting_base_color_filling
6) STEP SIX:

Now you are ready to paint. Start by filling in the design with your chosen base color. I recommend using a rather small brush for the edges, depending on the detail of your design of course. Now let it dry.

byannika_kitchen_sign_painting_shadow_outline
7) STEP SEVEN

Create a shadow outline with a pencil around your painted design and fill it with a second color to give your letters depth.

byannika_kitchen_sign_painting_decorating
8) STEP EIGHT

The last step is to decorate your painted design with swirls, lines, dots or whatever you can come up with. You can do this by first outlining your ornaments with a pencil or you can go free hand. Remember, as long as you keep inside the design, you can always easily do some touch ups, by using the other paint colors. If your board is painted, touch up can be done outside the design as well, with corresponding board color.

byannika_kitchen_sign_painting_detail
Yay,  that’s it! You should now be holding a pretty cool and fun sign you can decorate your home with.

byannika_kitchen_sign_painting
I hope you enjoyed this simple sign tutorial. Let me know if you have any questions.
Have a wonderful week.

/Annika

The Five Senses of Simple Living

Wednesday, August 17, 2016

“Common sense will only get you a common life.” Bryant McGill

five senses that heighten the experience of simple living

Five Senses of Simple Living

If I had to choose my favorite sense I’d definitely pick taste. I love food; eating, cooking, reading about it, learning about its medicinal abilities. Food creates community, it comforts, it heals, and it can transport me to a different time, place and culture in a moment. But I specifically love sweets and as we all know, sugar has a well deserved bad reputation.

Have you ever removed sugar from your diet for an extended amount of time? I have, several times, if I’m being honest, for health reasons. And after each hiatus, the first bite of a sugary treat causes my face to contort and my taste buds to practically jump off my tongue. The sweetness is shocking. It triggers an intense reaction as my sensitivity to the taste has been heightened. This caused me to realize that what I thought was a harmless sweet tooth, is actually a desensitized sensory function of taste.

I’ve noticed this same effect of simple living. I’m constantly working towards a minimalist lifestyle and in almost every area of my life simplifying has heightened my senses. I’m more aware of all the invaders, obstacles, and the disruptors of simple.

When it comes to our biological human senses, most of us go through the day without a thought to our five senses. Our senses are constantly in action, allowing us to experience life through multi-colored sunsets, music that moves our souls, food that comforts, the smell of a newborn’s head, and the softness of her velvety skin.

Our senses give life texture and most of the time we are too busy to appreciate them.

Five Senses of Simple Living

Senses define how we experience our existence and too often we are too frazzled or overwhelmed to pay attention. The simple life draws us closer to our senses and the purpose we choose to pursue, and like removing sugar, when our lives are free from distractions our senses are heightened to live fully engaged in what matters most.

Simple living teaches us that when we seek approval or acceptance based on the standard lifestyle of consumption and keeping up with the Kardashians or the Joneses, it is just a desensitized sensory function; a misguided illusion of contentment.

Our physical senses dictate much of how we experience our natural world, but the pursuit of simple living requires intentional development of a different sensory system. We must create an environment that engages our attention and guides us away from sugary promises of happiness and into a slow natural fullness of simplicity.

Here are five senses that heighten the experience of simple living:

(Less) Common Sense

Common sense is loosely defined as a thought or action that is accepted by the majority of people. The simple life, however, distances us from the thoughts and actions of the majority of people. A slower, simpler life has changed my idea of some common sense values that are held by most of the population. Things like debt, fashion trends, and standards of beauty are no longer defined by the common sense of the masses. Now my (less) common sense is defined by fewer needs, fewer wants, controlled spending and saving habits, and a deeper appreciation for the character of a person over their appearance.

Common sense for the simple life is less common but makes more sense. Reduce stress by placing boundaries on your time, reduce debt and live beneath your means, reject unhealthy and unreasonable expectations of beauty, and live a life of gratitude for who you are and what you can give.

That is what should be common.

5 Senses - SAT 3

Dollars and Cents (see what I did there?)

Speaking of debt… a simple life certainly doesn’t require debt. In fact, debt steals the simple from our lives by demanding our time and attention. The effect debt has on our life is devastating and distracts us from pursuing what we value and love the most.

As simplifying becomes a way of life, I’ve experienced a new sense for dollars and cents. Though we would always like to see a bit more of it at the end of the month, I’ve noticed a paradox within my  relationship with money.

On one hand I value money more. It’s no longer something I am willing to throw at every shiny and pretty thing at Target. Credit cards are no longer free money dispensers. Its value is much more than the number printed on the corner. The value is in the time and effort spent to earn it and its power to build up or tear down a life.

On the other side of the paradox I value money less. Its role in my life is less important. I don’t need more money to find happiness; I find that within myself and my attitude toward life. Retail therapy is less therapeutic and a newer car or bigger house is less appealing. The wealth flaunted in our world does not cause envy, it reminds me to be grateful for all the things money can’t buy.

Ab-Sense of Distraction

Busyness causes an epidemic of distraction seeking behaviors. It’s not hard to find with social media at our fingertips, streaming available on every device, and Pokemon Go taking over the streets.

Simple living redirects our intentions when we drift into distraction.

A slow life with less filling our calendars reveals the beautiful moments waiting to be noticed in the white spaces of life. The other night I laid down with my four year old as she was falling asleep. Just for a minute, I thought. Netflix was paused in the other room. But when she rolled over and put her arm around my neck and snuggled into my shoulder, I just about died. I didn’t leave for an hour and a half.

Netflix has nothing on snuggles from my firstborn.

Stop seeking distraction in your downtime because the most beautiful moments are right in front of you and I promise, they will bring more joy and fulfillment to your life then the blue glow of an LED screen.

5 Senses - SAT 2

No Non-Sense

Simple living gives us permission to declare a No Non-Sense policy on the cultural beliefs displayed before us (and it’s kind of fun):

Designer bags and shoes define my worth – NONSENSE

A new car means I’m successful – NONSENSE

Shopping a sale for things I don’t need, with money I don’t have, because it’s on sale – NONSENSE

Perfection is what makes me beautiful – NONSENSE

Conformity is acceptance – NONSENSE

See how fun that is?

I don’t want any of those non-sense beliefs in my home or heart. I declare No Nonsense!

5 Senses - SAT

Sixth Sense (intuition – not dead people)

No, you won’t see dead people when you simplify life, but you may resurrect your intuition. There is a voice within each of us that is silenced by all the other voices telling us who we should be and what we should own. Our intuition wants to reconnect our hearts with the life we’re capable of living.

Simplifying clears away the clutter and it clarifies our hopes and values. It causes a conversation within us that creates a greater sense of who we are meant to be. It gives us permission to live with our hearts. It takes away pressures of perfect highlight reels on Facebook and it reclaims the joys in the little, simpler things of life.

When we quiet the noise in our heads we can finally listen to the symphony of our hearts.

Our senses remind us to pay attention to the details because when you’re striving for simple, the details matter. The sweetest life isn’t discovered through instant gratification and sugar highs, but through intentional presence in the small, slow moments tuning into our senses.

5 Senses - SAT 4

Lisa Avellan is a stay at home mom striving for simple in San Diego, California. She writes about intentional living and minimalism on her blog Creative Holistic Home. She is passionate about writing, holistic nutrition, travelling and languages, and her family. You can connect with Lisa on Facebook, Twitter, and Instagram.

Let Them Be: The Value of Letting Young Kids Experience Nature 

Wednesday, August 17, 2016

I watched her place her foot onto a rock and test it for stability. Finding it adequate, she added the weight of her body to the rock and then tested the next one.

Rock by rock she moved across the creek until—with a victory whoop—she jumped onto dry ground.

With sudden clarity I could see her, in my memory, doing the exact same thing as a three-year-old.

“The more risks you allow children to take, the better they learn to take care of themselves." - Roald Dahl

Photo taken near Moraine Lake / Banff National Park

If there is one thing I know as a mom it is this: three-year-olds turn into thirteen-year-olds far too quickly.

I also know that unless we let them test and push themselves while they’re young, they won’t be ready for the pressures of the teen and young adult years. It’s one of the many reasons that I’m so passionate about getting kids into nature. There’s no better place for children to challenge themselves and build their confidence.

Have you ever planned an outdoor family adventure but hesitated because one of your kids felt too young? 6 tips to help you get even your youngest into nature!

Have you ever had an outdoor adventure in mind for your family but hesitated because one or more of your children felt too young for it?

The idea of foregoing certain outdoor experiences because your children are young isn’t one my husband and I ever subscribed to. We’ve been hiking, skiing, and boating with our kids since they were babies.

Have you ever planned an outdoor family adventure but hesitated because one of your kids felt too young? 6 tips to help you get even your youngest into nature!

Naturally, our outdoor experiences looked different when our kids were young. We fit our adventures around nap times, we didn’t hike as far, we went slower, we took turns carrying the youngest when needed, and we didn’t make it to the end of the trail every time.

banff-post5

But I will always be grateful that we decided to embrace family adventure even with babies and toddlers. It is because of those efforts that I now get to watch my kids hop rocks with ease… or rappel down a rock wall with surprising confidence… or try something totally new, like zip-lining over a gorge, with courage born of practice and experience.

Have you ever planned an outdoor family adventure but hesitated because one of your kids felt too young? 6 tips to help you get even your youngest into nature!

Benefits of Letting Young Kids Experience Nature 

  1. By being immersed in nature from a young age, a love of nature takes root and continues to grow as they do.
  2. They learn to test themselves, push their limits, and grow in their confidence. {Encouraging Young Adventurers}
  3. They feel like they have more freedom—and parents who trust them to take reasonable risks and solve their own problems.

Have you ever planned an outdoor family adventure but hesitated because one of your kids felt too young? 6 tips to help you get even your youngest into nature!

Tips for Exploring Nature with Babies and Toddlers

  1. Invest in a good sling or hiking backpack.
  2. Work with your personality as a parent. I know moms who never risk missing a nap (I can’t blame them!) and others whose little ones have been trained to nap on the go, whether in the carseat or in a hiking backpack. There’s nothing wrong with either, so just know where you fall on the spectrum and work within it. When our children were young, we often timed it so that they’d nap on the drive and then be ready to go when we arrived. (Or vice versa.)
  3. Snacks, snacks, snacks. I mentioned it a recent post about observing vs. exploring nature, but simple, nutritious snacks are essential for keeping a toddler’s energy up. Sometimes when you think your toddler won’t go any farther, you’ll find that a few minutes of rest and a yummy snack will perk that little one right back up!
  4. Explore at the youngest child’s pace. Or…
  5. Hike with friends or family so that you can split into a slower group and a faster group.
  6. Give up the end goal, and enjoy the journey!

Have you ever planned an outdoor family adventure but hesitated because one of your kids felt too young? 6 tips to help you get even your youngest into nature!

I was struck by a recent article at the Art of Simple where the writer shared a Scandinavian expression:

“The safest place for a child is at the top of a five-foot tree.”

It’s a sacrifice to get our kids into nature. It requires time, energy, planning, and patience. Some outings go like we’d hoped, and to be honest, others don’t!

But when we give our young children freedom to explore and to push their limits, they gradually gain something much larger than the ability to climb a tree or cross a creek: they gain self-assurance that will carry them through each stage.

Have you ever planned an outdoor family adventure but hesitated because one of your kids felt too young? 6 tips to help you get even your youngest into nature!


The majority of the photos from this post were taken at Johnson Lake, one of our favorite little spots within the incredible Banff National Park. Banff has something for everyone—from daring adventurers to novice nature explorers—and I think a lot of people would be surprised to learn how friendly it is for young kids.

At Johnson Lake, for example, there’s an easy trail around the entire lake. We took more an hour to explore just a small stretch of the trail—stopping to balance on logs and to collect pine cones and other nature treasures. 🙂

By keeping in mind the tips above, I think you’ll find that any outdoor adventure can be adjusted to fit the needs of your youngest adventurers, and as you know, I think it’s well worth the effort.

What was your family’s approach to outdoor adventure while the kids were small? 

Easy Grilled Vegetables Recipe

Tuesday, August 16, 2016

As a family that is passionate about spending time outdoors we’re thrilled to partner with Coleman Canada and Canadian Tire in the Get Outside Day movement! I believe that getting outside is important for our health, overall well-being and for building strong family connections.

We’re getting outside this week and cooking some delicious (and healthy!) grilled vegetables. Head over to the official Get Outside Day website where I’m sharing the recipe!

Keep outdoor cooking simple (and healthy!) with this easy recipe for grilled vegetables.

When you’re cooking outdoors what is one of your go-to meals? I’d love to hear your ideas!

« Previous Page
Next Page »

Primary Sidebar

Rebecca Cooper — Founder, Simple as That Blog

Hello, I'm Rebecca. Welcome to my blog, Simple as That. Come along as we embrace simplicity in crafting, photography, travel, and family life. Read more about me.

Newsletter

Get the latest updates from Simple as That delivered to your inbox.

Join for Free

Beyond Snapshots: Mastering the Art of Mobile Photography

Connect

  • Bloglovin
  • Facebook
  • Instagram
  • Pinterest
  • Twitter

Follow On Pinterest

Visit Rebecca - Simple as That Blog's profile on Pinterest.

Categories

  • Crafts / DIY
  • Holidays
  • Motherhood
  • Organization
  • Photography
  • Printables
  • Recipes
  • Simple Living
  • Travel
  • Wellness

Our Privacy Policy

Follow on Instagram

Instagram has returned invalid data.

Printable 2023 Calendar

Our printable calendars and organizational pages have been essential in keeping our home and my life in order and I guarantee they will be a help to you too!

Click here to learn more

© Simple as That Blog, 2017 · Design by Brian Gardner

Simple as That Blog

Facebook / Instagram / Pinterest / Twitter / Contact