• About
    • About Rebecca
    • Meet the Team
    • Media Kit
    • FAQ
  • Photography
  • Holidays
  • Recipes
  • Printables
  • 2019 Calendar
  • Write for Us
  • Beyond Snapshots

Simple as That

Making Everyday Beautiful

Blog

Easy Slow Cooker Chicken and Wild Rice Soup

Thursday, March 17, 2016

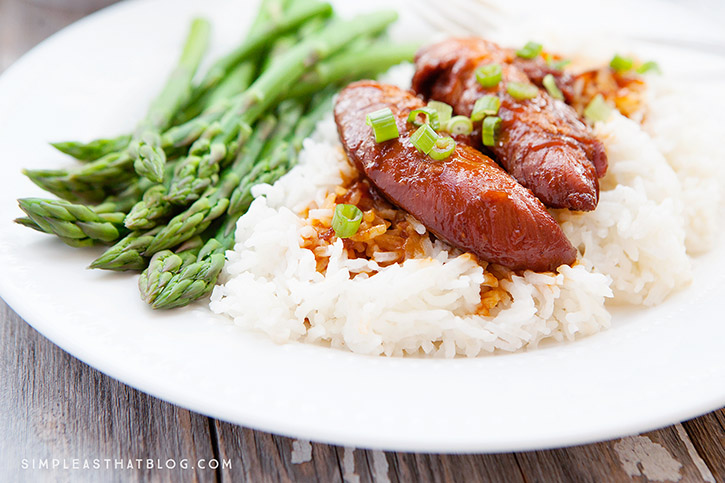
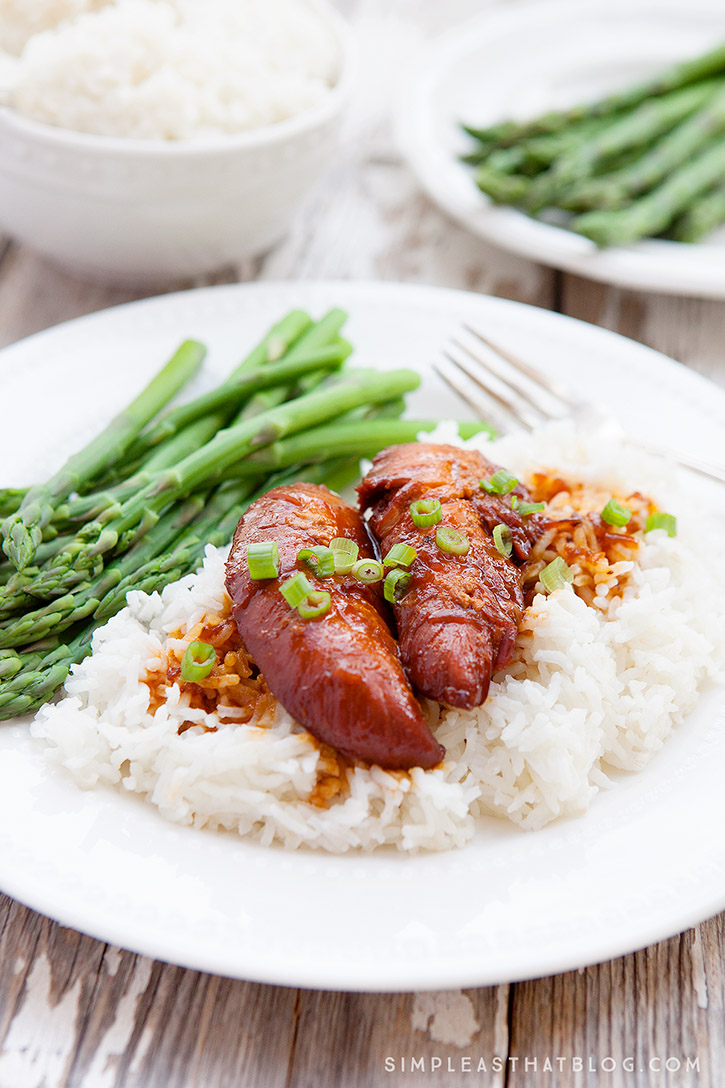
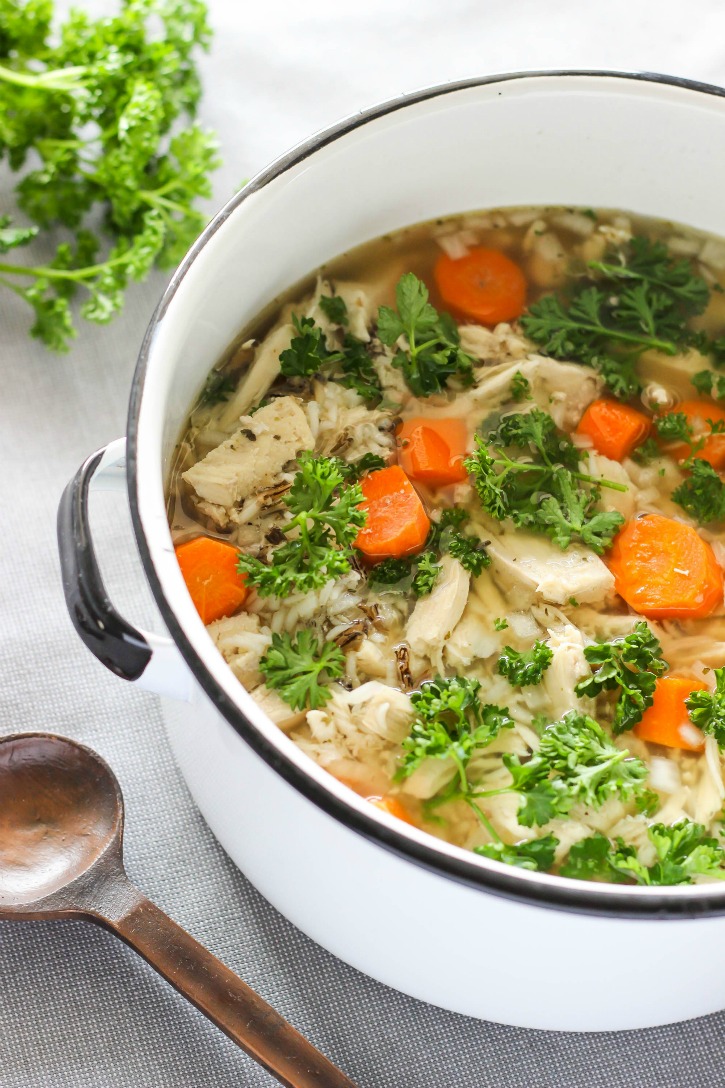
Easy Slow Cooker Chicken and Wild Rice Soup – made with simple, wholesome ingredients. This hearty recipe is perfect for busy weeknights and weekends.

Easy Slow Cooker Chicken and Wild Rice Soup - made with simple, wholesome ingredients. This hearty recipe is perfect for busy weeknights and weekends.

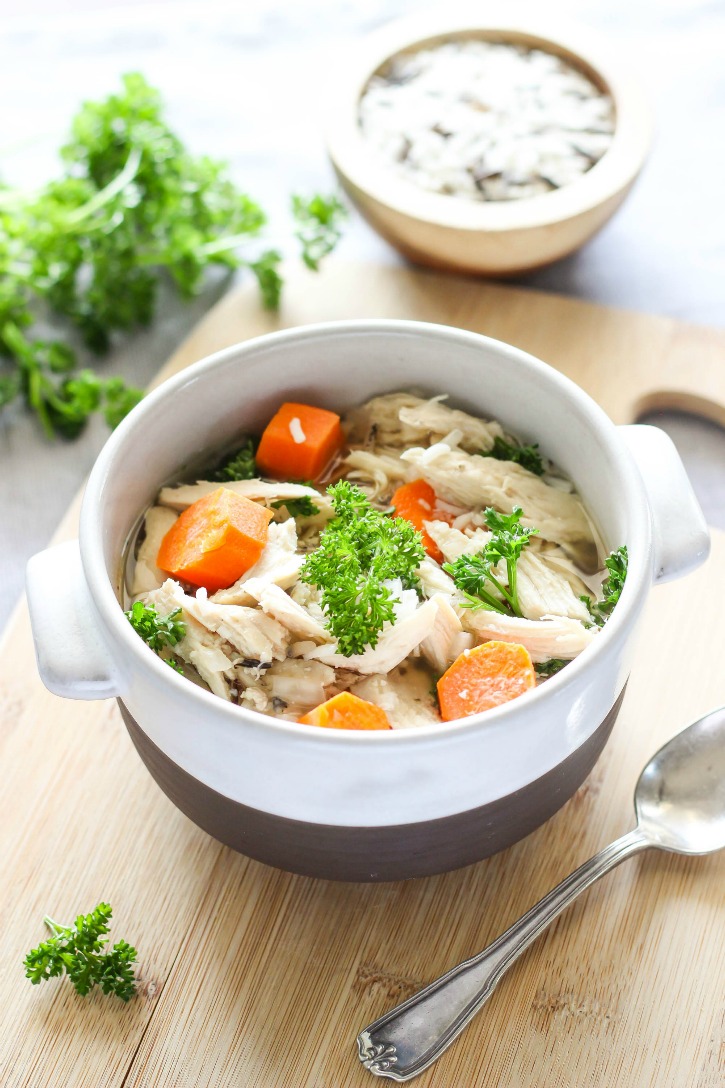
Hello there!  It’s me again, Katie from The Casual Craftlete blog.  I am happy to be here today sharing a super easy and delicious recipe.  This Slow Cooker Chicken and Wild Rice Soup is the ultimate comfort meal.  This is a great springtime recipe or perfect for when you are feeling under the weather.  It’s incredibility filling and makes you feel good inside.  This soup is made with all natural and easy ingredients.  It’s great for incorporating spring vegetables!

Easy Slow Cooker Chicken and Wild Rice Soup - made with simple, wholesome ingredients. This hearty recipe is perfect for busy weeknights and weekends.

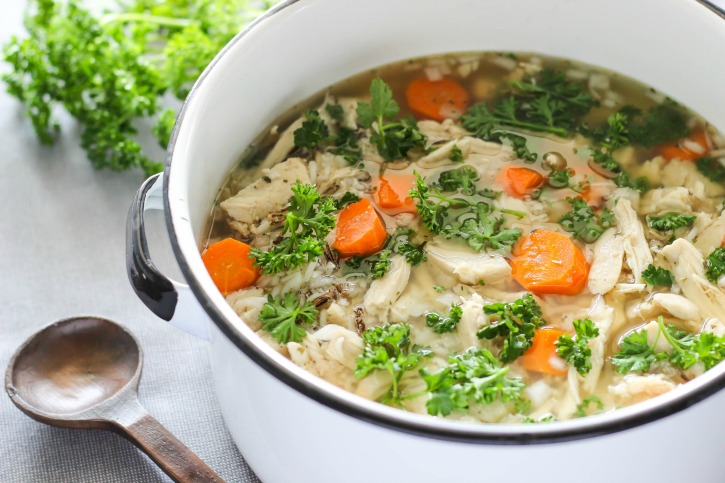
Springtime here is Southern Illinois is typically rainy and chilly.  All I want to do is curl up on the couch and watch tv.  This slow cooker chicken and wild rice soup recipe is perfect for warming me and my family up on those cool days.  The thing I love about slow cooker meals, including this one, is that there is very little prep when it comes to making the recipe.  I can chop up a few vegetables and throw all the ingredients into the crockpot and let it cook away all day.  Lately, my preschooler has been sick a lot and there is just something about chicken soup that helps heal the soul.  It is so comforting and always a favorite for most families.

Easy Slow Cooker Chicken and Wild Rice Soup - made with simple, wholesome ingredients. This hearty recipe is perfect for busy weeknights and weekends.

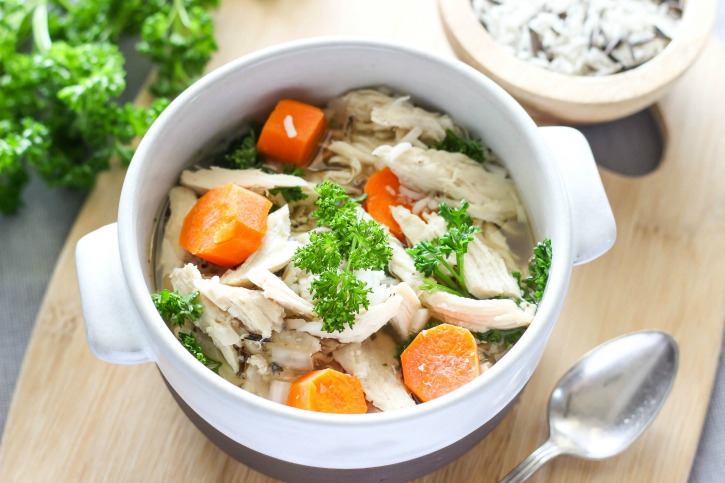
The great thing about this recipe is that you can customize the ingredients to you and your family’s desire.  You can add your favorite vegetables and seasonings to your taste.  For my recipe, I am not a huge fan of celery, so I left it out and used celery salt instead.  Feel free to add celery and any other ingredients you like.  That’s the great thing about cooking; you can make up your own recipes as you go.  Trial and error is how you find out what you like and dislike when it comes to food.  I love the freshness of this soup!

Easy Slow Cooker Chicken and Wild Rice Soup
 
Print
Recipe type: Main
Cuisine: American
Serves: 8
Ingredients
  • 4 carrots, peeled and chopped
  • 1 medium white onion, chopped
  • 3 garlic cloves, finely minced
  • 1 cup uncooked wild rice, rinsed and drained
  • 2 dried bay leaves
  • ½ teaspoon dried thyme
  • ½ teaspoon dried basil
  • ½ teaspoon celery salt
  • Salt and black pepper, to taste
  • 2 pounds boneless skinless chicken breasts
  • 10 cups low-sodium chicken broth
  • Handful of chopped fresh parsley
Instructions
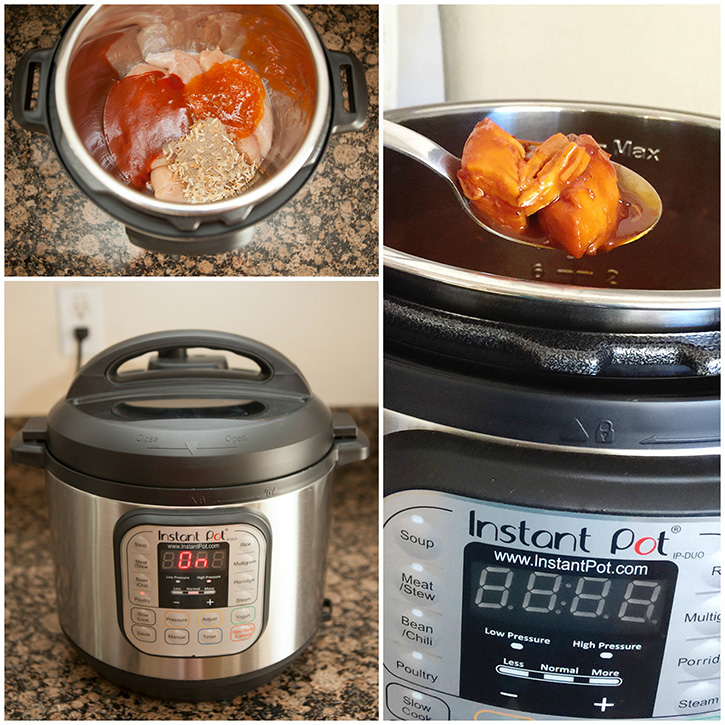
  1. In a large 6 quart slow cooker. combine carrots, onion, garlic, wild rice, bay leaves, thyme, basil, celery salt, salt, and pepper. Top with chicken breast. Add chicken broth.
  2. Place the lid on the slow cooker and cook on low for 6 to 6½ hours or on high for 3½ hours. Remove chicken and shred. Return chicken to the slow cooker and stir. Remove bay leaves and add chopped parsley. Season to taste.
3.4.3177


Easy Slow Cooker Chicken and Wild Rice Soup - made with simple, wholesome ingredients. This hearty recipe is perfect for busy weeknights and weekends.

Thank you for letting me share my recipe for Slow Cooker Chicken and Wild Rice Soup!  What is your favorite soup recipe?

Chocolate Cherry Magic Bars

Thursday, March 10, 2016

6 layers of deliciousness make up these Chocolate Cherry Magic Bars. If you love coconut, cherries and chocolate, this simple dessert recipe is sure to please.
Chocolate Cherry Magic Bars Recipe

Hi. My name is Julie. And I’m a people pleaser. I like to make people happy.

Now this can be a good thing, but it can also be a negative thing because you know what? People are hard to please. And what they think they want always changes.

My favorite person to please is my husband. He’s my #1 taste tester over at Tastes of Lizzy T. And there’s one thing with him that will never change.

His love for chocolate, cherries and coconut.

Chocolate Cherry Magic Bars Recipe

So yeah…you can see that these chocolate cherry magic bars would take first place in his eyes.

Have you ever made magic bars? They’re so simple and so versatile. I’ve made peppermint and pumpkin magic bars and I knew the next on the list to try would be a chocolate cherry magic bar.

Here’s the layers…

Chocolate graham crackers

Coconut

Sweetened Condensed Milk

….baked together until gooey and golden brown.

Chocolate Cherry Magic Bars Recipe

You’ll let that beautifulness cool to room temperature, then spread on some cherry jam. I chose to use Smuckers Natural Sour Cherry Fruit Spread. It tastes just like my grandma’s pie filling and you’ll often find me eating out of the jar with a spoon.

Shhh…don’t tell anyone. 😉

Use whatever cherry jam you’d like, and you can even get brave and try a different flavor of jam.

Chocolate & strawberries, anyone?

Chocolate Cherry Magic Bars Recipe

Lastly is that lovely chocolate ganache. I’m a bit obsessed with ganache. If you’ll remember, when I shared with you all last month, that recipe had ganache also. This time you’ll use 1/2 cup heavy cream and 1 1/2 cups chocolate chips. This is going to make just the right amount and texture of ganache to spread over your cherry magic bars.

Dark chocolate and cherry jam. I’m in love.


Chocolate Cherry Magic Bars Recipe

So did I win my husband over with these?

Yes.

More than I could’ve hoped for. I always wait with bated breath as he takes his first bite and processes the flavors.

He fell head over heels in love.

With the cherry magic bars, and all over again with me. 🙂

Chocolate Cherry Magic Bars Recipe

5.0 from 2 reviews
Chocolate Cherry Magic Bars
 
Print
6 layers of deliciousness make up these Chocolate Cherry Magic Bars. If you love coconut, cherries and chocolate, this simple dessert is for you!
Author: Julie Clark
Recipe type: Dessert
Cuisine: American
Serves: 15 bars
Ingredients
  • 1¾ cups chocolate graham cracker crumbs
  • 1 tablespoon granulated sugar
  • 1 stick (1/2 cup) salted butter, melted
  • 2½ cups shredded coconut (sweetened)
  • 1 can (14 ounces) sweetened condensed milk
  • 1½ cups Smuckers Natural Red Tart Cherry Fruit Spread*
  • ½ cup heavy cream
  • 1½ cups dark chocolate chips
  • ⅓ cup sliced almonds
Instructions
  1. Preheat the oven to 350 degrees.
  2. Combine the graham cracker crumbs, sugar and melted butter in a small bowl.
  3. Spray a 9x13 baking pan with cooking spray.
  4. Spread the crumb mixture evenly over the bottom of the baking pan, pressing down to make a compact crust.
  5. Sprinkle with coconut.
  6. Pour the condensed milk evenly over the coconut.
  7. Bake at 350 degrees for 20 minutes until lightly browned.
  8. Allow the baked bars to cool to room temperature.
  9. Gently spread the cherry fruit spread overtop the coconut layer.**
  10. In a small bowl, heat the heavy cream for 30 seconds in the microwave.
  11. Place the chocolate chips in a medium-size bowl.
  12. Pour the heated heavy cream overtop the chocolate chips, cover the bowl and allow it to sit for 3 minutes.
  13. Stir the chocolate and cream mixture. If the chocolate is not completely melted, heat it in the microwave in 10 second intervals***, stirring between each time, continuing until the chocolate is completely smooth.
  14. Pour or spoon this melted chocolate overtop the cherry jam, smoothing with the back of a spoon until it completely covers the top.
  15. Sprinkle sliced almonds over the chocolate, if desired.
  16. Place the pan in the refrigerator to allow the chocolate to completely set.
  17. Cut into 15 or 20 bars, as desired.
  18. Store in the refrigerator.
Notes
*This is my favorite cherry jam. Feel free to use homemade or your favorite brand.
**To make the jam easier to spread, warm it for 10-20 seconds in the microwave and stir, then spread.
***Be sure to take your time melting the chocolate. Use just 10 second intervals and stir well between each time. If the chocolate gets too hot, it will harden, so be sure to take your time!
3.4.3177


25 Fun Apple Snacks

Thursday, March 10, 2016

25 fun Apple Snacks – Here are some creative ways to serve apples to your kids! Kids will love the variety of apple snacks and are sure to have some fun with their food!

Creative ways to serve apples snacks that your kids will LOVE!


All four of my kids enjoy apples so it’s no surprise that they’re one of our go-to healthy snacks. One way my kids especially love to eat their apples….

applepeeler


…peeled and spiraled. This heavy duty peeler is one kitchen tool we use often in our house! If you’re looking for more fun ways to enjoy apples keep on scrolling, I have 25 more!

Turtle Apple Snack | Simple as That

Apple Turtle

Strawberry Apple Fruit Leather | Eat. Drink. Love

Strawberry Apple Fruit Leather

Cinnamon Caramel Apple Energy Balls | Cupcakes and Kale Chips

Cinnamon Caramel Apple Energy Balls

Apple Sandwiches | Messes to Memories

Apple Sandwiches

Applesauce Muffins | Simple as That


Apple Penguin | Kitchen Fun with My Three Sons

Penguin Fruit Apple

Apple Pie Dip | Cooking Classy

Apple Dip

Apple Cinnamon Granola Bars | Lovely Little Kitchen

Healthy Chewy Apple Cinnamon Granola Bars

Apple Cookies | Paleo Eats and Treats

Apple Cookies

Apple Frog | Canadian Family

Apple Frog

Caramel Apple Nachos | Lil’luna

Caramel Apple Nachos

Apple Fritter Pull Apart Bread | Host the Toast

Apple Fritter Pull Apart Bread

Baked Apple Chips | Recipe Critic

Baked Apple Chips

Apple Panda Snack | Meet the Dubiens

Apple Panda Snack

Apple Crisp Stuffed Baked Apples | Life in the Lofthouse

Baked Apples

Crunchy Apple Boats | Childhood 101

Crunchy Apple Boats

Apple Pie Taquitos | Jo Cooks

Apple Pie Taquitos

Fruit and Yogurt Dip with Baked Cinnamon Chips | Creative Bites

Fruit Yogurt Dip

Apple Cinnamon Breakfast Cookies | Hello Healthy

Apple Cinnamon Breakfast Cookies

Peanut Butter Apple Cinnamon Sushi Rolls | Mom on Timeout

Apple Cinnamon Sushi Roll

Beautiful DIY spring hostess gift

Sunday, March 6, 2016

Hello everyone. It’s Annika here, checking in to spread some Spring vibes. It is officially Spring now, but I have to admit it is not looking much like it here in Denmark. I’m not one to get those winter blues, but today is really grey and wet and I’m starting to long for those sunny strolls in the garden. Nonetheless I do love all the imagery the magazines sprinkles of a promising season to come, and let’s not forget all the little Spring bulbs that are starting to find their way out of the cold dirt. I always feel like I found little sparkling gems, when I stumble upon those tiny Spring flowers.

simpleasthat_blog_march_005-compressor
Today’s simple project is sure to create some Spring vibes. I have created an easy DIY hostess gift tutorial for you and since Easter is not far away,  I thought incorporating eggshells would make it a pretty versatile project to create for throughout the month of March.

simpleasthat_blog_march_004
Basically for this project, I have planted Spring bulbs in empty eggshells and put them in an egg carton. If you choose to give this as a gift, the spring bulbs can still be transferred to the garden, while staying in the eggshell. There are really good nutrients in the eggshell, so it’s pretty practical, too. Also, an alternative could be starting your vegetable seeds and adding them to eggshells to give as a hostess gift, ready to be planted into the garden. Either way, it’s a cute and useful gift to give.

You’ll need the following materials.
– empty eggshells
– spring bulbs
– egg cart

Follow the steps outlined in the image below, to create a quick and easy hostess gift

simpleasthat_blog_march_006-compressorsimpleasthat_blog_march_002-compressor simpleasthat_blog_march_001-compressor (1)simpleasthat_blog_march_003-compressor
I hope you enjoyed this little spring project.
Stop by my blog to find spring and Easter printables.

Have a great week!
Annika

Simple Berry Basket Succulent Planter

Thursday, March 3, 2016

Hello everyone! It is Kara from A Kailo Chic Life, and I am so excited to share this tutorial for making your own simple berry basket succulent planter with you today. Spring is right around the corner and that means that it’s time for new growth and new plantings. I love using succulents around my house to give a pop of color and life to the room. They are also great outdoors on the patio or in your garden. Succulents come in such a wide range of colors, shapes, and textures and are so simple to plant and keep alive that they are great for everyone whether you are just starting out with gardening or your an old pro. Today I will show you how to re-purpose a plastic berry basket (it was supposed to be a kids Easter basket!) into a mini succulent garden just in time for spring.

Simple Berry Basket Succulent Planter

Simple Berry Basket Succulent Planter

The process is really straight forward and just look at all those colorful succulents! Who wouldn’t want that on their spring table?

The Supplies:

  • Plastic Berry Basket with no holes (I purchased this one from Target for $1 and they had other colors too)
  • Potting soil
  • Gold leaf pen or gold acrylic paint
  • assortment of baby succulents

Simple Berry Basket Succulent Planter

Begin by adding a little “Midas touch” to your basket with the help of your gold leaf pen or gold acrylic paint. Sure you could leave the basket as is, but the little band of gold makes this planter seem so much fancier and more expensive!

Simple Berry Basket Succulent Planter

I simply colored around the top edge of the basket, but feel free to paint the handle as well. Or even add a little pattern to the berry basket itself. Once your paint has dried, fill your basket with dirt and all your baby succulents. The nice thing about succulents is that you can easily break off baby succulents from the larger mama succulent and replant them and they will re-root and grow. Easy as that! So if you would like an assortment of succulents, but don’t want to buy a ton of plants, buy a few larger ones and separate all the growth into several little babies to plant. I bet you could even ask your local garden center if you could just purchase a few “suckers” (i.e. baby succulent off shoots) from several different kinds to get a nice assortment at a discounted price.

Simple Berry Basket Succulent Planter

Simple Berry Basket Succulent Planter

You have to admit, this simple berry basket succulent planter makes the cutest little spring centerpiece ever! If you liked this tutorial, feel free to check out my blog, A Kailo Chic Life, for even more succulent planter ideas and other fun crafts, recipes, and decor.

Instant Pot Apricot Chicken

Thursday, March 3, 2016

This Apricot chicken can be made in the slow cooker or Instant pot. With just 4 ingredients this dish is easy and tasty! It’s the perfect solution if you need dinner in a pinch.

This Apricot chicken can be made in the slow cooker or Instant pot. With just 4 ingredients this dish is easy and tasty! It's the perfect solution if you need dinner in a pinch.

We tried this recipe out for the first time a few weeks ago and have already made it twice more since then. I love finding recipes the whole family can eat and this one is definitely one we’ll have in our regular meal rotation.

This delicious Apricot Chicken can be made in the slow cooker or in our new favorite kitchen gadget - the Instant pot. With just 4 ingredients, this dish is both easy and tasty! It's the perfect solution if you need dinner in a pinch.

We made this dish in our amazing Instant Pot but it can be made just as easily in the slow cooker. My Instant Pot is easily one of the most used appliances in my kitchen. It’s replaced my rice cooker and I definitely use it more than my slow cooker these days! I love it so much.

This delicious Apricot Chicken can be made in the slow cooker or in our new favorite kitchen gadget - the Instant pot. With just 4 ingredients, this dish is both easy and tasty! It's the perfect solution if you need dinner in a pinch.

This Apricot Chicken is a family favorite that I defer to often when I’m menu planning. Have I told you about the running list I keep of our family’s go-to meals? This list of meals (ones I already know my family loves, plus a few new ones we’ve tried that were a hit) has made it easy to fill in our menu when I sit down to plan on Sundays.

Meal planning used to feel like just one more thing to add to my ever growing to-do list! You can read how I was able to simplify meal planning and finally make it work for me.  I wanted more family and less frenzy at the dinnertime hour and meal planning was exactly what I needed to make that happen!

5.0 from 1 reviews
Instant Pot or Slow Cooker Apricot Chicken
 
Print
Author: Rebecca Cooper
Recipe type: Dinner
Ingredients
  • 1 cup Apricot Jam
  • 1 small bottle Russian Salad Dressing
  • 1 package onion soup mix
  • 5-6 chicken breasts
Instructions
  1. Combine jam, dressing and soup mix in a bowl and mix well. Place chicken in crockpot. Pour sauce over chicken and set slow cooker.
  2. Cook 6 hours on low, 3 hours on high.
  3. Serve with your favorite vegetable side.
  4. **Using an Instant Pot makes this meal even quicker to prepare. Place chicken breasts in Instant Pot, pour sauce over chicken. Select manual and set a cook time of 10-12 minutes depending on the size of your chicken breasts.
  5. When done, vent the instant pot. Remove chicken. Set Instant Pot to sauté and for 5-6 minutes stir sauce until it thickens. Pour sauce on chicken and serve over rice.
3.5.3226

**Note: If you can’t find Russian dressing at your local grocery store you can substitute Catalina dressing in this recipe.

The ingredients for this recipe are so easy to keep on hand. Serve with some fresh or frozen veggies and you have a simple meal the whole family will love!

Grocery Pickup

I recently started ordering my groceries online, and it has been life changing you guys! You might think I’m exaggerating, but ordering from home and having someone do my shopping and load my car has simplified making meals for my family in ways I couldn’t have dreamed. I don’t know why I didn’t start doing it sooner.

Here’s $10 to try Walmart’s free grocery pickup. You can thank me later!

This delicious Apricot Chicken can be made in the slow cooker or in our new favorite kitchen gadget - the Instant pot. With just 4 ingredients, this dish is both easy and tasty! It's the perfect solution if you need dinner in a pinch.


We purchased an Instant Pot about a month ago and we’ve been loving it! Anything that helps me get dinner on the table faster is ok in my book!

We’ve made several meals in the Instant Pot since we got it, but this Apricot Chicken has to be our favorite! It takes just 30 minutes to cook and the chicken is so moist and flavorful when it’s finished.

This delicious Apricot Chicken can be made in the slow cooker or in our new favorite kitchen gadget - the Instant pot. With just 4 ingredients, this dish is both easy and tasty! It's the perfect solution if you need dinner in a pinch.

This Apricot Chicken dish is perfect for weeknights when you have a lot on the go. With little to no prep you can have a delicious dinner on the table with minimal effort.

If you liked this post you might also enjoy…

  • Rustic Italian One-Pot Chicken and Rice
  • Mexican Green Rice
  • Cheesy Cauliflower Bake
  • Easy Chicken and Stuffing Casserole

How to Make a Floral Headband

Tuesday, March 1, 2016

How to Make a Floral Headband – create your own beautiful floral headbands with a few simple steps. Use as a photo prop, for a special occasions or to dress up any outfit! 

Create a simple and beautiful floral headband for Spring with this easy to follow tutorial.

As a mom of three girls I’ve grown quite the collection of hair accessories over the years. I love to make my girls headbands and clips – it’s less expensive than buying them and I can customize the colors to their different outfits.

Create a simple and beautiful floral headband for Spring with this easy to follow tutorial.

Michaels has such a gorgeous collection of Spring florals and I wanted to create my girls some beautiful floral headpieces. I also wanted them to be comfortable to wear so we tried our hand at making our own and they turned out beautifully! Below you’ll find a quick tutorial on how to make your own!

Create a simple and beautiful floral headband for Spring with this easy to follow tutorial.

Materials

Leather Suede Cord

Spring Florals

Glue Gun / Hot Glue

Scraps of ribbon or lace

Elastic

Felt

Create a simple and beautiful floral headband for Spring with this easy to follow tutorial.

Step No. 1

First step is to create the backbone of the headband. First, hot glue three pieces of leather suede cord together. Braid them together until they’re the length that you need for the headband. Make it about 1-2 inches shorter than the circumference of the person’s head that you’re making it for. Once your braid is complete, hot glue the three ends together. Trim off any excess pieces.

Step No. 2

Attach a short piece of elastic to the ends of the braided piece. This will make the headband stretchy and more comfortable to wear. If you’re making it for a smaller child it will also allow the headband to grow with the child. Hot glue the elastic to each end. Wrap a small piece of ribbon or lace around the ends of the elastic and the braided pieces hot glue together to secure.

Step No. 3

Now that the headband is finished it’s time to add your flowers. Remove flowers from their stems. Attach largest flowers first, if needed you can secure them to the headband by hot glueing on the front and also attaching a small piece of felt ot the back to secure it from the back.

Step No. 4

Continue around the rest of the headband glueing flowers and leaves until the headband is as full as you’d like.

Create a simple and beautiful floral headband for Spring with this easy to follow tutorial.

Michaels new Floral Market has over 500 new blooms and freshly picked projects make this the prettiest spring ever.

Just by swapping out a few décor pieces or adding a lovely floral arrangement can completely transform your home for the fresh, new season.

If you don’t know where to begin, you can always take a look at some of the fun projects on Michaels.com or the other 49 Makers’ ideas on The Glue String for to see how they personalized their crafts!

An InLinkz Link-up

You could win a Trip to the Makers Summit!  The event last year was amazing and it would be so fun to see YOU there!

 Win a Trip to the Michael's Makers Summit


7 Tips for an AWESOME Staycation

Tuesday, March 1, 2016

These 7 tips will help you have the most awesome staycation you can dream up! | 7 Tips for an AWESOME StaycationYears ago, my husband and I would drift each night into the modestly decorated nursery of our soon-to-arrive son. I’d sit in our craiglisted glider with a hand on my round belly, he’d take the floor near the crib, and we’d dream together about what the upcoming years would look like.

We imagined sleepless nights and slobbery kisses, overflowing library bags and a table covered in arts and crafts, exploring the West coast with our kids in tow or even living abroad for a while.

Then parenting hit… and we put down some roots… financial responsibilities grew… and although we still have big dreams for our family, we learned that every now and then, the easiest route is the best route. 🙂

Enter the staycation.

These 7 tips will help you have the most awesome staycation you can dream up! | 7 Tips for an AWESOME StaycationIt’s an amazing way to reconnect as a couple and family without taking vacation days or stressing over travel preparations or spending money on flights and hotels.

A staycation is just you and your team, consciously playing and relaxing in the place you’re already most comfortable: home.

These 7 tips will help you have the most awesome staycation you can dream up! | 7 Tips for an AWESOME Staycation7 Tips for an Awesome Staycation

1. Make it official. Block it out in your calendar, give it a festive name, oh hey—tell your kids what a staycation is! When you’re at home, it’s easy to get distracted by errands and projects, so commit to jumping with two feet into your staycation.

2. Set some ground rules about technology. Talk to you family and find some middle ground you’re comfortable with, like devices are okay during the day but are set aside each evening beginning with dinner. Or go big and toss all of them into a basket on top of the fridge and see what happens. (Warning: this experiment is likely to be harder for parents than kids.)

3. Line up a couple of fun adventures, remembering that less is more. Choose a fun outing or two, like a trip to a museum, an ice skating rink, a nearby national park, a lake, or beach. (For more, check out these 25 staycation ideas.) But be mindful of not overcrowding your schedule and losing the relaxing pace of staycation.

4. Stock the fridge with delicious food! At our house, a well-stocked fridge is key to success any day, much less on staycation. I find that—especially on staycation—choosing easy snacks like string cheese and clementines takes some of the pressure off me as the mom, because my kids can always just grab something from the fridge when they’re hungry.

And don’t forget to throw in a few treats, like one of Tampico’s juice flavors! A big thanks to Tampico for sponsoring this post! My kids are always MORE than happy when they spy Tampico in the fridge.

These 7 tips will help you have the most awesome staycation you can dream up! | 7 Tips for an AWESOME Staycation5. Plan a couple of family-favorite meals, and plan to order in (or go out) for some others. The last thing you want on a staycation is your family complaining about dinner. (You can save that for your average weekday!) So plan some simple meals that are always a win, and, as the budget allows, let a restaurant do the heavy lifting for the other meals.

6. Make home feel special with a few extra touches. My formula for a home I want to be in is this: general tidiness, flowers, and candles. A little prep work right before your staycation will go a long way.

7. Come up with some unique activities that don’t take you farther than your living room. We recently bought a dozen single bottles of root beer from a beverage store and conducted a thorough taste test with our extended family. Everyone loved it! We’ve also made root beer from scratch using dry ice—another huge win.

We’ve also had fun drilling into coconuts (our boys looove power tools) and making piña coladas. This is a great way to add a tropical flare to your vacation. And don’t forget a splash of Tampico! 😉

These 7 tips will help you have the most awesome staycation you can dream up! | 7 Tips for an AWESOME StaycationNo matter your reasons for staycationing this year—whether it’s to save money or to reconnect in a low-pressure environment—I hope these tips help you have the most awesome staycation you can dream up!


Disclosure: This post was sponsored by Tampico Beverages. While I was compensated to write a post about Tampico, all opinions are my own. 

Whole Wheat Cinnamon Chocolate Chip Bread

Monday, February 29, 2016

Whole Wheat Cinnamon Chocolate Chip Bread is a whole grain treat that your kids will love, they won’t even know that it’s good for them.

Whole Wheat Cinnamon Chocolate Chip BreadLately, I’ve been experimenting with white whole wheat flour. I’m trying to feed my family more whole grains and making swaps wherever I can. Some things they don’t mind (whole wheat waffles) some things they just aren’t on board for (whole wheat pasta is no-go). I found white whole wheat flour and thought that it might be an easy way to make some treats with whole grains. So far, it has been pretty easy to make a 1:1 swap in most recipes. I think that it is just fine in a cookie, or a bread like this, but probably not a layer cake or something that is supposed to be really light and have a loose crumb. It has a milder taste than a full wheat flour and my kids had no idea that this bread was whole wheat. I added cinnamon for flavor, and also to darken the bread so they wouldn’t ask questions because it doesn’t look like the normal chocolate chip bread that I make. Sneaky, huh?

This cake is great the next day toasted with a little butter. Just in case you were wondering.

Whole Wheat Cinnamon Chocolate Chip Bread


Whole Wheat Cinnamon Chocolate Chip Bread:

  • 6 Tablespoons butter, room temperature
  • 2/3 cup sugar
  • 3 eggs
  • 1 teaspoon vanilla
  • 2 cups white whole wheat flour
  • 2 teaspoons cinnamon
  • 1/2 teaspoon baking soda
  • 1/2 teaspoon baking powder
  • 1/2 teaspoon salt
  • 1 cup buttermilk
  • 1/2 cup mini chocolate chips
  • whole sanding sugar (optional)

Whole Wheat Cinnamon Chocolate Chip Bread

Preheat oven to 350°. Spray a 9×5 loaf pan with cooking spray.

Cream together butter and sugar until light and fluffy. Add eggs and vanilla.

Whole Wheat Cinnamon Chocolate Chip Bread

In a medium bowl whisk together flour, cinnamon, baking soda, baking powder, and salt.

Add 1/3 of the flour mixture and stir until combined.

Whole Wheat Cinnamon Chocolate Chip Bread

Add 1/2 of the buttermilk. Repeat with remaining ingredients.

Whole Wheat Cinnamon Chocolate Chip Bread

Add chocolate chips (save a few for the top) and mix until everything just comes together, being careful to not over-mix.

Whole Wheat Cinnamon Chocolate Chip Bread

Spread the batter evenly into the prepared pan. Sprinkle top with sanding sugar and remaining chocolate chips.

Whole Wheat Cinnamon Chocolate Chip Bread

Bake for 45 – 50 minutes or until a toothpick comes out clean. Allow to cool in pan for 15 minutes, remove from pan and cool completely on a wire rack.

Whole Wheat Cinnamon Chocolate Chip BreadSlice and enjoy!

Whole Wheat Cinnamon Chocolate Chip Bread
 
Print
Whole Wheat Cinnamon Chocolate Chip Bread is a whole grain treat that your kids will love, they won't even know that it's good for them.
Author: Bree Hester
Serves: 8 to 10 slices
Ingredients
  • 6 Tablespoons butter, room temperature
  • ⅔ cup sugar
  • 3 eggs
  • 1 teaspoon vanilla
  • 2 cups white whole wheat flour
  • 2 teaspoons cinnamon
  • ½ teaspoon baking soda
  • ½ teaspoon baking powder
  • ½ teaspoon salt
  • 1 cup buttermilk
  • ½ cup mini chocolate chips
  • whole sanding sugar (optional)
Instructions
  1. Preheat oven to 350°. Spray a 9x5 loaf pan with cooking spray.
  2. Cream together butter and sugar until light and fluffy. Add eggs and vanilla.
  3. In a medium bowl whisk together flour, cinnamon, baking soda, baking powder, and salt.
  4. Add ⅓ of the flour mixture and stir until combined.
  5. Add ½ of the buttermilk. Repeat with remaining ingredients. Add chocolate chips (save a few for the top) and mix until everything just comes together, being careful to not over-mix.
  6. Spread the batter evenly into the prepared pan. Sprinkle top with sanding sugar and remaining chocolate chips.
  7. Bake for 45 - 50 minutes or until a toothpick comes out clean. Allow to cool in pan for 15 minutes, remove from pan and cool completely on a wire rack.
Notes
Adapted from Love From the Oven. http://www.lovefromtheoven.com/2015/08/18/chocolate-chip-loaf/
3.4.3177


Healthy Shamrock Shake Recipe

Thursday, February 25, 2016

Healthy Shamrock Shake Recipe – Avoid the drive-though with this healthy copycat recipe! Make your favorite treat at home with only 160 calories!

Healthy Shamrock Shake Recipe: Avoid the drive-though with this healthy copycat recipe! Make your favorite treat at home with only 160 calories!

Raise your hand if a certain Shamrock Shake has you hitting the drive-though far too often lately! I’ve been there, but this year I’m skipping the fast food version and using this healthy copycat recipe instead.

Have you ever checked out the nutrition info on the McD version? I couldn’t believe it when I saw these numbers! One shake has 820 calories, 23g of fat, 135g of carbs, and 115g of sugar! Insane right?! More calories than you should eat in a meal and a full HALF CUP OF SUGAR in one serving!!

This healthy shamrock shake recipe has just 164 calories, 0g of fat, 35g of carbs, and 14g of sugar. Plus it has 3g of fiber and 7g of healthy protein! You’re favorite treat made healthy enough for breakfast!

Healthy Shamrock Shake Recipe: Avoid the drive-though with this healthy copycat recipe! Make your favorite treat at home with only 160 calories!

 You’ll notice in the recipe that I used spinach to add the green color to the shake. You can skip it and just use green food coloring, or add both spinach and food coloring. I promise you can’t taste the spinach, so don’t worry. 😉

Healthy Shamrock Shake Recipe
 
Print
Healthy Shamrock Shake Recipe: Avoid the drive-though with this healthy copycat recipe! Make your favorite treat at home with only 160 calories!
Serves: 2 servings
Ingredients
  • SHAKE:
  • 2 medium bananas, frozen
  • 1⅓ cup skim milk
  • ¼ teaspoon pure peppermint extract
  • ½ cup spinach
  • green food coloring (optional)
  • marchino cherry (optional)
  • PEPPERMINT WHIPPED CREAM (optional):
  • 1 cup heavy whipping cream
  • 1 tablespoon pure maple syrup
  • ⅛-1/4 teaspoon pure peppermint extract
Instructions
  1. Put all of the shake ingredients into a blender and blend until smooth. Add green food coloring to brighten the green color if you want. Taste and add peppermint extract if needed.
  2. For the optional peppermint whipped cream: Whip the heavy cream, maple syrup and peppermint extract with an electric mixer until fluffy. If you want the pretty topping look, put the whipped cream in a piping bag with a star piping tip.
3.4.3177

 I hope you love this fun healthy St. Patrick’s Day recipe! Here are a few more fun and healthy ideas!

17 Shamrockin’ St. Patrick’s Day Ideas

Clover Leaf Lei for St. Patrick’s Day

Tropical Spinach Smoothie

« Previous Page
Next Page »

Primary Sidebar

Rebecca Cooper — Founder, Simple as That Blog

Hello, I'm Rebecca. Welcome to my blog, Simple as That. Come along as we embrace simplicity in crafting, photography, travel, and family life. Read more about me.

Newsletter

Get the latest updates from Simple as That delivered to your inbox.

Join for Free

Beyond Snapshots: Mastering the Art of Mobile Photography

Connect

  • Bloglovin
  • Facebook
  • Instagram
  • Pinterest
  • Twitter

Follow On Pinterest

Visit Rebecca - Simple as That Blog's profile on Pinterest.

Categories

  • Crafts / DIY
  • Holidays
  • Motherhood
  • Organization
  • Photography
  • Printables
  • Recipes
  • Simple Living
  • Travel
  • Wellness

Our Privacy Policy

Follow on Instagram

Instagram has returned invalid data.

Printable 2023 Calendar

Our printable calendars and organizational pages have been essential in keeping our home and my life in order and I guarantee they will be a help to you too!

Click here to learn more

© Simple as That Blog, 2017 · Design by Brian Gardner

Simple as That Blog

Facebook / Instagram / Pinterest / Twitter / Contact